laptop as wifi hotspot windows 7 for android

Title: How to Create a WiFi Hotspot with Windows 7
Channel: 1stepatatime
How to Create a WiFi Hotspot with Windows 7 by 1stepatatime
Windows 7 Hotspot to Android: The Ultimate Guide (Secret Trick!)
Unlock Android Internet: Windows 7's Hidden Hotspot Powerhouse
Ever wished you could conjure internet on your Android phone from your trusty Windows 7 machine? Well, you're in luck! It's entirely possible, actually. Forget those frustrating times you’re tethered to a slow Wi-Fi spot. This guide unveils the secrets. We'll transform your Windows 7 PC into a potent Wi-Fi hotspot. Subsequently, your Android device will get online with ease.
The Windows 7 Wireless Magic: Setting the Stage
Firstly, let's admit it. Windows 7 is getting older, yes. However, it can still pull off some impressive tricks. Creating a Wi-Fi hotspot is definitely one of them. We'll utilize the built-in capabilities of the operating system. Consequently, you won’t need any fancy third-party software. Let's get started by configuring your network settings. You can do this easily.
Step 1: Prepare Your Network Adapter
Your journey begins with your network adapter. Head to the "Network and Sharing Center" on your Windows 7 desktop. You can access it through the Control Panel. Then, click on "Change adapter settings." Locate your active network connection, which is the source of your internet. This is usually an Ethernet connection or a Wi-Fi adapter.
Step 2: The Command Prompt Command
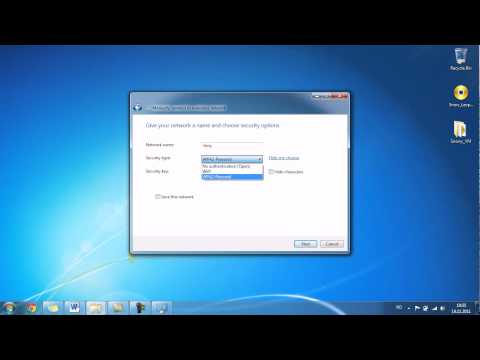
Next, open the Command Prompt. You can find it by searching in the Start menu. Run the Command Prompt as an administrator. Now, it’s time for some command-line wizardry. Type the following command and press "Enter": netsh wlan set hostednetwork mode=allow ssid="YourHotspotName" key="YourPassword"
Replace "YourHotspotName" with your desired hotspot name. Keep it simple, and memorable, right? Also, replace "YourPassword" with a strong password. Make it secure. Keep it private. This is how you connect to the internet.
Step 3: Activating the Hotspot
Now, you must activate the hotspot. Use the command below:
netsh wlan start hostednetwork
If you get a message that says "The hosted network started," you're doing great. If not, review the previous steps. Ensure you didn't make any typing mistakes. And if you have a network problem, you can always search online.
Step 4: Sharing the Internet Connection
The final step involves sharing your internet connection. Go back to the "Network and Sharing Center." Click "Change adapter settings" again. Find your internet connection (the one providing internet access). Right-click it and select "Properties." Navigate to the "Sharing" tab. Check the box that says, "Allow other network users to connect through this computer's internet connection." A dropdown menu will appear. Select your newly created Wi-Fi hotspot from the list. Click "OK". Now, you are almost there.
Android's Invitation To Join the Hotspot Party
Now, let's shift our focus to your Android device. Your Windows 7 hotspot is ready to roll. Let's get your Android connected.
Step 1: Wi-Fi Search
On your Android phone, go to "Settings." Then, tap "Wi-Fi." Your Android device should start scanning for available Wi-Fi networks.
Step 2: Select and Connect
You should see the hotspot name you created (e.g., "YourHotspotName"). Tap on it. Enter the password that you set in the Command Prompt. Once you've entered the password, your Android device will connect. You will be online.
The Secret Trick: Troubleshooting the Bumps
Sometimes, things don't go smoothly. So now comes the secret. What if your Android isn't connecting? Don't fret! Here's a troubleshooting tip:
- Restart Everything: Close and restart both your Windows 7 PC and your Android phone.
- Check Firewall: Ensure your Windows Firewall isn’t blocking the connection.
- Driver Woes: Update your network adapter drivers on the Windows 7 machine.
- Signal Strength: Place your Android device close to your Windows 7 PC. Good signal strength is very vital.
- Compatibility: You could also consider updating your Android operating system.
- Reset: Reset your network settings on your phone.
In addition, you might consider some third-party software. These programs can sometimes simplify the hotspot creation process. However, the built-in method is usually the most reliable.
Enjoy the Freedom: Your Android is Connected
Congratulations! You’ve mastered the art of creating a Windows 7 hotspot. As a result, your Android phone is now surfing the web. It is an enjoyable experience. Enjoy streaming videos, scrolling through social media, or checking emails. This is how people benefit from your expertise.
Beyond the Basics: Advanced Tips
Furthermore, let’s delve deeper into some advanced topics. You might want to tweak your hotspot settings for optimal performance.
- Bandwidth Management: You can manage bandwidth usage. This is particularly useful if you have limited data. You can limit the bandwidth allocated to your Android device.
- Security Updates: Regular updates will keep your system and connection secure. Check for Windows 7 security updates.
- MAC Filtering: Implement MAC address filtering. This adds an extra layer of security. This will also help you protect your network.
The End: Embrace Your Newfound Connectivity
You did it! Now you can turn on your Windows 7 hotspot at any time. Furthermore, any Android device can get connected. Enjoy your newfound ability. Now, you can harness the power of your Windows 7 machine. Enjoy the internet on your Android device. The secret is now yours to share.
Is Your Apple Laptop's Wi-Fi REALLY Working? (Secret Trick Inside!)Windows 7 Hotspot to Android: The Ultimate Guide (Secret Trick!)
Hey tech-savvy friends! Ever found yourself staring at your Android phone, its data plan dwindling like a snowman in July, while your trusty Windows 7 laptop sits by your side, a veritable internet faucet? We’ve all been there! Sharing your Windows 7 internet connection with your Android device can feel like unlocking a hidden treasure chest. But let's be honest, Windows 7, while a classic, isn't exactly the most intuitive when it comes to creating a hotspot. Fear not, because we’re diving headfirst into the world of Windows 7 hotspotting and Android connectivity, with a secret trick up our sleeve. It's like a digital handshake, connecting your devices effortlessly.
1. Why Bother with a Windows 7 Hotspot?
Before we get our hands dirty, let's touch base on the ‘why’. Why even bother setting up a hotspot on your Windows 7 machine? Think of it as having your own private Wi-Fi bubble. Here are a few compelling reasons:
- Data Saver: Conserve your precious mobile data. Binge-watching, streaming, and downloading – all without eating into your data plan!
- Emergency Backup: In case your home Wi-Fi takes a nap, your Windows 7 hotspot becomes your lifeline for staying connected.
- Cost Efficiency: Potentially saving money by avoiding overage charges from your mobile carrier.
- Shared Internet: Sharing your internet is a great way to connect nearby devices.
2. The Windows 7 Wireless Network Limitations - A Quick Reality Check
Let's get real for a moment. Windows 7, being older than some of your smartphones, doesn't natively have a built-in hotspot feature like its more modern successors (Windows 10 and 11). It’s like trying to teach an old dog new tricks. We will need to work our way around this, but don’t worry.
3. The Secret Weapon: Virtual Router Software (And Why It's Awesome)
This is where the secret trick comes in! We're going to use a free, lightweight, and incredibly effective software called Virtual Router Plus. Think of it as a translator, converting your Windows 7's wired or wireless network into a Wi-Fi signal your Android device can understand. It’s like having a hidden portal to the internet.
4. Downloading and Installing Virtual Router Plus: Easy Peasy
Head over to your favorite search engine (Google, Bing, whatever floats your boat!) and search for "Virtual Router Plus download." Find a reputable website (like the official source or a trusted download site), and download the software. The installation process is straightforward; follow the on-screen prompts, and you'll be set up in a jiffy. The software offers to make your Windows 7 PC a Hotspot, which can provide internet access to any device.
5. Configuring Virtual Router Plus: Your Gateway to Connectivity
Once installed, open Virtual Router Plus. You’ll be presented with a simple interface. Here’s what you need to do:
- Network Name (SSID): Create a name for your Wi-Fi network. This is what your Android device will see. Choose something memorable (or silly – it's your choice!).
- Password: Set a strong password to secure your hotspot. Think of this as the key to your internet castle, protecting your data from lurking strangers.
- Shared Connection: Select the internet connection you want to share (usually your wired or wireless network).
- Start Virtual Router: Click the "Start Virtual Router" button. Boom! Your hotspot is live!
6. Connecting Your Android Device to Your Windows 7 Hotspot: The Magic Touch
Now, grab your Android phone!
- Go to Settings: Open your Android's settings menu.
- Wi-Fi: Find and tap the "Wi-Fi" option.
- Select Your Network: You should see the network name you created in Virtual Router Plus. Tap on it.
- Enter the Password: Type in the password you set and tap "Connect."
If all goes well, you should see a "Connected" status, and your Android phone will have internet access courtesy of your Windows 7 machine!
7. Troubleshoot Like a Pro: When Things Go Wrong
Sometimes, even the best-laid plans go awry. Here are a few troubleshooting tips:
- Check Internet Connection: Make sure your Windows 7 PC itself has an active internet connection. Without internet, there's nothing to share.
- Firewall Woes: Your Windows firewall might be blocking the hotspot. Temporarily disable the firewall to see if that resolves the issue. (Remember to re-enable it afterward for security.)
- Restart and Refresh: Sometimes, a simple restart of both your Windows 7 PC and your Android device can work wonders.
- Driver Issues: Although rare, outdated or corrupted network drivers on your Windows 7 machine can cause problems. Update your network drivers through Device Manager.
8. Fine-Tuning Your Hotspot: Optimizing Performance
Let's get a little more technical. Here are some tips to enhance your hotspot's performance:
- Channel Selection: In Virtual Router Plus, you might be able to change the Wi-Fi channel. Experiment with different channels to find the one with the least interference.
- Proximity Matters: The closer your Android device is to your Windows 7 PC, the better the signal strength and speed.
- Limit Connected Devices: The more devices connected to your hotspot, the slower the internet speed will be for each device.
9. Security First: Keeping Your Hotspot Safe
Don't be that person with an open, unsecured Wi-Fi hotspot. Here's how to keep your data safe:
- Use a Strong Password: A strong password is your first line of defense. Choose a combination of uppercase and lowercase letters, numbers, and symbols.
- Change the Password Regularly: Consider changing your hotspot password periodically to enhance security.
- Monitor Connected Devices: Check Virtual Router Plus to see which devices are connected to your hotspot. If you see any unfamiliar devices, immediately change your password.
10. Bandwidth Considerations: Mind Your Data Usage
Remember, you're sharing your internet connection. Be mindful of your data usage, especially if you have a limited data plan.
- Monitor Data Consumption: Keep track of your data usage on both your Windows 7 PC and your Android device.
- Limit Streaming: Streaming videos or downloading large files can quickly eat up your data. Try to limit these activities.
- Consider Data-Saving Features: Many Android apps have data-saving features that can help reduce data consumption.
11. The Alternatives: Exploring Other Software Options
While Virtual Router Plus is our go-to, here are a few other software options you can explore:
- Connectify Hotspot: A popular choice with a user-friendly interface.
- mHotspot: Another free option with similar functionality.
12. Windows 7 vs. Android: Optimizing the Experience
To get the best experience possible, make sure your Android device is up to date. Ensure you’re using the most recent version of Virtual Router Plus.
13. Beyond Basic Hotspotting: Advanced Tips and Tricks
Are you ready to level up your game?
- MAC Address Filtering: Some software allows you to limit which devices can connect by their MAC addresses.
- Bandwidth Limiting: You might be able to limit the bandwidth allocated to connected devices using certain software.
14. What About Windows 7 Updates?
Keep your Windows 7 up to date; this is always recommended for security and stability. However, updates shouldn't interfere with your hotspot functionality.
15. The Enduring Legacy of Windows 7 and Android Connectivity
Windows 7, while old, continues to serve, and the ability to connect it to your Android device via a hotspot is like a digital handshake. It’s a testament to technology’s adaptability.
Conclusion: Your Windows 7 to Android Hotspot Journey – Made Easy!
So, there you have it! We've demystified the process of creating a hotspot on your Windows 7 computer and connecting it to your Android device, using the secret weapon of Virtual Router Plus. We’ve covered why you might want to do this, the troubleshooting steps to take, the software, and even the security precautions you should take. Remember to keep the password safe, and enjoy the newfound freedom of sharing your internet. Go forth and conquer; you're now a Windows 7 hotspotting pro!
FAQs: Your Burning Questions Answered!
1. Is Virtual Router Plus safe to use?
Yes, Virtual Router Plus is generally safe to use. However, always download it from a reputable source and scan the downloaded file with your antivirus software.
2. Can I use the Windows 7 hotspot trick with other operating systems?
The principles are similar for Windows 8, 10, and 11, but those operating systems have built-in hotspot functionality, so you won't need the extra software.
3. What if my Android device isn't connecting?
Double-check your network name, password, and internet
Laptop WiFi Vanished? Find Your Network NOW!Cara Download & Install Driver WIFI & ETHERNET Manual untuk Windows 781011

By inprez id Cara Download & Install Driver WIFI & ETHERNET Manual untuk Windows 781011 by inprez id
How To Enable WiFi Internet Connection In Windows 7

By MDTechVideos International How To Enable WiFi Internet Connection In Windows 7 by MDTechVideos International
how to create a wifi hotspot on windows 7 Professional
By iTon how to create a wifi hotspot on windows 7 Professional by iTon

Title: You Are Not Connected to Any Network Fix WiFi
Channel: asal ngelik
You Are Not Connected to Any Network Fix WiFi by asal ngelik
Wifi Not Found
Here's your article:
The Art and Science of Crafting a Superior Homemade Sourdough Starter
Embarking on the journey of sourdough bread baking is, at its heart, a profound connection to the past. It's a dance with time, a conversation with wild yeasts and beneficial bacteria, and ultimately, a testament to the simplicity and complexity of nature. To truly elevate your sourdough experience, mastering the creation of a robust and vibrant starter is paramount. Forget the notion of a one-size-fits-all approach; this is a process demanding patience, observation, and a deep understanding of the living entity you are cultivating. This in-depth guide will equip you with the knowledge needed to not just create a starter, but to cultivate a powerhouse of fermentation, yielding loaves that are nothing short of extraordinary.
Understanding the Microcosm: What Makes a Great Sourdough Starter
A thriving sourdough starter is not merely a mixture of flour and water; it’s a dynamic ecosystem, a living community of wild yeasts and lactic acid bacteria (LAB). These microorganisms, naturally present in flour and the surrounding environment, work synergistically to leaven the dough, develop flavor, and improve the bread's texture. The ideal starter boasts a balanced population of these crucial players. Yeasts are responsible for producing carbon dioxide, which gives the dough its rise. LAB, on the other hand, provides the characteristic sour flavor profile, acting as a natural preservative and contributing to the bread's complex aroma. A well-balanced starter results in a bread that not only rises beautifully but also develops a sophisticated flavor profile, ranging from mild tang to pleasantly assertive sourness. This is where the magic lies: a harmonious blend of time, temperature, and the subtle interplay of these microscopic architects.
The Ritual of the Initial Mix: Setting the Stage
The genesis of your sourdough starter requires a methodical approach. Begin with equal weights of unbleached, all-purpose flour and filtered, non-chlorinated water. The flour is your yeast and bacteria's food, while the water provides the medium in which they will thrive. Avoid tap water, as chlorine can impede the microorganisms' growth. A glass jar, such as a mason jar, is ideal, allowing you to observe the activity within. Combine the flour and water in the jar, stirring vigorously to eliminate any lumps. This initial mixture, often referred to as the “first feeding,” is the foundation. Cover the jar loosely with a lid or a piece of breathable material like cheesecloth secured with a rubber band. This allows air to circulate, introducing wild yeasts and bacteria into your mixture.
The Daily Dance: Feeding and Observation
The first week is a period of close observation and daily feeding. The speed at which the starter develops depends on the ambient temperature; warmer environments generally accelerate the process. In the initial days, you might observe little to no activity. This is perfectly normal. As the yeast and bacteria begin to colonize, you may see small bubbles forming on the surface and within the mixture. These bubbles are a sign that the yeast is actively producing carbon dioxide, the essential gas that will lift your bread. Every 24 hours, discard a portion of the starter (usually half) to prevent it from becoming overly acidic or overflowing. Then, add equal weights of flour and water to the remaining culture, stirring well. This routine, the feeding, is the heart of the process. This act allows the starter to thrive by providing fresh nutrients.
Decoding the Signs: Interpreting the Starter’s Signals
The starter will provide signals to show the right time to change the process . The peak of activity is a critical indicator of the starter’s readiness. Observe the starter's behavior after feeding. Note the rise and fall. A mature starter will double in size, or even triple, within a few hours after feeding. This rise is due to the production of carbon dioxide by the yeast and is a clear sign of its vitality. The aroma is the second sensory cue to monitor. Initially, the starter may have a slightly sweet smell. As it matures, it will develop a tangy, slightly sour aroma. Avoid any concerning signs that will bring your starter to failure.
Adapting to Temperature: Influencing the Tempo of Fermentation
Temperature is a pivotal factor influencing the fermentation process. Warmer temperatures, typically around 70-75°F (21-24°C), accelerate the fermentation, leading to faster bubble development and a quicker rise. Colder temperatures, conversely, slow down the activity. During colder months or in cooler environments, you might need to extend the feeding intervals, or place the starter in a warmer spot, such as near a radiator or in a proofing box, to maintain optimal activity. Conversely, in warmer climates, feeding more frequently or refrigerating the starter between feedings might be necessary to maintain the proper balance. This fine-tuning showcases the dynamic relationship between the baker and the starter.
The Transition to Baking: Preparing Your Starter for Success
Once the starter consistently doubles in size within 4-8 hours after feeding, it is ready for baking. The starter should also have a pleasant, tangy aroma and display a network of bubbles throughout. The key is to test if your starter is up to par. To confirm its readiness, perform a "float test." Take a small spoonful of the starter and drop it into a bowl of water. If it floats, it's ready to use. If it sinks, it needs a few more feedings.
Maintaining the Legacy: Ongoing Care and Refinement
Maintaining a healthy sourdough starter requires consistent care. After you've used a portion of your starter for baking, you must replenish it. Feed the remaining starter with equal parts of flour and water, and allow it to ferment as usual. If you are baking frequently, you can keep your starter at room temperature and feed it daily. If you bake less often, store it in the refrigerator. When refrigerated, the starter requires a feeding once a week. Before baking, take the starter out of the refrigerator and feed it once or twice at room temperature to activate it.
Troubleshooting Common Challenges: Addressing Potential Issues
Even with careful attention, problems can arise. A starter that smells like nail polish remover indicates that the yeast population is out of balance. Increase the frequency of feedings and add additional flour and water to restore balance. If mold appears, discard the entire starter and start anew. A flat starter might be a sign that the yeast is dormant. Try feeding it more frequently and ensure that the flour and water ratios are correct. The issue could also be the flour. Make sure to use high-quality, unbleached flour.
Flour Power: The Impact of Flour Choices
The type of flour you use in your starter significantly impacts its flavor and behavior. Unbleached all-purpose flour works well for beginners, as it typically contains a good balance of nutrients for yeast and bacteria. Experimenting with different flours, such as whole wheat or rye, can add complexity and unique flavors to your starter and your bread. Whole wheat flour, rich in bran, tends to promote a faster rise due to its higher nutrient content. Rye flour offers a distinct earthy flavor and contributes to a slightly stickier starter. However, changes to the flour type may require adjusting feeding schedules and hydration levels.
Hydration and Consistency: Finding the Sweet Spot
The consistency of your starter, also known as the hydration level, also influences its performance. Hydration is the ratio of water to flour by weight. A 100% hydration starter, common for beginners, has equal parts flour and water. A higher hydration starter, such as 125%, may offer a more open crumb in your bread, but it requires more experience to handle. The ideal hydration level depends on your baking preferences and the type of bread you wish to make.
The Science of Sourdough: A Deeper Dive
The fermentation occurring in a sourdough starter is a complex biochemical process. The wild yeasts consume sugars, producing carbon dioxide and alcohol. The LAB consume the starches in the flour, producing lactic acid and acetic acid, which generate sourness and act as natural preservatives. These acids also contribute to the gluten development, adding structure and flavor to the bread. The interplay of these microorganisms, influenced by hydration, temperature, and flour type, is what makes each starter unique and allows for a vast array of bread profiles.
Beyond the Basics: Advanced Techniques and Experimentation
Once you've mastered the basics, explore advanced techniques. Consider using a levain, a small portion of the starter used specifically to leaven the dough. This can provide better control over the fermentation. Try using different flours, experimenting with varying ratios of whole wheat, rye, and bread flour. Explore methods of controlling the acidity with techniques like cold or warm proofing. Embrace online communities, books, and resources to get inspired and learn more. The world of sourdough is vast, and the journey of exploration is just as rewarding as the final product.
The Rewards of Patience: The Ultimate Sourdough Experience
The creation of a sourdough starter is more than just a process; it is a testament to the power of natural processes and the rewards of patience. From the simple act of mixing flour and water to the exquisite aroma of a freshly baked loaf, the experience is deeply satisfying. By following these guidelines, you can embark on your sourdough journey and craft a starter that becomes a source of pride, a foundation for exceptional bread, and a connection to a culinary tradition that spans centuries.. The joy of creating something from essentially nothing is unparalleled. The taste of a crusty, tangy sourdough loaf, made with your very own starter, is the ultimate reward.
