hp laptop wifi wire black broken
Title: How to remove and reattach WiFi antenna cables
Channel: James Has Answers
How to remove and reattach WiFi antenna cables by James Has Answers
HP Laptop WiFi Nightmare: Black Wire SNAPPED! (Easy Fix Inside!)
HP Laptop WiFi Woes: That Dreaded Black Wire – and How to Conquer It!
Picture this: You’re in the zone, fingers flying across the keyboard. Suddenly, your WiFi vanishes. The dreaded spinning wheel of death appears, taunting your productivity. Then, you realize your HP laptop is stubbornly refusing to connect. It's a digital desert, isn't it? You're stranded without internet.
Recognizing the Culprit: WiFi Failure on Your HP
First off, don't panic. Although frustrating, this is a common issue. Many HP laptop owners face similar WiFi connection problems. You might see a tiny "X" over your WiFi icon. Alternatively, the laptop may simply show "No connections available." Occasionally, the WiFi adapter itself might be malfunctioning. It’s often something fixable, thankfully.
Unveiling the Usual Suspect: The Black Wire's Tragic Tale
Now, let’s get to the heart of the matter. Often, the culprit is a simple internal issue. Specifically, the black WiFi antenna wire. Inside your HP laptop, this wire connects to the WiFi card. Over time, it can become loose. In the worst-case scenarios, it can even snap. The results? Your WiFi signal is gone. The internet connection disappears.
Tools of the Trade: Gathering Your Arsenal
Before you begin the repair, you'll need some key tools. You'll need a small Phillips head screwdriver. Moreover, a plastic spudger is highly recommended. It's a safe tool for prying things open. Additionally, a pair of needle-nose pliers could be helpful. Depending on the damage, you might consider electrical tape. Finally, a well-lit workspace is crucial.
Disassembly Demystified: Unveiling the Inner Workings
So, are you ready to start fixing the HP laptop? Begin by powering down your laptop completely. Unplug the power cord. Next, carefully flip the laptop over. Locate the screws on the bottom panel. Remove these screws. They are securing the bottom panel.
Gaining Access: Opening the Bottom Panel
Now, gently lift the bottom panel. Use the plastic spudger to help pry it open. Be careful not to force anything. Once you're inside, you'll see the various components. You'll likely find your WiFi card located near one edge. It's usually a small circuit board.
Locating the WiFi Card and Antennas
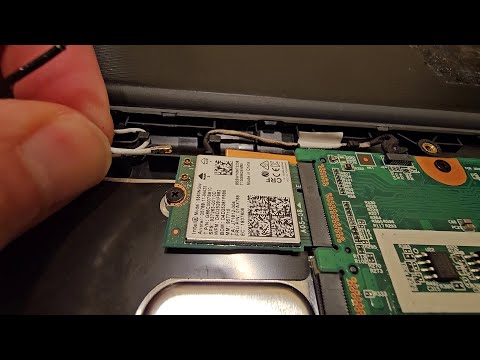
The WiFi card will have a couple of wires connected. These will be the antenna wires. They usually connect via small connectors. These connectors may have been damaged. The black wire is often the one that disconnects first. Now, you can see the problem.
The Black Wire's Reconnection: Simple Fixes
So, you've found the black wire. If it's simply loose, gently reconnect it. Push the connector firmly onto the WiFi card. Ensure it clicks securely into place. If the wire has snapped, and you are skilled, you can attempt a repair. Otherwise, consider a professional. First, examine the wire closely.
The Art of the Reconnection
If the black wire has come off, try to gently push it back on. Make sure it clicks into place. It is a small connector. Be very careful not to force it. If it won't stay, it may be damaged. You might need a replacement part. The old part can easily be sourced.
Reassembly: Putting It All Back Together
Once you've reconnected the wire, it’s time for reassembly. Carefully replace the bottom panel. Make sure everything is aligned properly. Then, replace the screws. Tighten them gently so that it is secure. Avoid over-tightening which can damage the panel.
Testing the Results: The Moment of Truth
Now, power on your HP laptop. Check your WiFi connection. The moment of truth has arrived. If the repair was successful, your WiFi should now be working. You should see a strong signal again. The internet should be readily accessible.
Troubleshooting Further: When the Fix Doesn't Work
If your WiFi is still not working, don't give up. There could be other issues. The WiFi card itself could be faulty. Download necessary drivers. Also, ensure the antenna wires are correctly connected. The problem could be software-related.
The Importance of Patience: A Calm Approach
Remember, patience is key. Work slowly and methodically. Review online videos if you feel unsure. Consider getting professional help if you're not comfortable. Don't let it overwhelm you.
Preventative Measures: Protecting Your WiFi Connection
To prevent future issues, handle your laptop with care. Avoid dropping it. Avoid extreme temperatures. You should also regularly update your drivers. Ensure your WiFi card stays functional.
Final Thoughts: Triumph Over Connectivity Challenges
So, there you have it! You've hopefully conquered your HP laptop's WiFi problem. The frustration of internet outages is now a thing of the past. Enjoy your repaired laptop. The internet is now back in your grasp. You’re back online! Good luck!
Lenovo WiFi Card Replacement: SHOCKINGLY Easy DIY Fix!HP Laptop WiFi Nightmare: Black Wire SNAPPED! (Easy Fix Inside!)
Hey everyone! Ever been there? Your HP laptop, humming along, seemingly ready to conquer the digital world, suddenly… crumbles. No Wi-Fi. Nada. Zilch. You check the connection, the router, maybe even perform a little (okay, a lot) of frustrated voodoo. But still, your HP laptop stubbornly refuses to connect. You’re staring at the dreaded "No Internet Access" message, and it's enough to make you want to scream (we've ALL been there!). Then, the realization hits: could it be that infamous black wire? That tiny, seemingly insignificant wire that powers your Wi-Fi antenna?
The Dreaded Black Wire: A Tale of Snapped Strands and Stress
Let's be real, the black wire in your HP laptop (and many other brands) is a bit of a digital Achilles' heel. It's fragile, easily dislodged during upgrades, and often the culprit behind those infuriating Wi-Fi dropouts. Think of it as the tiny heart of your internet connection, and when it's broken, your digital life flatlines. It's like trying to drive a car without a spark plug – utterly useless. We've all felt this frustration. Maybe you were upgrading your RAM, or perhaps you accidentally bumped the laptop during a cleaning frenzy. Whatever the cause, seeing that snapped black wire sends a chill down your spine.
Diagnosis: Confirming the Black Wire Breakdown
So, how do you know it's the black wire? First things first, don't panic! Breathe. Let's troubleshoot.
- The Obvious Signals: Is your Wi-Fi icon showing the "no connection" symbol? Can’t find any available networks? This is usually your first clue.
- The Hardware Check: This is where things get a little more hands-on. You'll need to open up your laptop. Now, I know, this sounds intimidating. But trust me, it's usually easier than you think! (Just remember to be careful and unplug your laptop before doing anything! Safety first!)
- Locate the Wi-Fi Card: Usually a small card, often covered by a metal shield, near the bottom of your laptop, specifically near the hinges.
- Visual Inspection: Carefully remove the shield if there is one. Look for that telltale black wire (sometimes it could be grey, but it'll be thin and connected to the Wi-Fi card). Inspect the connection points. Are they loose? Disconnected? Snapped? This is where you'll find your answer.
If you spot a broken black wire, congrats (in a weird, commiserating sort of way)! You've found the problem. But don't worry; you're not alone, and more importantly, there's a fix.
Tools of the Trade: What You’ll Need to Tackle the Fix
Before we dive into the actual repair, let's gather our tools. Prepare yourselves for a quick trip to the hardware store or a little online shopping. This is a relatively inexpensive fix, thank goodness.
- A Small Phillips Head Screwdriver: This is your primary weapon for opening your laptop. Make sure it's the right size; you don't want to strip those tiny screws.
- A Spudger or Plastic Pry Tool (Highly Recommended): These handy tools help you gently pry open your laptop without scratching or damaging the case. (You can often use a guitar pick in a pinch!)
- New Wi-Fi Antenna Wires (Optional, but Recommended): If the wire is snapped clean, you can try the splice approach. But, if the break is close to the connector, purchasing a replacement Wi-Fi antenna wire is the smarter move. They’re readily available online.
- Soldering Iron and Solder (If splicing): If you’re feeling ambitious (and possess the skills), you can solder the wire back together. But honestly, for most of us, this is the trickiest part.
- Electrical Tape (or Better Yet, Heat Shrink Tubing): For insulation, if you're splicing the wire.
- A Steady Hand and Patience: This isn’t rocket science, but it does require some precision. Take your time, and don't rush.
Step-by-Step: The Easy Fix (Even If You’re Not Tech-Savvy!)
Alright, let's get this Wi-Fi nightmare sorted. Here's a step-by-step guide to fixing that broken black wire. We're going to keep it simple, focusing on the methods most of us can handle.
- Power Down and Disconnect: Unplug your HP laptop. Remove the battery (if possible). Safety first, always!
- Open Her Up: Gently remove the screws from the bottom panel of your laptop. Use the spudger or pry tool to carefully separate the panel from the base. Be gentle; force is rarely the answer.
- Locate the Wi-Fi Card (Again): Refer to the instructions above.
- Identify the Broken Wire: Double-check the black wire is, indeed, snapped.
- Option 1: Replacing Entire Cable (Recommended):
- Unplug the old wire: Carefully detach the broken wire from the Wi-Fi card. Note the connection points for the new wire.
- Plug in the replacement: Then, plug in your new Wi-Fi antenna wire. Ensure it clicks securely in place.
- Secure the Wire: Some Wi-Fi cards have small clips or adhesive to keep the wire from moving. Make sure the wire is routed correctly, so it doesn't get pinched when you reassemble the laptop.
- Option 2: Splicing the Wire (If You’re Confident):
- Strip the wire: Carefully strip a small amount of insulation from both ends of the broken wire. Less is more, you don't want to snip too much.
- Solder the wire: Carefully solder the stripped ends together. Make sure the connection is secure and clean.
- Insulate the connection: Apply electrical tape or heat shrink tubing over the soldered area to insulate the wire.
- Reassemble: Carefully replace the Wi-Fi card shield (if there was one) and reassemble your laptop. Screw the bottom panel back on.
- Test and Celebrate: Plug in your laptop and power it on. Check your Wi-Fi connection. If all goes well, you should be back online! Cue the happy dance!
Avoiding Future Snaps: Tips to Prevent a Repeat Performance
Once you’ve got your Wi-Fi working again, you'll want to prevent this from happening again. Here are a few preventative measures:
- Handle with Care: When opening and closing your laptop, especially around the hinges, be mindful of the wires.
- Proper Storage: When transporting your laptop, avoid excessive bending or twisting, which could stress the wires.
- Regular Cleaning: As you clean your laptop, be extra cautious around the Wi-Fi card area.
- Consider an external antenna: If you often find yourself in areas with weak Wi-Fi, consider an inexpensive external Wi-Fi antenna. This can enhance the signal and reduce the strain on the internal antenna wire.
Troubleshooting Tips: When Things Get Tricky
Sometimes, a quick fix doesn't quite cut it. Here are some troubleshooting tips if your Wi-Fi still isn’t working after the repair:
- Double-Check the Connections: Is the wire securely connected to the Wi-Fi card and the antenna?
- Driver Issues: Sometimes, driver issues can cause Wi-Fi problems. Try updating your Wi-Fi drivers. Right-click on the Wi-Fi adapter in Device Manager and select "Update driver."
- Hardware Failure: If everything seems connected correctly, the Wi-Fi card itself might have sustained damage. Consider replacing the Wi-Fi card.
Don’t Give Up! You’ve Got This!
Fixing a snapped black wire might seem daunting, but trust me, it’s a conquerable challenge for most of us. Think of it as a learning experience, a chance to become a little more tech-savvy! And, best of all, it saves you money!
Wrapping Up: Back to the Digital Freedom!
So, there you have it! We've navigated the treacherous waters of the snapped black wire, armed with knowledge and a little bit of elbow grease. Hopefully, your HP laptop is now happily connected to the internet, ready to stream, browse, and conquer the digital world. Remember, it's okay to ask for help if you need it. There are tons of online resources and videos available, or (if you're really stuck) you can always take your laptop to a professional. But, with a little patience and the right approach, chances are you've fixed it yourself! Now go forth and enjoy the freedom of Wi-Fi!
FAQs: Your Burning Questions Answered
1. What if I break a different wire?
- If a non-Wi-Fi antenna wire is broken such as a screen wire, you should replace it. The process is very similar. However, you should be extra careful.
**2. Is it okay to use electrical tape
Laptop WiFi Hotspot: Why You're Offline & The SHOCKING Fix!Replace the Wireless Antenna Cables HP Pavilion Gaming Notebook HP Support

By HP Support Replace the Wireless Antenna Cables HP Pavilion Gaming Notebook HP Support by HP Support
How to repair WiFi antenna connector

By CRM How to repair WiFi antenna connector by CRM
Laptop wifi antenna repair Perth

By cirrus Link Repair Laptop wifi antenna repair Perth by cirrus Link Repair

Title: HP Laptop Ethernet Connected No Internet PROBLEM Solvedmacnitesh2023shortsethernet
Channel: Mac Nitesh
HP Laptop Ethernet Connected No Internet PROBLEM Solvedmacnitesh2023shortsethernet by Mac Nitesh
Wifi On Laptop
HP Laptop WiFi Woes: Mend the Black Wire, Reclaim Your Connection!
The digital world hinges on seamless connectivity. A flickering Wi-Fi signal on your HP laptop can bring your workflow, entertainment, and communication to a screeching halt. But before you resign yourself to expensive repairs or a new device, consider a surprisingly common culprit: a severed black wire within your laptop's internal Wi-Fi antenna system. This seemingly minor issue can manifest as intermittent connection, drastically reduced speeds, or complete inability to access the internet, leaving you facing the dreaded "no internet access" message. Fortunately, the fix is often within your grasp, requiring only a few readily available tools and a bit of careful attention. We'll guide you through the process of diagnosing and repairing a broken black wire, empowering you to restore your Wi-Fi functionality and reclaim your online experience.
Understanding the Culprit: The Black Wire's Crucial Role
Within your HP laptop, nestled beneath the display bezel, or within the chassis itself, resides the Wi-Fi antenna assembly. This assembly houses a series of wires, often color-coded, that transmit and receive radio signals, enabling your laptop to communicate with your router and the vast expanse of the internet. The black wire, specifically, frequently serves as one of the primary antenna connections, or in some models, it's a ground wire. When this vital link is severed or damaged, the antenna's capabilities are severely compromised. The resulting impact ranges from weak signal strength to complete Wi-Fi failure. This breakdown may be due to any number of factors, from general wear and tear to forceful opening and closing of the laptop screen over prolonged uses.
Identifying the Problem: Wi-Fi Symptoms and Verification
The symptoms of a broken black wire can be subtle at first but will progressively worsen over time. You might initially experience fluctuating Wi-Fi speeds, sporadic disconnects, or difficulty connecting to specific networks. As the damage worsens, these issues will intensify. Eventually, your laptop may struggle to detect any Wi-Fi networks or report persistent connection errors. Some telltale signs include:
- Weak or Intermittent Signal: The Wi-Fi icon in your system tray displays a low signal strength, frequently fluctuating or disappearing altogether.
- Slow Connection Speeds: Even when connected, your download and upload speeds are significantly slower than expected – often an indicator of a compromised antenna.
- Frequent Disconnections: Your laptop repeatedly disconnects from the Wi-Fi network, requiring repeated reconnection attempts.
- Unable to Detect Networks: Your laptop doesn't display any available Wi-Fi networks, even when you are sure networks are within range.
- "No Internet Access" Error: Despite being connected to the Wi-Fi, your laptop reports "No Internet Access," indicating a failure to communicate with the internet.
To confirm the black wire as the source of your Wi-Fi troubles, you can perform some basic troubleshooting steps:
- Restart Your Laptop and Router: This simple step often resolves minor connectivity issues, and it eliminates the possibility of a software or router-related problem.
- Test on Different Networks: Attempt to connect to other Wi-Fi networks. If you can connect to other networks without issue, the problem likely resides within your laptop.
- Run Network Diagnostics: Windows and other operating systems offer built-in network diagnostic tools. These tools can identify common problems, but they may not always pinpoint a physical wire issue.
- Observe the Wi-Fi Antenna: In cases where the laptop physically has a visible antenna, observe the wire.
If these steps point towards a persistent Wi-Fi issue, and you suspect a hardware problem, it's time to investigate the internal components of your HP laptop.
Gathering Your Tools: Preparation is Key
Before you embark on the repair, gather the necessary tools and materials. Success hinges on having the right supplies at your fingertips. You'll need:
- Small Phillips Head Screwdriver Set: A precise screwdriver set, including small Phillips head and Torx bits, will be essential. Many HP laptops use tiny screws, so a dedicated set is highly recommended.
- Plastic Pry Tools: These tools are designed to gently separate plastic components without causing damage. A guitar pick will also work if necessary.
- Anti-Static Wrist Strap: Protect your laptop's sensitive internal components from electrostatic discharge.
- Magnifying Glass (Optional): This will help to examine small components and connections, aiding your ability to complete the task effectively.
- Soldering Iron and Solder (Optional): If the black wire is completely severed, you will likely need a soldering iron. If you're not comfortable with soldering, consider seeking professional assistance.
- Replacement Wire (Optional): If the wire is severely damaged, consider acquiring a replacement.
- Electrical Tape or Heat Shrink Tubing (Optional): For safely securing the repaired wire.
The Disassembly Process: Exposing the Wi-Fi Antenna
The precise disassembly steps will vary slightly depending on your HP laptop model. However, the general process remains the same.
- Power Down and Disconnect: Shut down your laptop completely and disconnect the power adapter.
- Remove the Battery: Locate the battery compartment and remove the battery.
- Remove the Back Cover: Locate and unscrew all the screws that secure the back cover of your laptop. There may be screws hidden under rubber feet or stickers. Use your plastic pry tool to carefully separate the cover from the chassis.
- Locate the Wi-Fi Card: Identify the Wi-Fi card. It will be a small circuit board with two or three small wires connected to it.
- Disconnect the Wi-Fi Wires: Gently disconnect the wires from the Wi-Fi card. Avoid pulling on the wires themselves; instead, carefully detach them from their connectors on the card.
- Remove the Wi-Fi Card: Unscrew the screws that hold the Wi-Fi card in place and remove the card.
- Access the Antenna: Often, the antenna wires run along the inside of the laptop lid. You will need to remove the screen bezel to access the antenna wires completely. This will usually involve removing screws and carefully prying the bezel away from the screen.
Examining the Black Wire: Pinpointing the Break
Once you have access to the Wi-Fi antenna and the black wire, carefully inspect the entire length for any signs of damage.
- Locate the Problem: The break may be near the connection point to the Wi-Fi card, the antenna itself, or along the wire's route.
- Assess the Damage: Determine the severity of the damage. Is the wire simply frayed, partially cut or completely severed?
- Prepare for Repair: If the wire is frayed or partially cut, you may be able to carefully strip away the insulation and reconnect the wires. If the wire is severed, soldering will likely be required.
Making the Repair: Soldering or Reconnecting
The repair method depends on the damage.
Method 1: Reconnecting a Frayed or Partially Cut Wire
- Carefully Strip the Insulation: Use a wire stripper or a small knife to carefully remove a small amount of insulation from both ends of the wire.
- Twist the Wires Together: Twist the exposed copper wires together, ensuring a secure connection.
- Secure the Connection: Apply electrical tape or heat shrink tubing to insulate and secure the connection.
Method 2: Soldering a Severed Wire
- Prepare the Wires: Strip the insulation from both ends of the severed wire.
- Tin the Wires: Apply a small amount of solder to the exposed copper wires on both ends. This will help the solder flow and create a stronger connection.
- Solder the Wires Together: Carefully align the two ends of the wires and use your soldering iron to melt the solder, joining the wires.
- Insulate the Connection: Apply electrical tape or shrink tubing to insulate and secure the soldered connection.
Important Safety Note: When soldering, use proper ventilation, and avoid touching the hot soldering iron.
Reassembly and Testing: Reconnecting and Verifying
- Reassemble the Antenna: Carefully position the antenna wires and components back into their original positions.
- Reinstall the Wi-Fi Card: Reinstall the Wi-Fi card and reconnect the antenna wires. Ensure the wires are firmly connected to the card.
- Reattach the Bezel and Body: Carefully reattach the bezel, ensuring all clips and screws are correctly positioned. Replace the other components, using the screws that you previously removed.
- Reconnect the Battery: Insert the battery and close up the laptop completely.
- Power On and Test: Turn on your laptop. Check the Wi-Fi icon in your system tray to see if the signal has returned. Connect to your Wi-Fi network and test the connection. If it is up, the repair has been a success, and your laptop is ready to explore the internet once again.
Troubleshooting and Further Assistance
If your Wi-Fi still isn't working, double-check all connections and ensure that all screws and components are in their correct positions. Here are some troubleshooting steps:
- Check the Wi-Fi Card: Ensure the Wi-Fi card is properly seated and connected. It might have been damaged during the disassembly.
- **Test the Antenna
