homemade laptop wifi amplifier
Title: can you use aluminum foil as a wifi antenna in your PC shorts
Channel: mryeester
can you use aluminum foil as a wifi antenna in your PC shorts by mryeester
Homemade WiFi Amplifier: SHOCKINGLY Easy DIY Boost!
Blast Your WiFi Signal: A Surprisingly Simple Home Hack!
Ever felt your WiFi signal just… vanish? Suddenly, your streaming stutters. Your video calls freeze. The internet acts as if it's actively avoiding you. Frustration mounts, right? Well, prepare to be amazed. I'm about to reveal a secret. It's a ridiculously easy DIY project that could solve your weak WiFi woes. Trust me, this is a game-changer!
The Secret Weapon: Pocket Change & a Little Ingenuity
Forget expensive gadgets. Forget tech jargon that makes your head spin. We're keeping it simple. You won't believe what we'll use to amplify your signal. Seriously, you probably already have most of the materials sitting around your house. What's the key ingredient? A simple can. That's right!
Think about how satellite dishes work. They focus and direct signals. We're using a similar principle. We're creating a reflector. This will concentrate your router's signal. Naturally, this boosts its reach.
Gathering Your Supplies: Simplicity at Its Finest
Get ready. The supply list is short:
- An empty metal can (soda or beer works perfectly). Make sure it's clean.
- A craft knife or scissors (be very, very careful!).
- Your WiFi router.
- Tape or glue.
Before you start, safety first! Handle the craft knife with extreme caution. Always cut away from yourself. Now we're prepared.
The Construction: A Step-by-Step Revelation
First, thoroughly clean your can. Afterwards, let it dry completely. Next, you'll need to cut the can. Carefully make a lengthwise slit. This will be the opening for your router's antenna.
Carefully cut a hole in the bottom of the can. Make sure the antenna fits through this opening. The can is essentially our reflector. As a result, it will boost your WiFi signal.
Now, center the router antenna. Insert it into the can’s opening. Make sure the antenna is securely positioned. Use tape or glue to hold it steady. Following this, position the can behind your router's antenna. This setup acts as a signal amplifier.
Troubleshooting: Fine-Tuning Your WiFi Fortress
Don't panic if results aren't immediate. First, experiment with the can's position. Sometimes, small adjustments make a huge difference. Conversely, consider your environment. Walls and obstacles can hinder the signal.
Also, try different can sizes. A slightly larger can might improve performance. If you're still struggling, check your router's settings. Update it. You could also reboot it. To be sure, ensure your router's firmware is up-to-date.
The Aftermath: Witnessing the WiFi Renaissance
Prepare to be amazed! The results can be noticeable. You might see a significant improvement in your signal strength. Downloads might speed up. Furthermore, streaming should be smoother. Finally you'll say goodbye to dead zones!
This DIY project is incredibly rewarding. You get to unleash your inner tech whiz. Furthermore, you'll enjoy faster, more reliable internet. It's a win-win.
Why This Works: Decoding the WiFi Magic
The antenna on your router radiates a signal in all directions. However, a can acts like a parabolic reflector. It collects the dispersed signal. Afterwards, it focuses it into a narrower beam. Therefore, instead of spreading everywhere, it concentrates it. Your signal then travels further.
The can’s shape matters. Curved surfaces focus the signal. As a result, the signal gets amplified. This simple principle explains the effectiveness of our DIY amplifier.
Beyond the Can: Exploring Further Enhancements
Ready to take it to the next level? You can experiment. Try different can shapes and sizes. Experiment with the materials inside the can. Furthermore, you can even build a more complex reflector using aluminum foil.
Furthermore, consider your router's location. Position it strategically. Place it in an elevated, central spot. Doing so will optimize signal distribution. Also, remove any obstacles. Those might be blocking the signal.
Final Thoughts: Unleash Your WiFi Power!
You've now learned a remarkably simple hack. It will boost your WiFi signal. No complex technology is needed. No costly upgrades are required. The only ingredients are everyday items.
This project is a testament to DIY ingenuity. It’s something many people can do. It offers a practical solution. Remember, the internet is an essential part of modern life. So, a strong WiFi signal is vital.
So, grab your can. Get your supplies ready. Take a few moments. Build your own WiFi amplifier. You'll soon experience faster, more reliable internet. Enjoy the boost! You earned it!
HP Laptop WiFi Driver: Download the FASTEST Fix Now!Homemade WiFi Amplifier: SHOCKINGLY Easy DIY Boost!
Hey tech-savvy friends! Ever feel like your Wi-Fi signal is weaker than a kitten's meow? Constantly battling dead zones and buffering woes? We've all been there. You’re in the middle of an epic Netflix binge, and poof! The buffering wheel of doom appears. Or maybe you're trying to upload a crucial document for work, and the progress bar stubbornly refuses to budge. Sound familiar? Well, we've got a shockingly simple, DIY solution that’ll boost your Wi-Fi signal and banish those connectivity blues: a homemade Wi-Fi amplifier! Buckle up, because we're about to embark on a journey to stronger, more reliable internet, and it's way easier than you think.
1. The Wi-Fi Weakness Blues: Why Your Signal Sucks (Sometimes)
Let's be honest: modern life practically runs on Wi-Fi. From streaming cat videos to attending virtual meetings, a strong, stable internet connection is no longer a luxury; it's a necessity. But what happens when that connection is, shall we say, less than stellar? Walls, furniture, other electronic devices, and even the weather can all play havoc with your Wi-Fi signal. Think of it like this: your router is the speaker, and the Wi-Fi signal is the sound. Obstacles in the room are like thick blankets, muffling the audio. Sometimes, the speaker (router) just isn’t powerful enough to reach the entire room or further.
2. Commercial Amplifiers: A Pricey (and Sometimes Patchy) Solution
Okay, okay, we all know about commercial Wi-Fi extenders and amplifiers. They promise a quick fix, often at a relatively hefty price tag. But, let's face it, buying one can feel like throwing money down a rabbit hole. Plus, depending on the brand and model, they can sometimes create more problems than they solve, leading to dropped connections and frustrating inconsistencies. They're like trying to patch a leaky boat with duct tape: it might work, but you're probably better off with a more robust solution.
3. Enter the DIY Hero: Your Homemade Solution
This is where the magic happens. Forget expensive gadgets and complicated setups. We’re going to build a completely homemade Wi-Fi amplifier using materials you probably already have lying around the house. We're talking simple, effective, and, most importantly, cheap. Think of it as a powerful internet upgrade without breaking the bank.
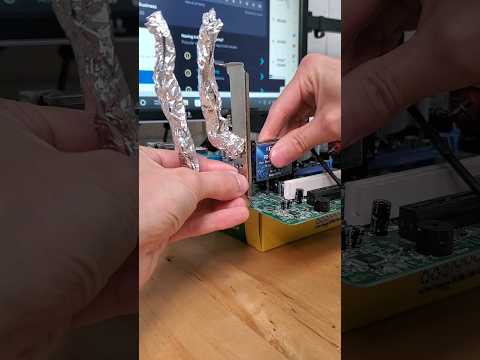
4. The Secret Ingredient: Aluminum Foil is Your Friend
Here's the main ingredient of our miracle recipe: aluminum foil! Yes, you read that right. The same foil you use to wrap your leftovers can be transformed into a Wi-Fi signal boosting powerhouse. Aluminum foil acts as a reflector, focusing and magnifying the signal, like a tiny satellite dish for your internet. It's like giving your router a megaphone!
5. Gathering Your Supplies: The Minimalist's Checklist
Before we dive into the instructions, let's gather your supplies. The beauty of this project? You likely already own everything you need.
- A piece of cardboard (cereal boxes work perfectly!)
- Aluminum foil
- Scissors or a craft knife
- Tape (duct tape or packing tape works best)
- A ruler or measuring tape (optional, but helpful)
See? Told ya it was easy!
6. The Construction Phase: Building Your Signal Booster
Alright, let's get building! Here's a step-by-step guide to creating your Wi-Fi amplifier:
Measure and Cut: Determine the size based on your router's antenna. A wider reflector will typically enhance the signal stronger, however, that is dependent on experimentation, where your optimal result lies.
Cover the Cardboard: Lay a piece of aluminum foil over the cardboard. Ensuring a smooth surface, fold the foil over the edges of the cardboard and secure them with tape.
Positioning and Testing: Place your homemade amplifier behind your router's antenna. Experiment with different angles and positions to find the most effective setup.
This is where the fun really begins. Experimentation is key!
7. Optimizing Your Amplifier: Fine-Tuning for Maximum Impact
Once you've built your amplifier, the next step is optimizing its performance. Think of your amplifier like a musical instrument; you have to tune it to get the best results.
- Experiment with Angles: The angle of the amplifier is crucial. Tilting it slightly up or down, left or right, can significantly affect the signal strength. Try different angles and test the connection in various locations to see what works best.
- Placement is Key: Place your router in an elevated position, away from physical obstructions. This will open the way for the signals to transmit.
- Test, Test, Test: The best approach is to use a Wi-Fi analyzer app on your phone or computer (there are plenty of free ones available) to measure the signal strength before and after implementing your amplifier. This way, you can visually see the difference and fine-tune the amplifier's position for maximum impact.
8. Beyond the Amplifier: Other Tips for a Stronger Signal
While our DIY amplifier is a fantastic starting point, there are other steps you can take to optimize your Wi-Fi and boost its performance. Think of it as a holistic approach to internet happiness.
- Router Positioning: Place your router in a central location, away from walls and obstacles. Avoid placing it near other electronic devices, which can interfere with the signal.
- Channel Selection: Your router broadcasts on a specific channel. Many routers automatically choose the best channel, but if your Wi-Fi is still slow, manually changing channels might help. Use a Wi-Fi analyzer to find the least congested channel in your area.
- Regular Router Reboot: Reboot your router regularly (once a week is a good rule of thumb) to clear its memory and ensure optimal performance. It's like giving your router a fresh start.
- Update Your Router Firmware: Make sure your router's firmware is up-to-date to ensure both security and performance.
- The Signal Killers: Make sure to keep your router free from obstructions.
9. Troubleshooting Common Issues: When Things Go Wrong
Sometimes, even the best-laid plans don't go perfectly. Here are some common issues and how to troubleshoot them:
- No Improvement: Double-check the construction of your amplifier. Ensure the foil is smooth and that the reflector is properly positioned. Experiment with different angles.
- Weak Signal: Try moving the amplifier closer to your router. Consider changing the position of the router.
- Interference: Make sure your router isn't near other electronic devices that could be interfering with the signal.
10. Cost-Benefit Analysis: The DIY Advantage
Let's talk about the return on investment (ROI). The cost of this DIY project? Virtually nothing. The only cost is your time and a little bit of aluminum foil. The benefits? A potentially significant boost in Wi-Fi signal strength, leading to faster downloads, smoother streaming, and a reduction in lag. This is a win-win scenario!
11. The Tech-Savvy DIYer's Toolkit
Embracing DIY tech solutions isn't just about saving money; it's about empowerment. It’s about taking control of your technology and adapting it to your needs.
12. Beyond Aluminum Foil: Exploring Advanced Options
While the aluminum foil method is a fantastic starting point, there are more advanced amplifier designs you could experiment with, if you're feeling ambitious. Consider searching online for designs that use other materials if the simple aluminum foil method isn't enough.
13. Safety First: Precautions to Keep in Mind
Always unplug your router before making any modifications or adjustments to its antenna. Avoid touching any internal components.
14. The Satisfaction of a Successful DIY Project
There's nothing quite like the satisfaction of successfully completing a DIY project. The feeling of accomplishment, the pride in your handiwork, and the improved performance of your Wi-Fi makes it all worth it.
15. The Future of Home Wi-Fi: Stay Connected, Stay Smart
As we move further into the digital age, a strong and reliable Wi-Fi signal will continue to be more crucial. Stay connected, stay smart, and embrace the power of DIY solutions!
Closing Thoughts: Unleash the Wi-Fi Warrior Within!
So there you have it! A simple, affordable, and shockingly easy way to boost your Wi-Fi signal with a homemade amplifier. We hope this guide has empowered you to take control of your internet connectivity and banish those frustrating connection woes. Go forth, amplify, and enjoy a faster, more reliable internet experience!
Frequently Asked Questions (FAQs)
1. Is this safe for my router?
Yes, absolutely! This DIY method uses passive reflectors, which do not directly interact with the router's internal components. As long as you're careful and don't make any modifications to the router itself, you're perfectly safe.
2. How much will this improve my Wi-Fi signal?
The improvement will vary depending on your router, the environment, and your placement. Using a Wi-Fi signal strength app before and after implementing
HP Laptop WiFi Button: Where Is It Hiding?!Dont Waste Money on WiFi Repeaters

By GGSheed Dont Waste Money on WiFi Repeaters by GGSheed
Make wifi receivers for mobile phones

By knoweasy video Make wifi receivers for mobile phones by knoweasy video
Wi-Fi Gun DIY Powerful Antenna for Wi-Fi
By Kreosan English Wi-Fi Gun DIY Powerful Antenna for Wi-Fi by Kreosan English

Title: How to make any Windows computer or laptop as WiFi Repeater or WiFi Extender
Channel: UniqueTutorials
How to make any Windows computer or laptop as WiFi Repeater or WiFi Extender by UniqueTutorials
Change Wifi Settings
Homemade WiFi Amplifier: SHOCKINGLY Easy DIY Boost!
Are you wrestling with weak WiFi signals, plagued by frustrating dead zones in your home or office? Do dropped connections and glacial download speeds make your online experience a constant source of irritation? Then prepare to be amazed! We’re about to unveil a surprisingly straightforward, exceptionally effective, and remarkably inexpensive method for supercharging your wireless network: the homemade WiFi amplifier. Forget expensive, often unreliable commercial boosters – with a few common household items and a little bit of ingenuity, you can dramatically enhance your WiFi range and signal strength.
Understanding the Underlying Principles: Why Amplification Works
Before we dive into the construction, let's briefly touch on the fundamental principles at play. WiFi signals, like all radio waves, propagate outwards from the source – your router. The strength of these signals diminishes rapidly over distance and is further weakened by obstacles like walls, furniture, and even weather conditions. A WiFi amplifier doesn't magically create a stronger signal; instead, it effectively focuses and directs the existing signal, preventing it from spreading out in all directions. This focused energy translates into a more powerful signal at the receiving end, boosting range and improving overall performance. We are essentially creating a targeted, directional antenna that concentrates the signal where you need it most.
Gathering Your Supplies: The Essential Ingredients
The beauty of this DIY project lies in its simplicity and accessibility. You likely have most of the necessary components already lying around your house. Here's what you'll need:
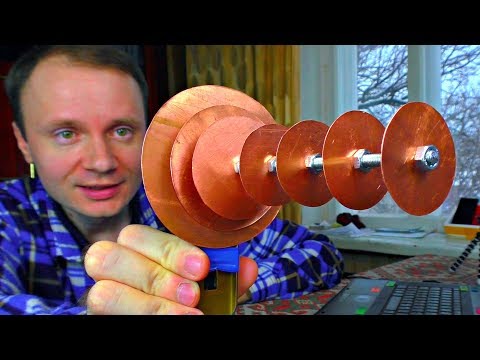
- A metal can: Choose a can that is empty, clean, and has a reflective interior. Coffee cans, soup cans, or even aluminum pie tins work exceptionally well. The size of the can will influence the range and directionality of the amplification. Experiment with different sizes to find the optimal performance for your specific situation. A larger can will tend to have a longer range but may be less directional.
- A WiFi router: The starting point of your WiFi signal. Ensure your router is in good working order. If the router is outdated, or very old, consider upgrading to a better router as well.
- Scissors or a utility knife: For precise cutting and shaping of the can. Exercise extreme caution when handling sharp objects. Always prioritize safety when making this project.
- Double-sided tape or glue: To secure the can to your router's antenna.
- Ruler and marker: For accurate measurements and markings.
- Optional: Metallic tape This is perfect for making a more robust build.
Step-by-Step Construction: Building Your WiFi Amplifier
Now for the fun part – bringing your homemade WiFi amplifier to life! Follow these instructions with care, and you'll be enjoying a significantly enhanced WiFi signal in no time.
- Preparation is Key: Thoroughly clean and dry your chosen metal can. Remove any labels or residue that could interfere with signal reflection. Wash the can thoroughly. This will get rid of any unwanted liquids.
- Measure and Mark: Using your ruler, measure the diameter of your router's antenna. This measurement is crucial. You need to ensure the antenna sits comfortably within the can.
- Cut the Can: Carefully cut a hole in the bottom of the can. The hole should be slightly larger than the diameter of your router's antenna. This will allow the antenna to be inserted into the can. Be precise, as a snug fit is crucial for optimal performance.
- Insert the Antenna: Gently feed the antenna through the hole in the can. The antenna should protrude from the bottom of the can. Make sure the antenna is sitting up straight and is not bent.
- Secure the Connection: Using double-sided tape or glue, firmly attach the can to your router. The can should be positioned so it is centered perfectly around the antena. Ensure the can remains firmly attached to prevent it from dropping or moving around.
- Test and Refine: Place your router with the newly created amplifier in the desired location. Test your WiFi signal strength in various locations within your home or office. You can use a smartphone app or online tool to measure the signal strength. The app will give you specifics on the WiFi signal.
Optimization and Fine-Tuning: Maximizing Performance
Your basic homemade WiFi amplifier is now complete! However, to truly maximize its effectiveness, consider the following optimization techniques:
- Directional Placement: Experiment with the orientation of the amplifier. Rotate the can to direct the enhanced signal towards the areas where you need the strongest WiFi coverage. Point the direction toward the areas where you need the WiFi signal.
- Antenna Positioning: Adjust the position of the antenna within the can. Moving the antenna slightly forward or backward can fine-tune the signal's focus and range.
- Material Matters: While a metal can works well, experimenting with different reflective materials, such as aluminum foil or metallic tape, lining the inside of the can. The more reflective the material, the more concentrated and powerful the signal.
- Height and Obstacles: Elevate your router and amplifier. High placement allows for better signal propagation with fewer obstructions. For your build, make sure your amplifier is clear of any metal objects, which could distort the signal.
Troubleshooting Common Issues:
Even with careful construction, you might encounter some challenges. Here's how to troubleshoot some common issues:
- Weak Signal: If the signal improvement is minimal, double-check the antenna placement and the can's alignment. Experiment with different can sizes and reflective materials.
- Interference: Nearby electronic devices can sometimes interfere with the WiFi signal. Position your router and amplifier away from microwaves, Bluetooth devices, and cordless phones.
- Connection Drops: If you experience intermittent connection drops, try repositioning the amplifier or checking your router's firmware for updates.
Beyond the Basics: Advanced Techniques for the Tech-Savvy
For those who want to take their DIY WiFi amplification to the next level, several more advanced techniques can further enhance performance:
- Multiple Amplifiers: Employ multiple amplifiers strategically placed to create a more comprehensive coverage area.
- Reflector Design: Explore more sophisticated reflector shapes, such as parabolic reflectors or helical antennas, for increased signal gain.
Safety Precautions: A Reminder
Always prioritize safety when working with tools and electrical devices. Never attempt to modify or tamper with your router's internal components. If you're unsure about any aspect of the construction or operation, seek guidance from a qualified professional.
Conclusion: Unleashing the Power of DIY WiFi
With these simple steps, you've not only amplified your WiFi signal but also demonstrated the power of ingenuity and resourcefulness. You've transformed ordinary household items into a high-performing WiFi solution, all without breaking the bank. Enjoy your stronger, more reliable wireless connection! This is your chance to take control of your WiFi experience and enjoy a seamless, uninterrupted connection throughout your home or office.
