laptop wifi adapter not working code 10
Title: Fix This Device Cannot Start. code 10 Error With WiFi & Other Drivers
Channel: Sandeep Singh
Fix This Device Cannot Start. code 10 Error With WiFi & Other Drivers by Sandeep Singh
laptop wifi adapter cannot start code 10, wifi adapter not working code 10, laptop wifi adapter not working
Laptop WiFi Adapter Code 10? FIX IT NOW! (Easy Steps)
Laptop WiFi Adapter Code 10? Banishing the Digital Demons: Your Ultimate Fix-It Guide
Ah, the Code 10 error. That digital gremlin that loves to pop up just when you need your Wi-Fi the most. It's a frustrating foe, isn't it? But don’t fret! This isn't a tech autopsy. Instead, think of this as your personal, friendly guide to vanquishing it! This is your definitive action plan. We'll tackle this frustrating issue head-on. Let's get you back online, pronto!.
Understanding the Code 10 Curse: What's Really Going On?
So, what exactly is this mischievous Code 10? In essence, it's the operating system's gentle (or not-so-gentle) way of saying, "Hey, this device isn't working right." Your laptop's Wi-Fi adapter is misbehaving. This often means there's a problem with the drivers. The drivers are the software that allows your computer to "talk" to your Wi-Fi card. The drivers might be corrupted, outdated, or simply incompatible. The Code 10 error also hints at hardware issues, though that's usually less likely. Therefore, before you panic, let’s explore the solutions.
Step 1: Restarting the Digital Battlefield (The Simple Fix)
First things first. Have you tried the most basic solution? You might be surprised by its effectiveness. Restart your laptop. This is often the digital version of hitting the reset button. It's simple but powerful. This action often resolves minor glitches. Close all your applications. Now, shut down your laptop completely. Then, wait for about a minute. Power it back on. Check your Wi-Fi connection. Moreover, if the issue persists, proceed to the next step.
Step 2: Driver Detective: Diagnosing and Updating Your Drivers
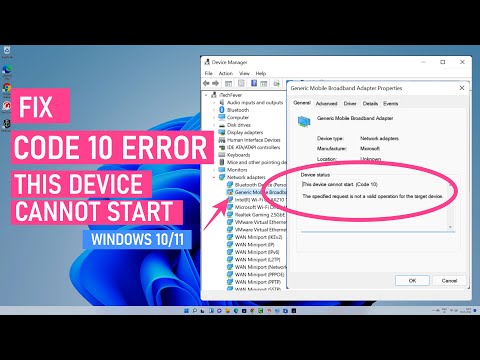
If a simple restart didn't do the trick, let's delve deeper. We’ll need to investigate your Wi-Fi adapter's drivers. Your drivers are your Wi-Fi’s operating instructions. You’ll have to access the Device Manager. There are various ways to get there. For instance, you can type "Device Manager" into the Windows search bar. Then, open the Device Manager. Locate "Network adapters." Click the arrow to expand the list. Your Wi-Fi adapter should be listed there. It usually has a name that includes "Wireless" or "Wi-Fi."
Now, right-click your Wi-Fi adapter. Select "Update driver." Choose "Search automatically for drivers." Windows will search for the latest drivers online. Consequently, it'll install them if it finds any. If that doesn’t work, go back to the Wi-Fi adapter. Right-click again. Select "Update driver" again. This time, choose "Browse my computer for drivers." Then, select "Let me pick from a list of available drivers on my computer." You might see a list of older drivers. Select an older driver and install it. However, it is better to go with the new driver. You can always go back and revert this. Sometimes, newer drivers aren't always the best ones for your specific system.
Step 3: Uninstall and Reinstall: A Fresh Start for Your Wi-Fi
If updating the drivers doesn't work, we'll try a more aggressive approach. Uninstalling and reinstalling the Wi-Fi adapter. This gives your system a fresh start. In Device Manager, right-click on your Wi-Fi adapter. Select "Uninstall device." A confirmation prompt will appear. Click "Uninstall." Afterward, restart your laptop. Windows should automatically reinstall the driver. Nevertheless, if it doesn't, follow the driver update steps from Step 2.
Step 4: Power Cycle: A Hardware Reset
Sometimes, a hardware hiccup can cause problems. Thus, try a power cycle. Shut down your laptop. Unplug the power cord. Remove the battery (if possible). Press and hold the power button for 30 seconds. Plug the power cord back in (and replace the battery). Restart your laptop. See if your Wi-Fi is working. If you can't remove the battery, just unplug the power cord and proceed. The key is to disconnect all power.
Step 5: Hardware Check: Is There a Physical Issue?
Let's talk about hardware. Code 10 can occasionally indicate a problem with the Wi-Fi card itself. However, it's less common. Check your laptop's manual. Find the location of your Wi-Fi card. Then, access it. Ensure the card is properly seated. Ensure there's no visible damage. Sometimes, the card might need to be reseated. That means taking it out and putting it back in. Consequently, if you are uncomfortable opening your laptop, take it to a professional.
Step 6: Troubleshooting Network Settings
Sometimes, the problem isn't the adapter itself. Check your network settings. Make sure your Wi-Fi is enabled. Check your network profile. Ensure it’s set to "Private" (for home networks). Check if there are any recent changes. Check your router settings (if applicable). Further, ensure the router is broadcasting the Wi-Fi signal.
Step 7: Running the Network Troubleshooter
Windows has a built-in troubleshooter. It can help diagnose and fix network problems automatically. In the Windows search bar, type "Troubleshoot settings." Select "Network Adapter." Then, run the troubleshooter. It will scan for problems. It will then give you potential solutions. Therefore, it might be able to fix the error for you.
Final Thoughts: Victory Awaits!
We've covered a lot of ground. By now, you should be well-equipped to conquer the Code 10 error. Remember to be patient. The solution might not be immediate. Indeed, it might take a few tries. Above all, if nothing seems to work, consider seeking professional help. Ultimately, with the right approach, you can get your Wi-Fi back up and running. Now get back online and start browsing!
Unlock Your Laptop's Wi-Fi: The Secret Trick They Don't Want You to Know!Laptop WiFi Adapter Code 10? FIX IT NOW! (Easy Steps)
Hey there, fellow tech travelers! Ever been in that frustrating situation where your laptop suddenly decides Wi-Fi is optional? One minute you're browsing cat videos, the next… crickets. If you've landed here, chances are you’re staring down the dreaded "Code 10" error on your Wi-Fi adapter. Don't worry, we've all been there; it's like your laptop's way of saying, "I'm not feeling the internet today." But guess what? We’re going to banish that Code 10 monster together! Prepare to be amazed because, after this, you’ll be back online faster than you can say "streaming marathon."
Why Did My Laptop's Wi-Fi Adapter Decide to Throw a Tantrum?
Think of your Wi-Fi adapter as the translator between your laptop and the internet. It's the little guy (or gal) interpreting the signals and passing them back and forth. Code 10 is essentially a generic error code, the digital equivalent of "something's wrong, and I'm not entirely sure what!" It can pop up for a bunch of reasons, from a driver snafu to a hardware hiccup. It's like a car’s check engine light; it tells you something's amiss, but you need to dig deeper to find the root cause.
Decoding the Code 10 Mystery: Common Culprits
Before we jump into solutions, let's acknowledge the usual suspects that typically cause this digital drama. A damaged driver file is a primary culprit, like a faulty instruction manual that the adapter is trying to follow. Also, Windows updates, while typically helpful, can sometimes clash with your Wi-Fi adapter. Lastly, although less common, a hardware problem can be the root.
Step 1: The Reboot Ritual (The Simplest Fix!)
Okay, let's start with the digital equivalent of a good night's sleep: a simple reboot. It's amazing how often this works. Think of it as hitting the "reset" button. Just shut down your laptop completely, wait a few seconds, and then power it back on. Sometimes, that's all it takes to get things humming again. It's the tech equivalent of turning your car off and on again; often, it magically solves the problem.
Step 2: Driver Dilemma? Updating Your Wi-Fi Adapter Drivers
If a reboot didn't do the trick, let's dive into drivers. Drivers are the software that allows your laptop's hardware to communicate with Windows. Outdated, corrupted, or incompatible drivers are prime suspects for Code 10. To fix this, we need to update or reinstall your Wi-Fi adapter drivers. Here's how:
- Open Device Manager: You can search for "Device Manager" in the Windows search bar or right-click on the Start button and select it from the menu.
- Locate Your Wi-Fi Adapter: Expand the "Network adapters" section. You should see your Wi-Fi adapter listed (it might say something like "Wireless Network Adapter" or a brand name like "Intel Wireless").
- Right-Click and Update Driver: Right-click on your Wi-Fi adapter and select "Update driver."
- Choose Your Update Method: You can choose to "Search automatically for drivers." Windows will then try to find the latest driver for you. Or, you can choose to "Browse my computer for drivers" if you've already downloaded a driver from the manufacturer's website.
Step 3: Driver Removal and Reinstallation: A Fresh Start
If updating doesn't do the trick, let's try a more aggressive approach: uninstalling and reinstalling the driver. Right-click on your Wi-Fi adapter in Device Manager and select "Uninstall device." A confirmation prompt will appear; make sure you check the box that says, "Delete the driver software for this device." Restart your laptop. Windows should (hopefully!) automatically reinstall the drivers when you reopen the Device Manager. If not, download the correct drivers from your laptop manufacturer's website.
Step 4: Roll Back the Clock: Driver Rollback
Sometimes, a recent driver update caused the problem. In this case, you can "roll back" to a previous, working version. In Device Manager, right-click on your Wi-Fi adapter, select "Properties," and then go to the "Driver" tab. If the "Roll Back Driver" button is active, click it. This restores an earlier version of the driver. If it’s greyed out, it means there's no previous driver to revert to.
Step 5: Power Cycling Your Router and Modem
Okay, time to check your internet connection. Sometimes, the problem isn't your laptop at all; it's the connection itself. Power cycle your router and modem. Unplug them both from the power outlet (or switch them off at the wall), wait a minute, and plug them back in. This reboot can often clear up connection issues. It's like giving your internet a fresh start.
Step 6: The Hardware Check: Is Your Adapter Physically Sound?
This is less common, but it's a possibility. If none of the software solutions work, there could be a problem with your Wi-Fi adapter itself.
- Check the Device Manager Again: Are there any other error messages related to the adapter?
- Look for Physical Damage: Open up your laptop (if you're comfortable doing so, and have the right tools!) and examine the adapter for any obvious signs of damage, like loose connections or burnt components. (If you're not tech-savvy, consider taking it to a professional.)
Step 7: Running the Network Troubleshooter
Windows has a built-in troubleshooter that's surprisingly effective. Search for "Troubleshoot settings" in the Windows search bar. Then, select "Network Adapter" and run the troubleshooter. It will automatically diagnose and attempt to fix any detected problems.
Step 8: Scan for Malware (Just in Case)
Malware can sometimes interfere with network functionality. Run a full scan with your antivirus software to ensure your system is clean. Think of it as a digital detox for your laptop.
Step 9: Check Windows Updates
Make sure your operating system is up to date. Go to Settings > Update & Security > Windows Update and check for any pending updates. Sometimes, even a Windows update can fix compatibility issues.
Step 10: Consider a System Restore
If you recently made significant changes to your system that might have caused the problem, consider using System Restore to revert to a previous state. This will undo recent changes that could be the culprit.
Step 11: Troubleshoot Network Settings
Sometimes, the issue could be in the network settings itself rather than the adapter.
- IP Address: Make sure your laptop is getting an IP address from your router. This is usually done automatically (DHCP - Dynamic Host Configuration Protocol). You can check by opening a command prompt (search for "cmd" in the Windows search bar) and typing
ipconfig. Look for the "IPv4 Address" and "Default Gateway" fields. If your IP address starts with169.254, you probably have a problem. You can try releasing and renewing your IP address. Open the command prompt and type in:ipconfig /release. Then, typeipconfig /renew. - DNS Servers: Sometimes, the DNS servers can cause connection issues. You can try using different DNS servers, such as Google's Public DNS (8.8.8.8 and 8.8.4.4). Go to "Network and Sharing Center" > "Change adapter settings." Right-click on your Wi-Fi adapter, select "Properties," and double-click on "Internet Protocol Version 4 (TCP/IPv4)." Check "Use the following DNS server addresses" and enter the Google DNS addresses.
Step 12: Reset Your Network Settings
As a last resort, you can try resetting your network settings. Go to Settings > Network & Internet > Status > Network reset. This will uninstall and reinstall your network adapters and set other networking components back to their original settings. Note that you may need to reconnect to your Wi-Fi network after this step, and you may need to re-enter your Wi-Fi password.
Step 13: Test with a Different Device (Elimination Game)
To isolate the issue, try connecting another device (another laptop, your phone, etc.) to your Wi-Fi network. If the other device connects successfully, then the problem is likely with your laptop, not your internet connection.
Step 14: Consider a USB Wi-Fi Adapter (As a Last Resort)
If all else fails, and you suspect your built-in Wi-Fi adapter is truly bricked, you can buy a USB Wi-Fi adapter. This is a small, external device that plugs into a USB port and acts as your Wi-Fi connection. It's a workaround, but it can keep you connected until you can get your laptop repaired or replaced.
Step 15: When to Call in the Experts
If you've tried everything above, and you're still battling Code 10, it might be time to call in the professionals. Your Wi-Fi adapter may require hardware replacement, or potentially the mother board. Take your laptop to a qualified repair shop.
Conclusion: Victory Over Code 10!
And there you have it, friends! Hopefully
HP Windows 7 WiFi Fix: The Easiest Adapter Upgrade EVER!wireless AC 9560 Code 10 not working in Windows 1110 Quick Fix

By The Geek Page wireless AC 9560 Code 10 not working in Windows 1110 Quick Fix by The Geek Page
How to Fix This Device Cannot Start Code 10 Error in Windows 1110

By Tech Review How to Fix This Device Cannot Start Code 10 Error in Windows 1110 by Tech Review
MENGATASI DEVICE CAN'T START ERROR CODE 10
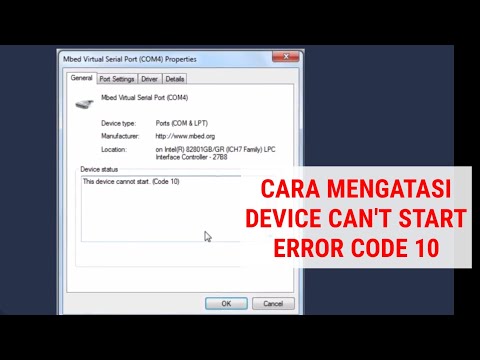
By Calon Guru Baru MENGATASI DEVICE CAN'T START ERROR CODE 10 by Calon Guru Baru

Title: how to solve windows 10 wifi issue
Channel: Solve4 U
how to solve windows 10 wifi issue by Solve4 U
Laptop Wifi Connect
Laptop WiFi Adapter Code 10? FIX IT NOW! (Easy Steps)
Staring at a blank screen, disconnected from the digital world? That dreaded "Code 10" error notification on your laptop's WiFi adapter is a frustrating digital roadblock. It signals a problem with your network adapter, preventing your laptop from connecting to the internet. But don't despair! We are here to guide you through a series of effective solutions, meticulously designed to restore your connection and get you back online in no time. Forget the frustration; let's dive into the solutions.
Understanding the Root Cause: Decoding the "Code 10" Error
Before we leap into solutions, it's helpful to understand what this "Code 10" error actually signifies. Broadly, this error code, typically found in the Device Manager, indicates that Windows is unable to start your Wi-Fi adapter. The most common culprits include outdated or corrupted drivers, conflicts with other hardware devices, or hardware malfunctions. Pinpointing the exact cause can sometimes be tricky, but by methodically working through the following steps, we can effectively diagnose and resolve the issue.
Step 1: The Initial Diagnostic: Restarting Your System and Router
Let's begin with the simplest, and often most effective, troubleshooting step: a full system restart. This simple action can clear out temporary glitches and reset various system processes, including the Wi-Fi adapter.
- Restart Your Laptop: Completely shut down your laptop and then power it back on. Try to connect to your Wi-Fi after the system fully boots up.
- Restart Your Router: Unplug your router from the power outlet. Wait for at least 30 seconds, then plug it back in. Allow the router to fully boot up before attempting to reconnect your laptop to your network.
Often, this resets the connection.
Step 2: Driver Solutions: Updating, Reinstalling, and Rolling Back
Drivers are the software bridge connecting your Wi-Fi adapter to your operating system. Outdated, corrupted, or mismatched drivers are frequent causes of the Code 10 error. Let's explore several driver-related fixes:
Updating Your Wi-Fi Adapter Driver via Device Manager:
- Right-click the Windows Start button and select "Device Manager."
- Expand the "Network adapters" section.
- Locate your Wi-Fi adapter (it might be labeled with a name like "Wi-Fi" or "Wireless Network Adapter").
- Right-click on the adapter and choose "Update driver."
- Select "Search automatically for drivers" to let Windows search for and install the latest drivers.
- Follow the on-screen instructions. Restart your laptop after the update process is complete.
Reinstalling Your Wi-Fi Adapter Driver:
- Follow steps 1-3 from the "Updating Your Wi-Fi Adapter Driver" section to access your Wi-Fi adapter in Device Manager.
- Right-click on the adapter and choose "Uninstall device."
- Confirm the uninstall by clicking "Uninstall."
- Restart your laptop..
- Windows should automatically reinstall the driver upon startup, or you can manually install the driver using the steps mentioned in the updating driver section.
Rolling Back to a Previous Driver Version:
- If you recently updated your driver and the Code 10 error appeared afterward, consider rolling back to the previous version.
- In Device Manager, right-click your Wi-Fi adapter and select "Properties."
- Go to the "Driver" tab.
- If the "Roll Back Driver" option is available, click it and follow the prompts. If it's unavailable, it means you don't have a prior driver version to revert to.
- Restart your laptop.
Step 3: Power Management Settings: Optimizing Adapter Performance
Sometimes, power management settings interfere with the proper functioning of your Wi-Fi adapter. Let's ensure your adapter is configured for optimal performance.
Accessing Power Management Settings:
- Open Device Manager (as described above).
- Right-click your Wi-Fi adapter and select "Properties."
- Go to the "Power Management" tab.
Disabling "Allow the computer to turn off this device to save power":
- Uncheck the box labeled "Allow the computer to turn off this device to save power." This prevents Windows from disabling the adapter to conserve battery power, which can sometimes lead to connection issues.
- Click "OK" and restart your laptop.
Step 4: Hardware Inspection and Troubleshooting
While less common, hardware issues can also trigger the Code 10 error. Here are some hardware-related steps to consider:
Checking the Physical Connection:
- For laptops with removable Wi-Fi cards, physically inspect the card. Open your laptop (consult your laptop's manual for instructions) and ensure the card is securely seated in its slot.
- Ensure that the antenna cables are connected, and there are no loose connections.
Testing on a Different Network:
- If possible, try connecting to a different Wi-Fi network. This will help determine if the issue is specific to your home network or a general problem with your adapter.If it works on a different network, the problem might be related to your router's settings or your internet connection.
Contacting Technical Support:
- If you have exhausted all other troubleshooting steps and you suspect a hardware malfunction, consider contacting your laptop manufacturer's technical support. They can provide further diagnosis and potential repair options.
Step 5: Running the Network Troubleshooter
Windows has a built-in network troubleshooter that can automatically diagnose and fix common network problems.
- Accessing the Network Troubleshooter:
- Click the Windows Start button.
- Type "Network troubleshooter" or ''troubleshooting" and click "Network troubleshooter" to find it in the search results.
- Click "Identify and repair network problems."
- Follow the on-screen instructions.
Additional Tips and Considerations
- Check for Malware: Run a full system scan using your antivirus software. Malware can sometimes interfere with network connections and cause the Code 10 error.
- Firewall Settings: Ensure your firewall isn't blocking your Wi-Fi adapter's communication. Temporarily disable your firewall (with caution!) to see if it resolves the issue. If it does, adjust your firewall settings to allow your adapter's traffic.
- BIOS Updates: Check if your laptop's BIOS (Basic Input/Output System) needs an update. Outdated BIOS versions can sometimes cause hardware compatibility problems. Consult your manufacturer's website for BIOS update instructions. Back up your data first.
- Operating System Updates: Make sure your Windows operating system is up to date. Newer updates may contain important fixes for network connectivity issues.
- Factory Reset (Last Resort): As a last resort, if none of the above steps work, you might consider a factory reset of your laptop. Back up all your important data before doing this, as it will erase all your personal files and settings.
Conclusion: Reclaiming Your Online Connection
The Code 10 error on your laptop's Wi-Fi adapter can be frustrating, but it is usually resolvable. By carefully following these steps, you can effectively diagnose and fix the problem, restoring your internet connection and getting you back online. By methodically working through each solution, you can pinpoint the root cause and implement the appropriate fix. With patience and determination, you can conquer this digital hurdle and continue to enjoy your online experience. In most instances, these solutions will have you back online in no time! Don’t forget to restart your laptop after each troubleshooting step to ensure all of the changes are properly applied.
