lenovo laptop wifi disabled
Title: Cara mengatasi wifi yang hilang atau turned of dengan mudah
Channel: Abdul Rohman
Cara mengatasi wifi yang hilang atau turned of dengan mudah by Abdul Rohman
lenovo laptop wifi disabled, lenovo laptop wifi not working, lenovo laptop wifi enable, lenovo ideapad wifi turned off, lenovo thinkpad wifi adapter disabled, lenovo ideapad disable wifi, lenovo laptop wifi adapter not working, lenovo government laptop wifi not working, lenovo laptop wifi not working windows 11, lenovo laptop wifi not working windows 10
Lenovo Laptop WiFi Dead? FIX IT NOW!
Laptop WiFi Woes? Reviving Your Lenovo's Connection
Navigating the digital world relies heavily on a solid Wi-Fi connection. So, when your Lenovo laptop abruptly loses its internet access, it's understandably frustrating. You are disconnected from everything, from crucial work emails to streaming your favorite shows. But hold tight. Don't panic! We'll get your Lenovo back online quickly. This guide offers practical solutions. It’s made to help you troubleshoot and fix the issue.
Spotting the Symptoms: Is Your WiFi Actually Dead?
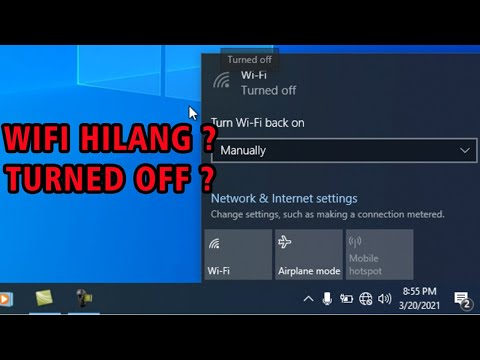
Before you launch into troubleshooting, let's confirm the problem. Your Lenovo laptop might display a few telltale signs. First, you might see a lack of Wi-Fi signals in the system tray. Also, you might try connecting to the internet. Consequently, you might get a “no internet access” error message. Furthermore, webpages may fail to load. Furthermore, applications that need internet access will fail. So, before diving in, verify that your system is not connected via Ethernet. If it is, then the issue might not be Wi-Fi related. If the symptoms match, then let's move on!
The Obvious First Steps: Quick Checks & Simple Fixes
Let's start with the basic checks. They often solve the problem. Initially, confirm that Wi-Fi is enabled. Look for the Wi-Fi icon in the system tray. It looks like a set of curved bars. If it's grayed out or showing a "no connection" indicator, right-click it. Then, select "Connect". Make sure Wi-Fi is enabled in your laptop's settings. Often, there's a physical Wi-Fi switch on the side or front of the laptop. Check to make sure it's turned on.
Restart, Refresh, and Reboot: The Classic Trio
Often, a simple restart works wonders. So, restart your Lenovo laptop. This refreshes the system. Moreover, it helps clear temporary glitches that might be causing the problem. If a restart doesn't fix the issue, try restarting your router and modem. Unplug both devices for about 30 seconds. Then, plug them back in. Let them fully power up before testing your connection. Therefore, you refresh your network connection.
Driver Dilemmas: Updating Your Wireless Network Adapter
Outdated or corrupted drivers can frequently cause Wi-Fi issues. You can check for updates. First, open Device Manager. You can search for it in the Windows search bar. Then, expand the "Network adapters" section. Right-click your wireless network adapter. Select "Update driver." Choose "Search automatically for drivers". Windows will look for the latest driver. Install it if available. Afterward, restart your laptop.
Network Troubleshooter: Windows' Built-In Hero
Windows offers a built-in network troubleshooter. It can pinpoint and fix common connectivity problems. Simply right-click the Wi-Fi icon in the system tray. Then, choose "Troubleshoot problems." Follow the on-screen prompts. The troubleshooter will scan for issues. It will try to resolve them automatically. At the end, it will generate a report too.
Airplane Mode: The Accidental Activator
Accidentally, you might have enabled Airplane mode. It disables all wireless connections. Check the system tray for a small airplane icon. If it's active, click it to disable Airplane mode. Ensure your Wi-Fi is re-enabled.
Forget and Reconnect: A Fresh Start for Your Connection
Sometimes, forgetting and reconnecting to your Wi-Fi network can help refresh the connection. Right-click the Wi-Fi icon. Select "Open Network & Internet settings." Then, click “Wi-Fi”. Click “Manage known networks”. Choose your network. Click "Forget." Afterward, reconnect to your Wi-Fi network. Re-enter your password.
IP Address Conflicts: Avoiding Network Clashes
In some instances, your Lenovo might be using a conflicting IP address. Try releasing and renewing your IP address. Open Command Prompt as an administrator. You can search for "cmd" in the Windows search bar. Then, right-click it, and choose "Run as administrator". Type ipconfig /release and press Enter. Then, type ipconfig /renew and press Enter. Restart your laptop after completion.
Firewall Interference: Examining Your Security Settings
Your firewall might be blocking your Wi-Fi connection unintentionally. Check your firewall settings. Make sure your Wi-Fi connection and network adapter are allowed access. Consult your firewall's documentation for specific instructions. You might need to temporarily disable the firewall if you suspect it's the culprit. Then, test your Wi-Fi connection.
Hardware Hurdles: When All Else Fails
If the above steps have failed, there might be a hardware issue. Check the Wi-Fi adapter. Ensure it’s properly seated in your laptop. If you're comfortable with hardware, open your laptop. Locate the wireless adapter. It is often a small card. Reseat it, or consult a professional.
Seeking External Guidance: When to Call in the Experts
If you tried all of these troubleshooting tips and are still encountering issues, it might be time to seek professional help. Contact Lenovo support directly. Or, take your laptop to a qualified technician. They can diagnose and fix more complex hardware problems. Ultimately, don't risk damaging your laptop further.
Unlock Free WiFi: The Ultimate Laptop Hacker App?Lenovo Laptop WiFi Dead? FIX IT NOW!
Hey there, fellow tech travelers! Ever stared at your Lenovo laptop screen, desperately searching for that sweet, sweet WiFi signal, only to be met with the dreaded "No internet, secured" message? Ugh, we've all been there. It's like being stranded on a deserted island, but instead of sand and coconuts, you're surrounded by deadlines and a growing sense of digital despair. Don't worry, though! We’re here to haul you back to civilization! Today, we're diving deep into the world of Lenovo laptop WiFi woes, arming you with the knowledge to conquer the "dead WiFi" beast and reclaim your internet freedom. Think of this as your digital survival guide; let’s explore the fix-it-now strategies!
1. The WiFi Wasteland: Why Your Lenovo Laptop's WiFi Went MIA
Before we start hammering at keys and clicking on buttons, let's understand the enemy. Why did your WiFi vanish in the first place? Was it a random act of electronic mischief? Or could a known culprit be involved? Some common causes include:
- Software Glitches: Your operating system (Windows, usually) might be having a bad day. A driver update could have gone rogue, or some hidden conflict could be causing problems.
- Hardware Hiccups: Sadly, even Lenovo laptops can experience hardware failures. Your internal WiFi adapter might have decided to retire early.
- Router Rage: Sometimes, your router is the problem, not your laptop. A simple reboot can often work wonders.
- Network Settings Nightmare: Incorrectly configured network settings can block your connection, making your life a misery.
- Accidental Disabling: Perhaps you accidentally disabled the WiFi adapter or put your laptop in airplane mode! We have all been there.
Think of it like this: your laptop's WiFi card is like a tiny radio transmitter, and your router is the radio station. If the radio station signal is weak or something’s blocking the transmitter, you ain't getting any tunes!
2. First Aid: The Quickest Fixes for a Dormant WiFi
Before we go hacking and slashing at the core of the issue, let's try some quick and easy fixes. These are the equivalent of putting a Band-Aid on a paper cut:
- Airplane Mode: This is the ultimate "duh" moment. Make sure Airplane Mode is OFF. You can usually find it in the Action Center (Windows key + A) or the system tray (bottom right corner of your screen).
- Restart Everything: Power down your laptop and your router. Wait a minute, then turn the router back on. Once the router is stable, power up your laptop again. This often solves simple issues.
- Check the Physical Switch: Some Lenovo laptops have a physical switch to turn the WiFi on/off. Make sure it’s in the "on" position. Yes, it happens!
- Update Windows: Go to Settings > Update & Security > Windows Update and make sure you've installed all the latest updates. Sometimes, these updates include driver fixes.
Think of them as low-hanging fruit. They are quick, easy and often solve the problem instantly.
3. Diving Deeper: Checking Your Wireless Adapter
If the quick fixes didn’t work, it's time to dig a little deeper. Let's see if your WiFi adapter is even functioning correctly.
- Device Manager: Right-click on the Start button (or press Windows key + X) and select "Device Manager." Look for "Network adapters." Expand this section.
- Is Your Adapter Present? Do you see your WiFi adapter listed? If not, something is seriously wrong. It might be disabled, or there might be a hardware problem.
- Driver Status: Are there any yellow exclamation marks next to your WiFi adapter? This indicates a driver issue. Right-click on the adapter and select "Properties" to see the error message and what's missing.
- Enable/Disable: Try right-clicking on your adapter and selecting "Disable". Then, right-click again and select "Enable." This can sometimes kickstart the adapter.
Imagine your WiFi adapter as a little intern at the office. Device Manager is their manager. If the manager has gone MIA, there might be a problem with the intern (adapter).
4. Driver Drama: Updating or Reinstalling Your WiFi Driver
Drivers are crucial! They're the software that allows your laptop to “talk” to the WiFi adapter. Outdated or corrupted drivers are prime suspects in the "dead WiFi" mystery.
- Update Driver: In Device Manager, right-click your WiFi adapter and select "Update driver." Choose the "Search automatically for drivers" option. Windows will try to find the latest driver online.
- Manual Download: If Windows can't find a driver, search the Lenovo support website for your laptop model. Download the latest WiFi driver from there.
- Reinstall Driver: (If the update fails) Uninstall your WiFi adapter in Device Manager (right-click and select "Uninstall device"). Then, restart your laptop. Windows should automatically reinstall a default driver. If not, install the driver you downloaded from the Lenovo website.
- Rollback: If you updated your driver recently and the WiFi stopped working afterward, try rolling back to the previous driver version. In Device Manager, right-click your WiFi adapter, select "Properties," and then go to the "Driver" tab. If the "Roll Back Driver" option is available, use it.
This would be like hiring a highly skilled tech person to fix the problem. You hired them or you want to hire them.
5. Network Troubleshooter: Letting Windows Be Your Detective
Windows has a built-in troubleshooter designed to diagnose and fix network problems. It's like having a little digital Sherlock Holmes:
- Run the Troubleshooter: Go to Settings > Network & Internet > Status. You should see a "Troubleshoot" option. Click it, and follow the prompts.
- Let it Work: Windows will scan for issues and attempt to fix them. Sit back and let it do its thing.
- Check the Results: The troubleshooter will present a report of what it fixed (or couldn't fix). Take note of the findings.
You're essentially telling the system to investigate where the issue lies and resolve it, in like with every detective solving a crime.
6. Router Reboot: The Usual Suspect
As mentioned previously, sometimes the problem isn't your Lenovo laptop. It's the router!
- Power Cycle: Unplug your router and modem (if you have a separate modem) from the wall outlet. Wait at least 30 seconds. Plug the modem back in first and wait for it to stabilize. Then, plug the router back in.
- Check Router Settings: Access your router's settings (usually by typing its IP address – often 192.168.1.1 or 192.168.0.1 – in your web browser). Make sure WiFi is enabled and that there are no restrictions on your laptop's MAC address. Restart and re-enter the password.
- Firmware Update: Check your router's firmware. Outdated firmware can cause problems. Refer to your router's manual for how to update it.
This will be like clearing the room for the internet to flow.
7. Advanced Warfare: Checking Your IP Address and DNS Configuration
Time to get a little techy. Let’s check your IP address and DNS settings.
- Open Command Prompt: Search for "cmd" in the Windows search bar and open the Command Prompt.
- IP Configuration: Type "ipconfig /all" and press Enter. Look for:
- IPv4 Address: This is your laptop's IP address on your local network.
- Default Gateway: This is your router's IP address.
- DNS Servers: These are the servers that translate website names (like google.com) into IP addresses.
- Troubleshooting: If your IP address starts with 169.254.x.x, that usually means your laptop isn't getting an IP address from the router. This is a problem and you may have to reconfigure your IP settings.
- DNS Configuration (If Necessary): In your network adapter settings (accessed through Device Manager or Settings > Network & Internet > Change adapter options), you can manually set your DNS servers to Google's (8.8.8.8 and 8.8.4.4) or Cloudflare's (1.1.1.1).
We're entering territory that is more complex but is also a sign you are more than ready to fix it.
8. Network Reset: A Fresh Start (Use with Caution!)
This is a bit of a nuclear option, but it can be effective. It resets all your network settings to their default values. Be warned: you'll lose all your saved WiFi passwords and need to reconnect to your networks.
- Go to Settings: Settings > Network & Internet > Advanced network settings > Network reset.
- Reset: Click the "Reset now" button and confirm.
- Restart: After the reset, your laptop will restart. You'll need to reconnect to your WiFi networks and enter your passwords.
This is almost like starting over. Sometimes a
**WiFi Nightmare? Fix Your Windows 10 Laptop NOW!**Cara mengatasi wifi disable di laptop

By Cara mengatasi wifi disable di laptop by
Cara Mengatasi Wifi Tidak Terdeteksi, Hilang, atau Tidak Muncul di Laptop

By Sobat OPS Cara Mengatasi Wifi Tidak Terdeteksi, Hilang, atau Tidak Muncul di Laptop by Sobat OPS
Cara mengatasi Laptop Tidak Bisa KonekConnect WIFI di Windows 11 & Windows 10 tutorial Internet

By Rifki Els Cara mengatasi Laptop Tidak Bisa KonekConnect WIFI di Windows 11 & Windows 10 tutorial Internet by Rifki Els

Title: Solusi Daftar Wifi Laptop Tidak Muncul di Windows 11 dan Windows 10 tutorial Internet
Channel: Rifki Els
Solusi Daftar Wifi Laptop Tidak Muncul di Windows 11 dan Windows 10 tutorial Internet by Rifki Els
Laptop Working
Lenovo Laptop WiFi Dead? FIX IT NOW! A Comprehensive Troubleshooting Guide
If you're reading this, chances are you're staring at a frustratingly inactive Wi-Fi symbol on your Lenovo laptop. The digital world feels distant when you can't connect, but fear not! We've navigated these murky waters countless times and have compiled a robust guide to get your connection back online swiftly and efficiently. This isn't just a list of generic fixes; we'll delve into the specifics, offering solutions tailored to a variety of Lenovo models and potential underlying issues. Let's get your Lenovo laptop talking to the internet again!
Understanding the Problem: Pinpointing the Root Cause
Before launching into a rapid-fire series of fixes, it's crucial to understand the why behind your dead Wi-Fi. Is the issue with the hardware, the software, or something else entirely? The symptoms can be deceiving, so we'll begin by establishing a diagnostic framework.
- Absence of Wi-Fi Icon: If the Wi-Fi icon is entirely missing from your system tray, this often points to a driver issue, a disabled adapter, or a critical hardware malfunction.
- Grayed-Out Wi-Fi Icon: A greyed-out icon usually indicates that the Wi-Fi adapter is disabled in the operating system (Windows) or that it’s struggling to find any available networks.
- "No Connections Available" Message: This message means your laptop can see the Wi-Fi adapter, but it can’t detect any nearby Wi-Fi signals. This suggests a problem with your router, the range, or a potential interference issue.
- Intermittent Connectivity: Frequent disconnections or slow speeds could be caused by a range of factors, including driver conflicts, router problems, or hardware degradation.
By carefully observing these symptoms, we can narrow down the potential avenues for troubleshooting.
First Steps: The Quick and Easy Solutions
Before diving into the more advanced techniques, let's begin with some of the most common and easily implemented fixes. These are the digital equivalent of checking the power button.
- The Physical Switch: Many Lenovo laptops, especially older models, have a physical Wi-Fi switch, usually on the side or front of the laptop. Double-check that this switch is in the "on" position. It's often a small sliding switch or a button with a Wi-Fi logo.
- Airplane Mode: Ensure Airplane mode is disabled. This disables all wireless connections, including Wi-Fi. Click the Airplane mode icon in the system tray or access it via the Action Center (Windows) to toggle it off.
- Restart Your Laptop: A simple restart can often resolve temporary software glitches that are interfering with your Wi-Fi connection. Close any open applications and restart your laptop.
- Restart Your Router/Modem: Even if other devices in your home are connected, a router issue can affect your Lenovo. Unplug your router and modem for 30 seconds to a minute, then plug them back in and allow them to reboot fully before retrying your connection.
If any of these initial steps resolve your issue, consider it a win. But if your Wi-Fi remains stubbornly offline, let’s move on to more intricate troubleshooting.
Delving into Device Manager: Driver Issues and Adapter Settings
Windows Device Manager is the brain of your hardware, and it can reveal a treasure trove of information about your Wi-Fi adapter. Access it by right-clicking the Start button (Windows icon) and selecting “Device Manager” from the menu.
- Identifying the Wi-Fi Adapter: Look for "Network adapters" in the list. Expand this category to locate your wireless adapter. It'll typically be named something like "Intel Wi-Fi…" or "Realtek Wireless LAN…"
- Driver Status: Right-click on your wireless adapter and select "Properties." Under the "General" tab, check the "Device status." If it says "This device is working properly," then the driver is likely installed correctly. If there's an error message, it indicates a driver issue. Common error messages include "This device is not working," "This device is disabled," or "A driver is not installed for this device."
- Driver Updates: If the driver status suggests a problem, the first step is to update the driver. Right-click the wireless adapter in Device Manager and select “Update driver.” Choose “Search automatically for drivers.” Windows will attempt to find and install the latest driver.
- Manually Installing Drivers: If the automatic update fails, you can download the latest drivers directly from the Lenovo support website (support.lenovo.com) using your laptop’s model number. Download the appropriate driver for your operating system and install it manually.
- Driver Rollback: If the Wi-Fi stopped working after a driver update, you can try rolling back the driver. In Device Manager, right-click the wireless adapter, select "Properties," go to the "Driver" tab, and click "Roll Back Driver." This will revert to a previously installed driver.
- Enabling the Adapter: If the adapter is disabled, right-click on it in Device Manager and select "Enable device."
Network Troubleshooter: A Built-In Diagnostic Tool
Windows includes a built-in network troubleshooter designed to help diagnose and fix common connectivity problems. You can access it through the settings menu.
- Accessing the Troubleshooter: Open Settings (Windows key + I), then go to "Network & Internet," and select "Status". Scroll down to the "Change your network settings" section and click on "Network troubleshooter."
- Following the Prompts: Run the troubleshooter and follow the on-screen instructions. It will attempt to diagnose and resolve any issues with your network adapter and Wi-Fi connection.
Advanced Troubleshooting: Beyond the Basics
If the above solutions haven't worked, it’s time to explore more involved techniques.
- Resetting TCP/IP and Winsock: Sometimes, corrupted network settings can cause connectivity problems. You can reset your TCP/IP stack and Winsock catalog using the Command Prompt. Open Command Prompt as an administrator (search for “cmd,” right-click, and select “Run as administrator”). Type the following commands, pressing Enter after each one:
*
netsh winsock reset*netsh int ip reset*ipconfig /release*ipconfig /renew*ipconfig /flushdnsRestart your laptop after running these commands. - Checking Your Power Management Settings: In Device Manager, right-click your Wi-Fi adapter, select “Properties,” and go to the “Power Management” tab. Uncheck the box that says “Allow the computer to turn off this device to save power.” This ensures your Wi-Fi adapter remains active even when not in use.
- Wireless Adapter Configuration: In Device Manager, go to "Properties" for your Wi-Fi adapter and go to the "Advanced" tab. Here, you'll find various configuration settings. Experiment with changing these settings, but be cautious. Depending on your adapter and router, you may want to experiment with settings like:
- 802.11 Mode: Ensure this is set to a mode that is compatible with your router (e.g., 802.11a/b/g/n or 802.11ax).
- Wireless Mode (or Mode): This can be set to auto or to a specific mode supported by your router.
- Roaming Aggressiveness: This setting controls how aggressively your laptop searches for the best Wi-Fi signal. Experiment with lower settings if you're experiencing frequent disconnections.
- Firewall Interference: Your firewall (Windows Firewall or a third-party firewall) might be blocking your Wi-Fi connection. Temporarily disable your firewall to see if it resolves the issue. If it does, you'll need to configure your firewall to allow your Wi-Fi adapter to connect.
Hardware Considerations: Is It a Hardware Failure?
Although less common, hardware problems can cause Wi-Fi failures.
- Internal Antenna Issues: A damaged internal antenna can lead to weak or no Wi-Fi signal. If you're comfortable with it, you can open your laptop and inspect the antenna cables. Ensure they are securely connected to the Wi-Fi card.
- Failing Wi-Fi Card: In some cases, the Wi-Fi adapter itself might be faulty. If you suspect this, you might consider replacing it. This requires some technical skill, so consult your laptop's service manual or seek professional help.
- External Hardware Issues: Confirm that your router is functioning properly. Test the internet with other devices.
Specific Lenovo Laptop Model Issues: Addressing Common Problem Areas
Lenovo laptops, like any brand, have specific vulnerabilities. Let's address a couple of common Lenovo-specific Wi-Fi issues.
- ThinkPad Models: Some ThinkPad models have a physical "Wireless Radio" switch on the side or the front of the machine. Double-check that this switch is turned on. Also, the "Fn + F5" key combination often controls the wireless radios. Ensure that Wi-Fi is enabled using this function.
- Legion Gaming Laptops: Some Legion models experience issues related to the Killer Wireless adapter. You might consider updating the Killer Wireless drivers or, in some situations, temporarily uninstalling the Killer Wireless software to see if it resolves the connectivity
