how to convert laptop to wifi hotspot windows 7

Title: How to Create a WiFi Hotspot with Windows 7
Channel: 1stepatatime
How to Create a WiFi Hotspot with Windows 7 by 1stepatatime
**Turn Your Windows 7 Laptop into a WiFi Hotspot: The SHOCKINGLY Easy Trick!**
Unleash the WiFi Genie: Transform Your Windows 7 Laptop into a Hotspot!
It's the digital age, and we're all tethered to the internet. But what happens when your main connection falters? Imagine this: You are miles away from your home network. Suddenly, you need internet access, and you have no WiFi! Then, a light bulb appears. Your trusty Windows 7 laptop comes to the rescue. It is an unsung hero, ready to share its internet connection.
The Hidden Power of Your Windows 7 Machine
Most people possess a laptop with hidden potential. It’s not just for spreadsheets. It's not just for streaming videos, either. Your Windows 7 laptop can become a powerful WiFi hotspot. It's unexpectedly simple, actually. Indeed, it’s a trick hidden in plain sight.
Setting the Stage: Preparing for WiFi Freedom
First, you need a working internet connection on your Windows 7 laptop. This could be through an Ethernet cable or a mobile broadband USB stick. Without an active internet source, this whole endeavor will be futile. Therefore, preparation is key. Make sure your laptop is fully updated. This provides security. It also ensures compatibility.
A Step-by-Step Guide to WiFi Liberation
Here’s the magic, the secret sauce. It’s not some complicated tech jargon. It's surprisingly user-friendly. Follow these steps:
Navigate to the Network and Sharing Center: Click the Start button. Then, select "Control Panel". Next, choose "Network and Internet". Finally, select "Network and Sharing Center".
Unleash the Wireless Network: At the left-hand side, you'll find the option "Change adapter settings." Click it. Here, you will see all your network adapters. One is your ethernet connection. The other is your WiFi connection.
The Critical Right-Click: Right-click the internet connection you are using. It is either an Ethernet or wireless connection. Then, select "Properties."
Sharing is Caring: In the properties window, select the "Sharing" tab. Tick the box that says, "Allow other network users to connect through this computer's Internet connection."
Choose Your Network: In the "Home networking connection" dropdown, you'll select the virtual WiFi connection that will be created. This will be your WiFi hotspot’s connection.
Get Ready to Connect: Click "OK". It might take a moment to set up. Your laptop is now a WiFi hotspot.
Securing Your New WiFi Fortress
Don’t forget security. It’s paramount. Go back to the Network and Sharing Center. Then, click "Set up a new connection or network." Choose "Set up a wireless ad hoc network". Follow the prompts. Create a strong password. This protects your connection from unwanted guests. Consider it like a digital lock.
Troubleshooting: Smooth Sailing Ahead
Sometimes things don't go perfectly. If you run into issues, don't panic. A lot of problems are easy to fix. Check your internet connection first. Ensure the Sharing feature is enabled. Are you entering the password correctly on your other devices? Restarting your laptop can often solve problems. Therefore, be patient. You can do this!
Beyond the Basics: Fine-Tuning Your Hotspot
You can customize your hotspot further. Navigate to the "Network and Sharing Center" again. Click "Change adapter settings". Right-click on the newly created "Microsoft Virtual WiFi Miniport Adapter". Select "Properties". Here, there are more advanced configurations. You can modify your network name. You can also change the security settings.
The Limitations: Knowing Your Boundaries
Keep in mind that a Windows 7 hotspot isn't perfect. It can drain your laptop's battery. It can also affect the speed of your internet connection. The number of devices you can connect is also limited. So, be mindful of these constraints. Ultimately, it’s an excellent solution for emergencies.
Conclusion: The Power is in Your Hands
So, there you have it. You've learned how to turn your Windows 7 laptop into a useful WiFi hotspot. It's a powerful tool, ready when you need it. It proves that old technology still has tricks up its sleeves. Therefore, embrace the freedom of a mobile internet connection. Now, go forth and share the WiFi love! You have all you need.
Laptop as Desktop WiFi: The SHOCKINGLY Easy Trick!Turn Your Windows 7 Laptop into a WiFi Hotspot: The SHOCKINGLY Easy Trick!
Ever been stranded with a slow internet connection, or worse, no internet at all? Picture this: You're at a remote cabin, relying on that tiny Wi-Fi stick for your laptop, and suddenly, poof – signal lost. Or maybe you're trying to share your laptop's internet with your phone, but the old "tethering" option seems as confusing as quantum physics. We've all been there, right? Well, fret no more! Today, we're diving deep into a ridiculously simple trick that lets you turn your Windows 7 laptop into a fully functioning Wi-Fi hotspot. Prepare to be amazed! This isn't some tech-speak mumbo jumbo; it's genuinely easy, and we’ll walk you through it step-by-step.
1. Why Bother? The Real-World Benefits of a Personal Hotspot
Before we dive into the "how," let's quickly talk about the "why." Why should you even care about turning your Windows 7 laptop into a hotspot? Think about it:
- Shared Internet: Ever wanted to connect multiple devices – your phone, tablet, maybe even a friend's laptop – to the internet using just your laptop's connection? This is your solution.
- Emergency Backup: Got a flaky home Wi-Fi? Your laptop can become your lifeline. It’s like having a spare tire for your internet connection, always ready when things go south.
- Travel Companion: Staying in a hotel with terrible Wi-Fi? Your laptop hotspot to the rescue! It's like bringing your own personal internet cloud wherever you go.
- Cost Savings: Avoid paying for multiple internet connections or expensive mobile data plans by sharing your existing laptop's internet. It is always a plus.
The benefits extend further than just convenience; they provide a crucial layer of flexibility. Knowing how to do this is a valuable skill in an increasingly connected world.
2. What You'll Need: A Quick Checklist Before We Begin
Alright, let's make sure you're fully prepared for this magical transformation. Here's what you'll need:
- A Windows 7 Laptop: Obviously!
- An Internet Connection: This can be anything from a wired Ethernet connection (the kind with the cable that plugs into your wall) to a Wi-Fi connection you're already using.
- Patience (Just a Little Bit): The whole process is incredibly easy, but a dash of patience never hurts, right?
That's it! No special software, no complicated hardware. Just your laptop and an internet source. Ready to start?
3. The Secret Weapon: The Hosted Network Feature
Windows 7 actually comes with a built-in feature called a "Hosted Network." This is the cornerstone of our entire process. It's like a hidden superpower waiting to be unleashed. Think of it as a built-in Wi-Fi emitter hiding in plain sight. We’ll simply activate and configure it.
4. Step-by-Step Guide: Unleashing Your Inner Hotspot Genius
Here's the simple method to unleash the Hosted Network and create your hotspot:
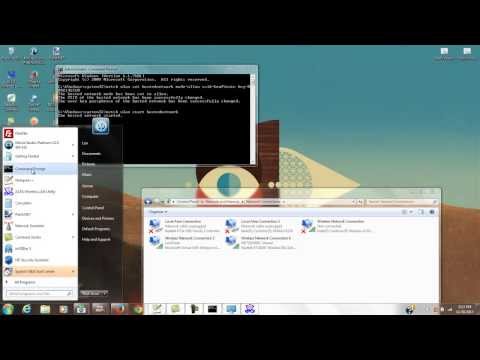
- Step 1: Opening the Command Prompt (As Administrator): Click the Start button, type "cmd" into the search bar, and right-click on "Command Prompt" in the search results. Choose "Run as administrator." This is crucial!
- Step 2: Activating the Hosted Network: In the Command Prompt window, type the following command and press Enter:
netsh wlan set hostednetwork mode=allow ssid="YourHotspotName" key="YourPassword"- Replace
"YourHotspotName"with the name you want your Wi-Fi network to have (e.g., "MyLaptopHotspot"). Make it memorable, but secure! - Replace
"YourPassword"with a strong password you’ll use to connect to your network. Think of it as your digital security gate.
- Replace
- Step 3: Starting the Hosted Network: Now, type the following command and press Enter:
netsh wlan start hostednetworkYou should receive a message confirming that the hosted network started. - Step 4: Sharing Your Internet Connection: This is where the magic truly happens.
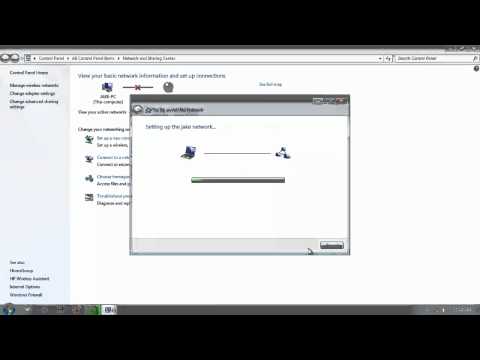
- Open the "Network and Sharing Center" (search for it in the Start menu).
- Click on "Change adapter settings" (usually on the left side).
- You'll see a list of your network connections. Right-click on the connection you're using to access the internet (e.g., your Wi-Fi adapter or your Ethernet connection).
- Select "Properties."
- Click on the "Sharing" tab.
- Check the box that says "Allow other network users to connect through this computer's Internet connection."
- From the "Home networking connection" dropdown menu, select your hosted network (it’ll likely have a name like "Wireless Network Connection 2").
- Click "OK."
- Step 5: Connecting Your Devices: Now, grab your phone, tablet, or other device and search for Wi-Fi networks. You should see your "YourHotspotName" listed. Enter your password, and voila! You’re connected!
It is as simple as that!
5. Troubleshooting: When Things Go a Little Awry
Sometimes, things don't go perfectly the first time. Don't worry; it happens! Here are some common troubleshooting tips:
- "The Hosted Network Failed to Start": Double-check your administrator privileges (did you run Command Prompt as admin?). Ensure your wireless adapter drivers are up to date. Sometimes, a simple reboot of your laptop works wonders.
- Devices Can't Connect: Make sure you entered the correct password! Also, check your sharing settings (step 4 in the guide above). Sometimes, network conflicts can arise; restarting your router and laptop helps.
- Slow Internet: The speed of your hotspot will depend on the speed of your laptop’s internet connection. If your laptop is getting slow internet, your hotspot will be slow, too.
6. The Command Prompt Chronicles: Deciphering the Language of Tech
We used the Command Prompt, which might seem intimidating initially. However, the commands are simple. The Command Prompt is the gateway to many of Windows 7's hidden capabilities.
7. Customization: Fine-Tuning Your Hotspot Settings
While the default settings work great, you can further customize your hotspot. You can change the network name and password anytime by repeating the netsh wlan set hostednetwork command.
8. Security First: Protecting Your Digital Fortress
Never underestimate the importance of security. Always use a strong password for your hotspot. Consider using WPA2 encryption for added security. Never share your password with untrusted individuals.
9. The Great Disconnect: Stopping Your Hotspot When You're Done
When you're finished using your hotspot, you need to stop it. Here's how:
- Stopping the Hosted Network: Open Command Prompt (as administrator) and type:
netsh wlan stop hostednetwork - Disabling Internet Sharing: Revisit the Network and Sharing Center, go to "Change adapter settings," and uncheck the "Allow other network users to connect through this computer's Internet connection" box in the properties of your original internet connection.
10. The Advantages Over Third-Party Hotspot Software
While third-party hotspot software exists, using the built-in Hosted Network has several advantages:
- No Extra Software: You don’t need to install anything extra, keeping your system clean and streamlined.
- Resource Efficiency: It utilizes system resources efficiently, so your laptop can continue to perform well.
- Compatibility: Being a native Windows feature, it offers superior compatibility and integration, making it less prone to conflicts with other software or drivers.
11. Beyond Windows 7: Hotspotting on Newer Operating Systems
Although this guide is specifically for Windows 7, the concept of creating a hotspot remains relevant. Later, Windows operating systems have similar features or built-in hotspot capabilities. The command structure and steps will vary, but the fundamental idea is the same.
12. Mobile vs. Laptop Hotspots: Which Reigns Supreme?
While your laptop hotspot provides a versatile solution, it’s important to understand its differences from mobile hotspots (like those on your phone):
- Power Consumption: Laptops consume more power than mobile phones. Be sure that your laptop is charged, or have access to power.
- Mobility: Mobile hotspots are incredibly portable. However, the laptop is often stationary.
- Setup Time: Setting up a laptop hotspot can take a few minutes, but mobile hotspots are instantly accessible.
- Battery Life: Laptops offer greater battery life for hotspot functionality than phones, especially if they have power-saving features.
13. Hidden Benefits: More Than Just Internet Sharing
Creating a hotspot opens up a whole world of possibilities beyond just sharing internet:
- File Sharing: You can quickly share files between devices on your hotspot network.
- Remote Access: You can use remote desktop applications to access your laptop from other
How to turn your Windows 7810 Laptop or PC into a WiFi Hotspot UpdatedHD

By iTech How to turn your Windows 7810 Laptop or PC into a WiFi Hotspot UpdatedHD by iTech
Turn Your Windows 7 Laptop into a WiFi Hotspot 2
By AvoidErrors Turn Your Windows 7 Laptop into a WiFi Hotspot 2 by AvoidErrors
Turn your Windows 7 Laptop into a Wi-Fi Hotspot or Repeater
By Len Farneth Turn your Windows 7 Laptop into a Wi-Fi Hotspot or Repeater by Len Farneth
Title: Create a laptop WiFi hotspot in under 30 seconds Windows 7
Channel: jacobspeeds
Create a laptop WiFi hotspot in under 30 seconds Windows 7 by jacobspeeds
Laptop Wifi Hotspot
Turn Your Windows 7 Laptop into a WiFi Hotspot: The SHOCKINGLY Easy Trick!
Do you find yourself tethered to your home or office WiFi, yearning for the freedom of internet connectivity on the go? Perhaps you have multiple devices that require internet access but only one available WiFi connection? Or maybe you're simply tired of paying extra for mobile hotspots when you already have a perfectly capable internet-connected laptop at your disposal? If so, then prepare to be amazed. We're about to unveil a remarkably simple method for transforming your Windows 7 laptop into a fully functional WiFi hotspot, giving you internet access wherever you roam. Forget complicated configurations and technical jargon – this is a straightforward process that even the most tech-averse individual can master.
Unveiling the Power: Why Your Windows 7 Laptop is the Perfect WiFi Hub
Before diving into the how-to, let's appreciate the inherent potential of your Windows 7 laptop. It's not just a device for browsing the web or composing documents; it's a powerful, versatile machine capable of much more. Your laptop's built-in wireless adapter, if functioning correctly, acts as the gateway to the internet, making it the ideal candidate for creating a WiFi hotspot. The software is already there; all you need to do is unlock its capability. This eliminates the need for expensive external devices or convoluted setup procedures. Think of it as a built-in, readily available solution that can be deployed in minutes.
Pre-Flight Check: Ensuring Your Laptop Is Ready for Takeoff
Before we begin the transformation, a quick inspection is in order. Ensure your laptop meets the following prerequisites:
- Operating System: This guide is specifically tailored for Windows 7. While the principles are similar on other operating systems, the exact steps may vary.
- Wireless Adapter: Your laptop must have a working wireless network adapter. This is the component that enables your laptop to "speak" to WiFi networks. Most laptops come equipped with this already. If you are unsure, check your device manager (search for "Device Manager" in the Start Menu). Look for a category called "Network adapters."
- Internet Connection: Your laptop requires access to the internet. This could be through a wired Ethernet connection, a pre-existing WiFi network, or even a 3G/4G/5G mobile broadband connection via a USB modem.
- Administrative Privileges: You must have administrator rights on your Windows 7 laptop in order to effect this change.
The Command Prompt Command That Creates WiFi Magic
The magic happens within Windows 7’s command prompt, a powerful tool hidden in plain sight. We'll use a simple but highly effective command to orchestrate the creation of your hotspot. Do not be intimidated; we will guide you through the steps.
Step 1: Launching the Command Prompt with Elevated Privileges
The first step is to open the command prompt with administrator privileges. This grants you the necessary permissions to modify your laptop's network settings. Here's how:
- Click the "Start" button (the Windows logo).
- In the search bar, type "cmd."
- Right-click on "cmd.exe" (or "Command Prompt") in the search results.
- Select "Run as administrator." If prompted by User Account Control (UAC), click "Yes."
This ensures the command prompt runs with the elevated privileges needed to carry out our next steps.
Step 2: The Core Command: Setting Up the Hosted Network
Now comes the pivotal moment: entering the command that activates the hotspot functionality. In the command prompt window, type the following command and press Enter:
netsh wlan set hostednetwork mode=allow ssid="YourHotspotName" key="YourPassword123"
Replace "YourHotspotName" with the name you want to give your WiFi hotspot (e.g., "MyLaptopWiFi"). Ensure you create a unique name that helps you easily identify your hotspot in a list of available networks.
Replace "YourPassword123" with a secure password of your choosing. Choose a strong password that is at least 8 characters long, using a combination of uppercase and lowercase letters, numbers, and symbols. This is critical for securing your new hotspot.
Explanation of the Command:
netsh wlan: This invokes the Windows Wireless Local Area Network (WLAN) utility.set hostednetwork: This instructs the utility to configure the hosted network feature.mode=allow: This enables the hosted network.ssid="YourHotspotName": This sets the Service Set Identifier (SSID), which is the name of your WiFi network (the name that will appear on other devices).key="YourPassword123": This sets the password for your WiFi network.
Carefully review the entered command to ensure accuracy before proceeding. A typo can prevent the hotspot from working correctly.
Step 3: Activating the Hosted Network
After successfully entering the set command, you need to start the hosted network. Type the following command into the command prompt and press Enter:
netsh wlan start hostednetwork
This simple command initiates the WiFi hotspot.
Step 4: Sharing Your Internet Connection for Seamless Connectivity
The hotspot is now set up, but we must share your internet connection with other devices. Here's how:
- Open the "Network and Sharing Center." You can find this by clicking the network icon in your system tray (located in the bottom-right corner of your screen) and selecting "Open Network and Sharing Center." Alternatively, go to the Control Panel's "Network and Internet" section.
- Click on "Change adapter settings" in the left-hand pane. This will open a window displaying your network adapters.
- Identify the network adapter that is currently connected to the internet (e.g., your wired Ethernet connection or your primary WiFi connection).
- Right-click on this adapter and select "Properties."
- In the "Sharing" tab, check the box that says, "Allow other network users to connect through this computer's internet connection."
- In the "Home network connection" dropdown menu, select your "Wireless Network Connection" which is the name of the virtual adapter created by the hosted network. This is usually named something similar to "Local Area Connection*."
- Click "OK" to save the changes.
This crucial step tells your laptop to share its internet connection with devices connected to the newly created WiFi hotspot. Without this, your hotspot would not be able to provide internet access.
Step 5: Connecting Your Devices and Enjoying the Benefits
With the hotspot now operational, the sharing configured, and the connection established, you can now connect your devices: smartphones, tablets, and other laptops.
- On the device you want to connect, go to the WiFi settings.
- Locate your hotspot's name (the SSID you chose) from the list of available networks.
- Enter your chosen password when prompted.
- Once connected, test the internet connection to confirm it is functioning.
Congratulations! You now have a fully functional WiFi hotspot running on your Windows 7 laptop. You have successfully transformed your laptop into a portable internet access point.
Troubleshooting Common Hiccups and Ensuring a Smooth Experience
While this process is generally straightforward, you may encounter minor issues. Here are some common troubleshooting tips:
- "The hosted network could not be started" Error: This usually indicates a driver issue or an issue with the wireless network adapter. Ensure your network adapter drivers are up-to-date. You can update them through the Device Manager. Right-click on your wireless network adapter and select "Update driver software." Also, ensure your wireless network adapter is enabled.
- "Unable to share the internet connection": Double-check that you correctly enabled internet connection sharing in the network adapter properties. Also, check your Windows Firewall settings. Occasionally, the firewall may block connections. You might need to create a rule to allow traffic on the appropriate ports (e.g., TCP port 80 and 443).
- Slow Internet Speeds: The speed of your hotspot depends on the speed of your laptop's internet connection. If you are connected via WiFi, the signal strength and distance to your router will also affect the hotspot's speed.
- Connectivity issues with specific devices: Certain devices may have specific issues. Ensure that your hotspot's security settings are compatible with the devices (e.g., WPA2 security).
Going Beyond the Basics: Advanced Customization and Fine-Tuning
While the core process is simple, you can further customize your WiFi hotspot.
- Changing the Hotspot Name and Password: You can change the SSID and password at any time by re-entering the
netsh wlan set hostednetworkcommand with the new values. Remember to restart the hosted network after making these changes. - Stopping the Hosted Network: To disable the hotspot, type
netsh wlan stop hostednetworkin the command prompt and press Enter. - Checking the Status: You can check the status of your hosted network by typing
netsh wlan show hostednetworkin the command prompt and pressing Enter. This will display information such as the SSID, the key (password status), and the number of connected clients.
Conclusion: Unleash the Power of Portable WiFi
You now possess the knowledge and skills to transform your Windows 7
