after windows 7 update dell laptop has no wifi

Title: Fix Dell Laptop Wi-Fi is Not Working Problem in Windows 1087 2025
Channel: FIXsage
Fix Dell Laptop Wi-Fi is Not Working Problem in Windows 1087 2025 by FIXsage
WiFi GONE After Windows 7 Update? (Dell Laptop Fix Inside!)
My WiFi's Vanished! Windows 7 Update and Dell Disasters
Hey there, fellow tech travelers! Ever find yourself staring blankly at your laptop, desperately seeking a WiFi signal that simply isn't there? Frustrating, right? Well, if you're a Dell user and running Windows 7, you might have stumbled upon a particularly nasty gremlin – a missing WiFi connection after a recent update. Trust me, I understand the panic! It’s like your digital lifeline has been cut.
The Ghost in the Machine: Unmasking the WiFi Wraith
So, you updated Windows 7, and poof! Gone is your precious internet. Before you start cursing the tech gods, take a deep breath. This isn't necessarily a sign of a hardware failure. In fact, the culprit is often a software glitch. Often a driver issue. The Windows 7 update, in its infinite wisdom—sometimes—can clash with the wireless network adapter drivers. This is a common problem. Consequently, your laptop might be broadcasting radio silence.
Decoding the Driver Dilemma: Your First Line of Defense
Therefore, let’s get this WiFi back online, shall we? It all starts with the drivers. Firstly, we need to locate the specific network adapter driver for your Dell laptop model. You can usually find this information on Dell's support website.
Navigate to Dell's website. Then, type in your service tag or laptop model number. Next, find the "Drivers & Downloads" section. Now, search for the "Network" category. You should see the driver specifically designed for your wireless adapter.
The Manual Reboot: A Digital Reset
After that, try a simple restart. Sometimes, a simple reboot does wonders. Restart your computer to see if this resolves the issue. If the WiFi magically reappears, then excellent! Consider yourself lucky. But if it doesn't, don’t worry. We have more tricks up our sleeve.
Driver Update Time: Banishing the Bugs
If a reboot didn't work, we should move on and update those drivers. This is where things get a bit more technical, but trust me, it's manageable. Download the latest driver directly from Dell's website. Once downloaded, locate the downloaded file on your computer.
Now, double-click the downloaded setup file. Follow the on-screen instructions to install the new driver. Once the installation is complete, restart your Dell laptop again. Crossing our fingers, the WiFi should be back!
Troubleshooting Tactics: When the Signal Fails
Still no WiFi? Don’t despair! We have more steps available. Maybe the driver isn’t the problem. It's time to investigate other common culprits. Let's troubleshoot a bit further.
- Verify the Wireless Switch: Many Dell laptops have a physical switch. It controls the wireless radio. Ensure that it’s turned ON.
- Examine WiFi Settings: Go to your Network and Sharing Center. Double-check that your WiFi adapter is enabled.
- Run the Troubleshooter: Windows 7 comes with a built-in troubleshooter. It helps diagnose network issues. Access it through your Control Panel. Then, select "Network and Internet". Finally, click on "Network and Sharing Center" to begin.
- Check for Hardware Conflicts: Open Device Manager. Look for yellow exclamation marks. These indicate driver conflicts.
Beyond the Dell: Broader Solutions
Even though this guide focuses on Dell laptops and Windows 7 updates, these troubleshooting steps can be applied to other laptops and operating systems. Keep in mind that the exact locations of settings might vary. However, the core principles remain the same.
The Final Word
Dealing with WiFi woes is never fun. It can be incredibly frustrating. But hopefully, by following these steps, you'll be back online. Remember, it's often a fixable software issue. So, don’t give up! With a little patience and persistence, you can conquer this digital challenge. Now, go forth and enjoy that sweet, sweet internet!
Laptop WiFi SOS! Connect Instantly (Secret Trick Inside!)WiFi GONE After Windows 7 Update? (Dell Laptop Fix Inside!)
We've all been there. You’re cruising along, enjoying some online bliss, maybe streaming your favorite show, or finally catching up with friends and family. Suddenly, poof—the internet vanishes! You glance down at your laptop, and the dreaded WiFi icon is sporting that telltale red "X." Panic starts to set in. And if you're rocking an older Dell laptop running Windows 7, the culprit might just be that pesky update you installed. But don't throw your laptop out the window just yet! We're here to walk you through the WiFi wilderness, hand in hand, and get you back online.
1. The Sudden Disappearance: Understanding the WiFi Woes
It's frustrating, isn't it? One minute, you’re connected, the next, silence. This isn't just a minor inconvenience; it’s like the power grid has been cut to your digital home. Why does this happen, and why is Windows 7, in particular, seemingly prone to these disappearing act dramas? Well, updates, while designed to improve your system, can sometimes play havoc with your drivers – those essential little software snippets that allow your hardware (like your WiFi adapter) to communicate with your operating system. Think of it like this: you’ve got a perfectly good conductor (your WiFi adapter) ready to make some beautiful music (internet connection), but the new update has replaced the sheet music with something completely unreadable.
2. Dell, Windows 7, and the Compatibility Conundrum
Dell laptops, specifically those from the era when Windows 7 reigned supreme, often have a particular set of challenges. Drivers, optimized for an older OS, might not play nicely with the latest updates. This can lead to conflicts and, ultimately, a disabled WiFi connection. It’s like trying to fit a square peg into a round hole – something's gotta give, and in this case, it’s often your internet access. We have to remember, technology marches forward, and sometimes, older systems get left behind. Think of it like a classic car: beautiful and reliable in its day, but occasionally needs a little extra TLC to keep it running smoothly in today's world.
3. First Steps: Troubleshooting 101 - The Obvious Checks
Before we dive into the more technical fixes, let's start with the basics. Sometimes, the answer is right in front of your nose, lurking in plain sight.
- Check the Physical Switch: Many laptops have a physical switch (often on the side or front) to enable or disable WiFi. Is it switched to "on"? Yes, we've all been there!
- Is the Airplane Mode Activated? This is another common blunder. Airplane mode disables all wireless connections, including WiFi. Check the system tray (the lower right corner of your screen) for the airplane mode icon.
- Restart Your Laptop: This is the tech equivalent of "have you tried turning it off and on again?" It's amazing how often this simple step works. A reboot can often clear up temporary glitches and get things running smoothly again.
- Check Your Router: Is the router working? Is it connected to the internet? Try restarting it as well. Sometimes the problem isn’t with your laptop at all, but with your home network setup.
4. The Driver Dilemma: Identifying the Culprit
If the above steps haven't worked, it's time to delve into the world of drivers. Here’s how to identify if a driver issue is to blame:
- Access Device Manager: Click on the Start button, search for "Device Manager," and open it. This is where your computer keeps tabs on all its hardware.
- Look for Network Adapters: Expand the "Network adapters" section. Here, you'll see your WiFi adapter, often named something like "Wireless Network Adapter" or similar.
- Check for Warning Symbols: Does your WiFi adapter have a yellow exclamation mark or a red "X" next to it? These are telltale signs of a driver problem.
5. Updating Your WiFi Driver: Your First Line of Defense
Now, the moment of truth. We’re going to attempt to update your WiFi driver. This is where we tackle the sheet music issue, replacing the garbled mess with something the conductor (your adapter) can understand.
- Right-Click and Update: Right-click on your WiFi adapter in Device Manager and select "Update driver."
- Choose Automatic Search: Select "Search automatically for drivers." Windows will search for the latest driver software online.
- Hope for the Best: If Windows finds an updated driver, install it and restart your laptop. This might be all you need!
6. Manual Driver Hunting: A Deeper Dive
Sometimes, Windows falls short. It cannot find the cure-all driver that you need. If the automatic search fails, we'll have to get our hands a bit dirtier.
- Find Your Dell Model Number: Look for a sticker on your laptop or in the battery compartment. It might say "Model" or "Service Tag."
- Visit the Dell Support Website: Go to Dell's official support website (support.dell.com).
- Enter Your Model or Service Tag: Enter your laptop's model number or service tag. Dell will then provide you with drivers specifically for your laptop.
- Download the WiFi Driver: Navigate to the "Drivers & Downloads" section and look for the WiFi driver (it might also be listed as a "Wireless Network Adapter" driver). Download the latest version, specifically the one intended for Windows 7, or the closest compatible version.
- Install the Driver: Run the downloaded file and follow the on-screen instructions to install the driver. Restart your laptop, and cross your fingers!
7. Roll Back the Driver: Undo the Update's Damage
Sometimes, an update is the problem itself. If you recently updated your WiFi driver and the problems started immediately afterwards, we can roll back to the previous version. Think of it as hitting the "undo" button.
- Access Device Manager: As before, go to Device Manager.
- Right-Click and Properties.: Right-click the WiFi adapter, and select "Properties."
- Go to the Driver Tab: Click the "Driver" tab.
- Roll Back to a Previous Version: If the "Roll Back Driver" button is available (not grayed out), click it. Follow the prompts, and restart your laptop.
8. Troubleshooting with the Network Troubleshooter
Windows has a built-in tool specifically designed to help with network issues. It’s like having a mini-tech support specialist right inside your laptop.
- Open Network and Sharing Center: Search for "Network and Sharing Center" in the Start Menu.
- Click on "Troubleshoot Problems": In the window, click on "Change adapter settings," and then look for the "Troubleshoot problems" option.
- Run the Troubleshooter: Follow the on-screen instructions. It will scan your network connections and attempt to identify and fix any issues.
9. Advanced Steps: Reinstalling the WiFi Adapter
If all else fails, you might need to reinstall the driver. This is a more drastic step, but sometimes it's necessary, like restarting the whole orchestra from scratch.
- Uninstall the Driver: In Device Manager, right-click your WiFi adapter and select "Uninstall device." Check the "Delete the driver software for this device" box if it's available.
- Restart Your Laptop: Windows will attempt to reinstall the driver automatically.
- If Not Reinstalled, Reinstall Manually: If Windows doesn't automatically reinstall the driver, use the Dell website driver download process outlined above.
10. Dealing with Conflicting Software: A Software Conflict.
Sometimes, other software on your computer can interfere with your WiFi connection. Antivirus programs, firewalls, and VPNs can all be guilty. Try temporarily disabling them to see if they’re the problem. Think of it as quieting the noisy audience so the music can shine.
- Disable Antivirus/Firewall: Temporarily disable your antivirus or firewall software (make sure you know how to re-enable it later!).
- Disconnect VPN: If you use a VPN, disconnect.
- Test, Test, Test: See if your WiFi connection returns. If so, you know one of these programs is the problem. Reconfigure your software settings, or consider updating programs.
11. Checking for Malware: An Invisible Enemy
Malware can wreak havoc on your system, including your WiFi connection. It's like a saboteur trying to disrupt the concert.
- Run a Full System Scan: Use your antivirus software to perform a full system scan.
- Remove Any Detected Threats: If malware is found, follow your antivirus software's instructions to remove it.
12. The Physical Assessment: Hardware Hiccups
While usually a software issue, sometimes the problem is physical. The WiFi adapter in your Dell laptop has experienced a physical failure.
- Check The Adapter: If all software fixes fail, you may have to bring the laptop to a technician.
13. The Power Cycle: A Final Reset
Sometimes, all you need is a fresh start. Power cycling your laptop (and your router) can often clear out temporary glitches.
- **
Not connected no connections are available windows 7 laptop

By IT Magics Not connected no connections are available windows 7 laptop by IT Magics
Dell window7 wifi network connect problem solve trick shortssubs

By tech 24 Dell window7 wifi network connect problem solve trick shortssubs by tech 24
Wireless Network Connection Enabled but Not connected Fix Windows 7
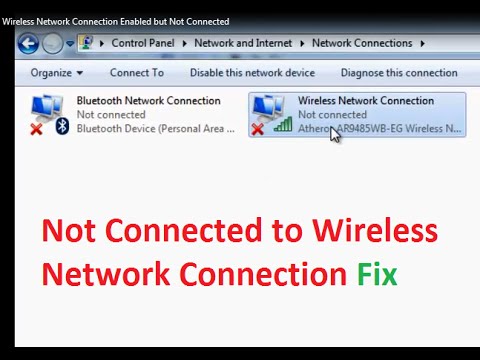
By troubleshooterrors Wireless Network Connection Enabled but Not connected Fix Windows 7 by troubleshooterrors

Title: Wifi Not Working in Windows 7 Short Cut Key for Wifi OnOffmacnitesh2024shortvirulshortsWifi
Channel: Mac Nitesh
Wifi Not Working in Windows 7 Short Cut Key for Wifi OnOffmacnitesh2024shortvirulshortsWifi by Mac Nitesh
My Laptop Work
WiFi GONE After Windows 7 Update? (Dell Laptop Fix Inside!)
It’s a scenario that’s enough to induce digital despair: You click the "Update" button for your Windows 7 machine, anticipating a seamless experience, only to be met with a perplexing absence of WiFi connectivity. The familiar bars that once signified a strong wireless signal vanish, replaced by a dreaded "Limited Connectivity" message, or worse, nothing at all. For Dell laptop users, this particular predicament can be especially frustrating, as the brand's widespread popularity makes it a common target for update-related malfunctions. But take heart. We've navigated this treacherous terrain countless times, and we're here to guide you through the recovery process, offering a definitive solution to restore your Dell laptop’s WiFi functionality after a problematic Windows 7 update. Forget the frustration; let’s reclaim your internet access.
Identifying the Culprit: The Windows 7 Update's Hand in Your WiFi Woes
Before we delve into the fixes, it’s crucial to understand why a Windows 7 update can seemingly erase your WiFi. The underlying issue often centers around the drivers, the crucial software components that allow your operating system to communicate with your laptop’s wireless network adapter. An update, in its attempt to improve system performance or security, can sometimes introduce incompatible or corrupted drivers. This is akin to replacing a perfectly functional engine with one that doesn’t fit your car. Specifically, updates targeting the "Network adapters" section in the Windows Update process can inadvertently disrupt the proper functioning of your wireless network adapter, leading to dropped connections or a complete inability to detect WiFi networks. This is particularly poignant for older hardware configurations, where driver compatibility can be more precarious.
The specific updates that often cause problems include those pertaining to the network adapter itself, and also those encompassing general system stability updates that may inadvertently interfere with existing hardware configurations. Pinpointing the exact offending update can be challenging, but in the majority of cases, the most recent update installed prior to the WiFi outage is the primary suspect. We will guide you step by step to identify and resolve the problem.
Step-by-Step Diagnostics: Pinpointing the WiFi Issue
Before we commence the repair process, a basic diagnostic is essential. This initial assessment will illuminate the problem and confirm that the WiFi issue is, in fact, update-related. Begin by verifying your Network Adapter settings by the following:
Accessing the Device Manager: Right-click the "Computer" icon on your desktop (or search for "Device Manager" in the Start Menu). Select "Manage" and then click on "Device Manager". This is your central hub for managing and observing all the hardware components on your system.
Inspecting Network Adapters: In the Device Manager, expand the "Network adapters" section. Here, you should see an entry for your wireless network adapter (e.g., "Dell Wireless 1707 802.11b/g/n (2.4GHz)" or similar).
Checking for Errors: Look for any yellow exclamation marks or red crosses associated with your wireless adapter. These symbols are clear indicators of driver-related problems. A yellow exclamation mark signifies a problem, like a driver that's not functioning correctly. A red cross means the device is disabled or not connected properly.
Verifying Connection Status: If the network adapter appears to be present without any error indicators, right-click on the adapter and select "Properties". In the "General" section, check the "Device status". If you see a message such as "This device is not working properly because Windows cannot load the drivers required for this device," then you've likely identified the root cause.
Physical Inspection (Optional): Although less common, hardware failure is always a possibility. Ensure that your WiFi adapter switch (often located on the side or front of your laptop) is turned on. Also, check the physical condition of your laptop’s wireless card (if you're comfortable opening your laptop; otherwise, seek professional advice).
The Dell Laptop WiFi Fix: Rolling Back the Culprit Update
The most effective solution to restore your WiFi functionality is usually to roll back the problematic update. This action reverts your system to a state preceding the WiFi failure, allowing your wireless adapter to function as intended. There are several methods to achieve this:
System Restore: This is often the first and most effective method.
- Accessing System Restore: Type "System Restore" into the Start Menu search bar and select "Create a restore point." In the window that opens, click on "System Restore."
- Choosing a Restore Point: The System Restore wizard will show you a list of restore points. Select a restore point created before the Windows 7 update that caused the WiFi issue. If multiple restore points exist, choose the one closest in time to the update.
- Confirming and Restoring: Follow the on-screen instructions to confirm your selection and begin the restore process. The process may take some time, and your computer will likely restart.
- Verifying WiFi Restoration: After the system restarts, check your WiFi connection. If successful, your internet connection should be restored.
Uninstalling the Problematic Update: If System Restore is unavailable or ineffective, you can manually uninstall the update that caused the issue.
- Accessing Installed Updates: In the Control Panel, go to "Programs" and select "View installed updates."
- Identifying the Recent Update: Sort the updates by "Installed on" to identify the most recent updates.
- Uninstalling the Update: Right-click on the suspect update and select "Uninstall." Follow the prompts to complete the process, and restart your computer.
- Testing the WiFi Connection: After the restart, verify if your WiFi has been restored.
Driver Rollback in Device Manager: Another option involves rolling back the driver of your wireless network adapter.
- Accessing Device Manager: Open Device Manager (as described earlier).
- Finding the Network Adapter: Expand the "Network adapters" section.
- Rolling Back the Driver: Right-click on your wireless network adapter and select "Properties."
- Navigating to the Driver Tab: Go to the "Driver" tab. You'll see options related to the driver.
- Rolling Back: If the "Roll Back Driver" option is available, click it to revert to the previous driver version. If the option is grayed out, it means there's no earlier driver version to revert to.
- Restarting: Restart your computer and check your WiFi connection.
Advanced Troubleshooting: Addressing Persistent WiFi Issues on Your Dell Laptop
If the methods above don’t deliver immediate relief, additional troubleshooting steps may be necessary.
Driver Updates (Manual Installation): Dell often releases specific driver updates for its products. While Windows Update handles this automatically, a manual installation can sometimes resolve the problem.
- Visiting the Dell Support Website: Go to the official Dell support website (www.dell.com).
- Entering Your Service Tag: Enter your Dell laptop’s service tag, which is typically found on a sticker on the bottom of the laptop or inside the battery compartment. This will take you to the product-specific support page.
- Downloading the Driver: Navigate to the "Drivers & Downloads" section, select "Network," and find the driver for your wireless network adapter. Download the correct driver for your specific model.
- Installing the Driver: Run the downloaded driver installation file and follow the on-screen prompts. Restart your computer to complete the process.
Network Adapter Reset: Resetting your network adapter settings can resolve conflicts.
- Accessing Network Connections: Open the Control Panel and go to "Network and Sharing Center."
- Changing Adapter Settings: Click on "Change adapter settings."
- Disabling and Enabling: Right-click on your wireless network adapter and select "Disable." Then, right-click again and select "Enable."
- Verifying Connection: Check your WiFi connection.
Firewall and Antivirus Interference: Although infrequent, firewall settings or antivirus software can sometimes block WiFi connections.
- Temporarily Disabling Firewall/Antivirus: Disable your firewall and antivirus software temporarily (ensure to reactivate them after testing).
- Testing WiFi: Check your WiFi connection after disabling these security programs.
- Adjusting Settings: If the WiFi works, you'll need to adjust the settings of your firewall and antivirus to allow your wireless adapter to connect.
BIOS Update: In rare cases, an outdated BIOS (Basic Input/Output System) can create hardware incompatibility issues. Updating your BIOS is a more advanced step.
- Accessing the Dell Support Website: As mentioned above, go to the official Dell support website (www.dell.com).
- Finding BIOS Updates: Navigate to the "Drivers & Downloads" section, and locate the BIOS update for your specific Dell laptop model.
- Following Instructions Carefully: Follow the instructions meticulously. BIOS updates carry a minor risk, so it's crucial to follow the provided guidelines precisely.
Preventative Measures: Safeguarding Your Dell Laptop's WiFi Performance
Once you've re-established your WiFi connection, consider the following to minimize the
