connect 2 laptops with wifi

Title: Transfer Files Between Two Laptops over Wi-Fi
Channel: Techy Druid
Transfer Files Between Two Laptops over Wi-Fi by Techy Druid
connect 2 laptops with wifi, connect two computers with wifi windows 10, can i connect two laptops with wifi, connect two laptops using wifi windows 10, how to connect two laptops using wifi, can i connect my laptop to two wifi networks at the same time
Laptop to Laptop WiFi: The SHOCKINGLY Simple Trick You NEED!
Laptop to Laptop WiFi: Ditch the Cables – It's Easier Than You Think!
Ever felt tethered by a digital leash, stuck wrestling with USB cables and the dreaded "transfer pending" screen? You're not alone. We've all been there, wanting a quick and seamless way to share files, photos, or even entire folders between our laptops. Forget the frustration. Prepare to be amazed. Because, the solution is surprisingly simple. You can connect your laptops directly via WiFi.
Unlocking the Secret: The Magic of Ad-Hoc Networks
So, how does this wireless wizardry work? The secret lies in something called an "ad-hoc" network. It's like setting up your own private WiFi bubble, just for your laptops. Instead of connecting through a router, they talk directly to each other. Think of it as a personal bridge between your devices. It’s a straightforward and often-overlooked feature. Frankly, it's a lifesaver.
Setting the Stage: Preparing Your Laptops for Connection
Before you jump into the digital deep end, ensure both laptops are ready. First, confirm they have WiFi capabilities. This is usually a given these days. But it's always smart to double-check. Next, make sure both laptops are in the same physical space. Walls and distance can interfere with the connection. Finally, and this is important, remember the operating systems may have slightly different setups.
Step-by-Step: Creating Your Ad-Hoc Network on Windows (Let's Start)
Let's dive into the practical stuff. Windows users, follow these steps:
Open Network and Sharing Center: You can usually find this by searching in the Windows search bar.
Set up a new connection or network: Click on this option.
Choose "Manually connect to a wireless network": Select this option.
Fill in the details: Give your network a name (something memorable!). Choose WPA2-Personal for security, and create a strong password.
Start the network: Once you're done, the network is ready. Your first laptop is good to go.
Connecting the Second Laptop: Joining the Wireless Party
With your ad-hoc network created, it's time to connect your second laptop. The process is quite similar:
Look for the Network: On your second laptop, scan for available WiFi networks.
Find your network name: Locate the network you created in the previous steps.
Enter the password: Type in the password you set up.
Connect: Hit "Connect." Now, both laptops should be linked.
Sharing is Caring: Files, Folders, and the Open Road
Now for the fun part: data transfer! You can move files in several ways. Firstly, you can share folders. Specifically, select the folder you want to share. Right-click it and go to ‘properties.’ Then, click ‘sharing.’ Enable sharing. Choose who can access it. The second approach is the good old copy-paste method. Simply copy the files you need and paste them into a shared folder on the other laptop.
The Final Touch: Troubleshooting and Fine-Tuning
Sometimes, things don't go perfectly. Don't fret! Here are a few common troubleshooting tips:
Check the Firewalls: Make sure your firewalls aren't blocking the connection. Temporarily disabling them during testing can help.
Verify Network Settings: Ensure both laptops are on the same network.
Restart if needed: Occasionally, a simple restart of both laptops can work wonders.
Password Issues: Double-check the password you're entering. Make sure there are no typos.
Beyond the Basics: Exploring Further Possibilities
This method is adaptable, too. You could use it to play games with others who are nearby. Moreover, it's applicable for printing. You can find tutorials online that go into far greater detail.
Conclusion: Embracing the Efficiency of Laptop-to-Laptop WiFi
So there you have it! A straightforward guide to connecting your laptops wirelessly. It's a convenient and efficient way to share files. It’s simple to set up. You can have two laptops linked in a short amount of time. Say goodbye to cable chaos. Embrace the freedom of laptop-to-laptop WiFi. Now, go forth and share!
WiFi Nightmare: Why Your Laptop's Offline & How to Fix It FAST!Laptop to Laptop WiFi: The SHOCKINGLY Simple Trick You NEED!
Hey there, tech-savvy pals! Ever been in a situation where you desperately needed to share files, or maybe even access the internet, but the Wi-Fi was playing hide-and-seek, and a cable was nowhere to be found? I know the feeling – it's like being stranded on a digital desert island! But guess what? There's a ridiculously easy trick to connect your laptops directly to each other using Wi-Fi, and it’s probably way simpler than you imagine. We're talking about setting up a direct wireless connection, effectively turning one laptop into a makeshift Wi-Fi hotspot, and the other into a happy recipient.
Let's ditch the frustration and dive into how to make this work!
1. The Unveiling: Why This Trick is a Game-Changer
Think of this as your digital Swiss Army Knife. This method is perfect for those times when:
- You're in a pinch: No Wi-Fi? No problem! You can still transfer files, access your shared folders, or even try and get online (more on that later!).
- You need speed: Direct connection often beats the sluggishness of a shared network, especially when dealing with large files. Imagine trying to send a massive video file to your colleague. This method can be a speed demon!
- You crave privacy: Sometimes, you don't want to connect to a public Wi-Fi. With this method, your connection is as personal as your favorite coffee mug.
2. Setting the Stage: What You'll Need (Hint: Almost Nothing!)
The beauty of this trick? You probably already have everything you need!
- Two laptops: Obviously! They need to have Wi-Fi cards, which is practically standard these days.
- A pinch of patience: Things don't always work perfectly the first time, so be ready to tweak a few settings if necessary.
- A sense of adventure: We're about to do something cool, so let’s embrace the excitement!
3. Windows Wizardry: Creating the Ad-Hoc Network on a Windows Laptop
Alright, Windows users, let's get down to business. This part requires a few clicks, but trust me, it's a breeze.
- Step 1: Open Network and Sharing Center: Go to your Windows search bar (the little magnifying glass) and type "Network and Sharing Center." Click on it.
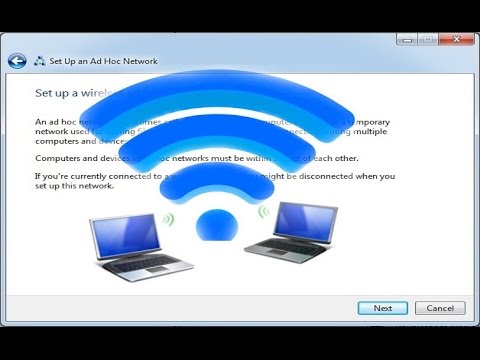
- Step 2: Set Up a New Connection or Network: In the Network and Sharing Center window, click on "Set up a new connection or network."
- Step 3: Choose "Set up a wireless ad-hoc network": Select the option that says, "Set up a wireless ad-hoc network." Even if that seems outdated, it is still a solid route to using Wi-Fi.
- Step 4: Give it a Name and a Password: Give your network a catchy name (like "MyLaptopNetwork") and create a strong password. It’s your own little digital fortress!
- Step 5: Share the Connection (Optional): If you want to share your laptop's existing internet connection with the other laptop, check the box that says "Share this connection." Note: not all internet connections will work.
4. Mac Mavericks: Joining the Party on a Mac Laptop
Mac users, follow these steps:
- Step 1: Open System Preferences: Click on the Apple logo in the top-left corner of your screen and select "System Preferences."
- Step 2: Select "Sharing": Click on the "Sharing" icon.
- Step 3: Choose "Internet Sharing": In the left-hand panel, select "Internet Sharing."
- Step 4: Share your Connection From: Select the connection you want to share (usually your Wi-Fi) from the dropdown menu.
- Step 5: Share to computers using: Check the box next to "Wi-Fi." Click on "Wi-Fi Options…" to set a network name and a password.
- Step 6: Start Sharing: Check the box next to "Internet Sharing" to activate the feature.
5. Connecting the Dots: Joining the Ad-Hoc Network on the Second Laptop
Now that you've got the network set up, it's time to connect the second laptop.
- Windows: Click on the Wi-Fi icon in the system tray (usually in the bottom-right corner). Find your newly created network name (e.g., "MyLaptopNetwork") and click "Connect". Enter the password when prompted.
- Mac: Click on the Wi-Fi icon in the menu bar (top-right corner). Select your network name from the list and enter the password.
- Confirmation: Once connected, both laptops should indicate they are connected.
6. File Transfer Fiesta: Sharing Files Between Laptops
Now for the fun part – sharing!
Windows:
- Enable File Sharing: Right-click on the files or folders you want to share and select "Properties." Go to the "Sharing" tab, and click on "Share." Choose who to share with (usually "Everyone").
- Access Shared Files: On the second laptop, open File Explorer and type
\\<IP address of the first laptop>in the address bar (replace<IP address of the first laptop>with the IP address – you can find this by opening Command Prompt and typingipconfigon the first laptop). You should see the shared folders.
Mac:
- Enable File Sharing: Go to System Preferences > Sharing. Check the box next to "File Sharing." Select the folders you wish to share.
- Access Shared Files: On the second laptop, open Finder. In the "Shared" section of the sidebar, you should see the name of the first laptop. Click on it to connect and access the shared files.
7. Troubleshooting Tango: When Things Don't Go Smoothly
Not everything works perfectly initially.
- Can't See the Network? Double-check that the Wi-Fi is turned on on both laptops. Make sure you entered the network name and password correctly.
- Can't Access Shared Files? Check file-sharing settings. Ensure that firewalls aren't blocking the connection.
- Internet Not Working? Remember, this only works if the host laptop is sharing its internet connection.
8. The IP Address Enigma: Why It Matters
If you are having trouble communicating one laptop to the other because of the IP Address, you may have to find the local IP address.
- Windows Users: Open the Command Prompt (search "cmd"), type
ipconfig, and look for "IPv4 Address." - Mac Users: Go to System Preferences > Network, select your Wi-Fi connection, and click "Advanced." The IP address will be listed.
9. Security Sensibility: Shielding Your Connection
It's important that you keep your connection safe.
- Always use a strong, complex password for your ad-hoc network.
- Disable file sharing when you're done.
- Consider using a firewall on both laptops.
10. Beyond the Basics: Other Creative Uses
- Gaming: You can play local multiplayer games without an internet connection.
- Software Installation: Transfer installation files between laptops quickly.
- Collaborative Projects: Work on documents and share files seamlessly.
11. The "Ad-Hoc" Advantage: Decoding the Terminology
The term "ad-hoc" means "for this purpose." It's essentially a temporary network.
12. Speed Matters: Expected Speed Comparisons
The expected speeds between laptops, under ideal conditions, can be as fast as the Wi-Fi cards within the laptops.
13. Battery Life Blues: Power Consumption Insights
Connecting your laptops via Wi-Fi will decrease battery life.
14. A Word of Caution: Potential Limitations
- Range: The range is usually limited to what the Wi-Fi cards are capable of.
- Internet Sharing Conflicts: Not all internet connections can be shared.
- Security Concerns: Be mindful of the security risks and keep your passwords strong.
15. The Ultimate Takeaway: Simplicity Reigned Supreme
You’ve now mastered a fantastic trick that can save you valuable time and frustration. The beauty of the direct laptop-to-laptop Wi-Fi connection lies in its simplicity and practicality.
So, there you have it! This simple trick can be a lifesaver in various situations. Think of it as a hidden tool in your tech arsenal, ready to be deployed whenever you need it. It's like having a secret handshake with your laptops, allowing them to communicate directly and efficiently. Now go forth and conquer those file transfers and network challenges!
FAQs: Your Burning Questions Answered!
Q1: Can I use this trick to connect to the internet on both laptops simultaneously?
A: Yes, if the first laptop is connected to the internet and is configured to share its connection, then the second laptop will also have internet access. However, the speed may depend on the original connection.
**Q2: Is this method
Dell WiFi Nightmare? FIX Your Connection NOW!How to connect two computers on the same wifi network windows 11

By IT Magics How to connect two computers on the same wifi network windows 11 by IT Magics
Sharing Files Between Computers Wirelessly Solution for sharing folders on WIFI network

By FIXsage Sharing Files Between Computers Wirelessly Solution for sharing folders on WIFI network by FIXsage
WINDOWS 10 Direct connect 2 Laptops Wirelessly NETVN

By NETVN82 WINDOWS 10 Direct connect 2 Laptops Wirelessly NETVN by NETVN82
Title: How to Connect two or more Computers by Wireless Connection & Share Files between them
Channel: TheBeginnerGuy
How to Connect two or more Computers by Wireless Connection & Share Files between them by TheBeginnerGuy
Laptop Working
Let's begin!
Title: Unveiling the Art of Time Management: Strategies for Peak Productivity and Reclaiming Your Day
We often find ourselves battling the relentless tide of tasks, deadlines, and obligations. Time, that precious and finite resource, seems to slip through our fingers, leaving us feeling overwhelmed, stressed, and perpetually behind. But what if we could master the art of time management, not just survive the day, but thrive in it? What if we could reclaim our time, achieve peak productivity, and finally experience the sense of accomplishment and control we crave? This is the journey we embark on today.
Understanding the Illusion of Time: Deconstructing the Myths of Busyness
Before we delve into practical strategies, let's dismantle some deeply ingrained myths that sabotage our efforts. The first, and perhaps most pervasive, is the glorification of "busyness." We often equate a packed schedule with productivity, believing that the more we do, the more we achieve. However, this is a dangerous illusion. Busyness, without focus, is simply a whirlwind of activity, scattering our energy and yielding minimal results.
Consider the contrasting figures of two individuals. One, constantly in motion, juggles numerous projects simultaneously, answering emails around the clock, and rarely taking a moment to breathe. The other, seemingly unhurried, tackles a single task with laser focus, eliminating distractions and dedicating their full attention. Which individual is likely to complete their most important tasks efficiently, and ultimately, achieve more meaningful results? The answer, of course, is the latter.
Another common misconception is the belief that multitasking is a virtue. In reality, our brains are not designed to handle multiple tasks simultaneously. Instead, we are "task-switching," a process that incurs a cognitive cost. Every time we jump from one activity to another, we lose valuable focus and have to re-orient ourselves. This constant switching drains mental energy and significantly reduces overall efficiency.
Finally, we often underestimate the power of planning and prioritizing. We approach each day reactively, letting urgent but often unimportant tasks dictate our actions. This leads to a feeling of being perpetually behind, constantly putting out fires, and never making headway on our most critical goals.
The Foundation of Effective Time Management: Goal Setting and Prioritization
The cornerstone of any successful time management strategy is a clear understanding of our goals and priorities. Without a roadmap, we are essentially drifting aimlessly, susceptible to the whims of the day. This is where effective goal setting and prioritization techniques come into play.
Begin by identifying your overarching goals. What do you truly want to achieve? What are your long-term aspirations? Define these goals with precision and clarity. Instead of vaguely stating "I want to be successful," define it more concretely, such as "I want to increase my business revenue by 20% within the next year."
Next, break down these overarching goals into smaller, manageable tasks. This creates a clear path to achievement and helps to avoid the feeling of being overwhelmed. For example, to increase revenue, you might break it down into tasks like "Generate more leads," "Improve customer retention," and "Optimize marketing campaigns."
Once you've defined your tasks, it's time to prioritize. Employ techniques such as the Eisenhower Matrix, which categorizes tasks based on their urgency and importance. Urgent and important tasks are addressed immediately, non-urgent but important tasks are scheduled, urgent but not important tasks are delegated, and non-urgent and unimportant tasks are eliminated. This system ensures that your time is focused on what matters most.
Another powerful prioritization tool is the Pareto Principle, also known as the 80/20 rule. This principle suggests that 80% of your results come from 20% of your efforts. Identify the 20% of tasks that will yield the greatest impact and focus your energy there.
Crafting Your Optimized Schedule: Techniques for Maximizing Productivity
With goals and priorities in place, it's time to design a schedule that optimizes your productivity. Several techniques can help you structure your day for maximum efficiency.
Time blocking is a highly effective method. Allocate specific blocks of time to particular tasks. Schedule meetings, appointments, and dedicated work periods. This prevents procrastination and ensures that you allocate sufficient time to each activity. Be realistic about the time required, and build in buffer periods for unexpected delays.
The Pomodoro Technique is a simple yet powerful method for combating procrastination and maintaining focus. Work in focused 25-minute intervals, followed by a 5-minute break. After every four "pomodoros," take a longer break of 20-30 minutes. This technique provides structure, prevents burnout, and allows for regular mental refreshers.
Batching similar tasks together is an excellent way to minimize task-switching and improve efficiency. For example, dedicate a specific time each day to check and respond to emails, rather than constantly interrupting your work. Schedule all your phone calls for a designated block of time. This streamlines your workflow and reduces the mental burden of constantly shifting gears.
Implement the "two-minute rule" to handle small tasks. If a task takes less than two minutes to complete, do it immediately. This prevents the accumulation of small tasks that can add up and create a sense of overwhelm.
Leveraging Technology and Tools: Streamlining Your Workflow
Technology can be a powerful ally in time management, but it can also be a source of distraction. It's crucial to use technology strategically to streamline your workflow and enhance your productivity.
Utilize calendar applications such as Google Calendar or Outlook Calendar to schedule appointments, set reminders, and block out time for specific tasks. Share your calendar with colleagues to facilitate collaboration and avoid scheduling conflicts.
Employ project management tools like Asana, Trello, or Monday.com to organize tasks, track progress, and collaborate with team members. These tools allow you to visualize your workload, assign responsibilities, and manage deadlines effectively.
Use email management tools to filter and prioritize your inbox. Implement rules to automatically file emails, unsubscribe from unwanted subscriptions, and schedule emails to be sent later. Consider using a "zero inbox" approach, aiming to process all emails daily.
Take advantage of note-taking apps like Evernote or OneNote to capture ideas, organize information, and create to-do lists. These apps are searchable and allow you to access your information from anywhere.
Cultivating Focus and Minimizing Distractions: The Art of Concentration
Distractions are the enemy of productivity. Learn to identify and minimize distractions to stay focused and maintain momentum.
Create a dedicated workspace free from interruptions. Turn off notifications on your phone and computer. Close unnecessary tabs and applications. If possible, wear noise-canceling headphones.
Practice mindfulness techniques to improve focus and reduce stress. Regular meditation can help you train your mind to stay present and avoid getting sidetracked by thoughts and worries.
Learn to say "no" to commitments that don't align with your goals. Protect your time by politely declining requests that will divert you from your priorities.
Schedule breaks regularly to avoid burnout. Take short breaks every hour to stretch, move around, and clear your head.
The Power of Habits and Consistency: Embedding Time Management into Your Life
Time management is not a one-time fix; it's a skill that develops over time. To solidify your progress, you must cultivate consistent habits.
Establish a morning routine that sets the tone for a productive day. Include activities such as planning your day, reviewing your goals, and engaging in physical exercise.
Review your progress regularly. At the end of each day or week, assess what you accomplished and identify areas for improvement. Adjust your strategies as needed.
Be patient with yourself. Building effective time management habits takes time and effort. Don't get discouraged by setbacks. Learn from your mistakes and keep practicing.
Celebrate your accomplishments. Acknowledge your progress and reward yourself for achieving your goals. Positive reinforcement will help you stay motivated and committed to the process.
Conclusion: Embracing the Journey to Time Mastery
Mastering time management is a transformative journey, not just a set of techniques. It's about developing a deeper understanding of your goals, priorities, and how you spend your time. By deconstructing the myths of busyness, embracing proven strategies, leveraging technology effectively, cultivating focus, and establishing healthy habits, you can reclaim your day, achieve peak productivity, and experience the sense of accomplishment and control you deserve. The power to manage your time effectively is within you; the journey begins now. Take action today, apply these strategies, and witness the remarkable transformation in your productivity and overall well-being.
