como mejorar la conexion wifi de mi laptop

Title: Mejorar el WIFI del PC facil y rapido eliannyanez yoteayudo secretos tecnologia negociosdigital
Channel: Elianny Yanez - COMO SER MEJOR QUE AYER
Mejorar el WIFI del PC facil y rapido eliannyanez yoteayudo secretos tecnologia negociosdigital by Elianny Yanez - COMO SER MEJOR QUE AYER
como mejorar la conexion wifi de mi laptop, como conectar dos laptops, como configurar internet no pc
Laptop WiFi Nightmare? FIX It NOW! (Guaranteed!)
WiFi Woes Vanquished: Rescue Your Laptop's Connection Today!
Are you constantly battling a flaky WiFi signal? Does your laptop seem determined to disconnect at the most inopportune moments? If so, you're not alone. Many users experience this frustrating situation. Thankfully, there are tried-and-true methods to resolve these issues. Let's explore them.
The Phantom Signal: Unmasking the WiFi Culprit
First things first, what's causing this digital disruption? It could be a myriad of issues. Understanding the root cause is paramount. Initially, consider your location. Are you far from the router? Physical obstructions like walls can weaken the signal. Also, be mindful of other devices. Microwaves and Bluetooth devices can interfere.
Similarly, your router itself might be the problem. Is it outdated? Outdated routers struggle to handle modern demands. Perhaps it needs a simple reboot. Restarting clears temporary glitches. Consequently, this often provides an instant fix. Furthermore, check your internet speed. Slow speeds can exacerbate WiFi issues.
Decoding the Wireless Code: Diagnosing the Problem
Now, let's perform some digital detective work. Begin by running a network troubleshooter. Your operating system typically includes one. It's a quick and easy first step. Furthermore, examine your laptop's network settings. Ensure WiFi is enabled. Also, verify the correct network is selected.
Moreover, consider your drivers. Outdated or corrupted drivers hinder performance. Update your wireless network adapter drivers. Download these from the manufacturer's website. As a result, this step can often resolve many connectivity problems. You might need to uninstall and reinstall them.
Router Reboot & Reset: A Digital Rebirth
This is often the simplest solution, yet extremely effective. Unplug your router and modem. Wait at least 30 seconds. Next, plug the modem back in. Allow it to fully boot up. Then, plug your router back in. Let it restart.
After this, try connecting to your WiFi again. If the issue persists, consider a factory reset. Locate the reset button on your router. Keep in mind that this will erase your settings. You'll need to reconfigure the network. You may need to consult your router's manual for instructions.
Channel Surfing: Optimizing Your WiFi's Frequency
WiFi routers broadcast signals on various channels. Overlapping channels can cause interference. Therefore, consider changing your router's channel. Access your router's settings through your web browser. Typically, this involves entering the router's IP address.
Look for the wireless settings section. You should find an option to select the channel. Experiment with different channels. Some suggestions: channels 1, 6, and 11 are often less congested. In addition, many routers offer automatic channel selection. This helps the router pick the best channel.
Boost Your Range: Extending Your Wireless Reach
Is your WiFi signal weak in certain areas? Consider these options. Firstly, reposition your router. Place it in a central location. Elevate it if possible. Remove any obstacles blocking the signal.
Secondly, explore using a WiFi extender. These devices amplify your signal. They create a stronger connection in dead zones. Alternatively, consider a mesh WiFi system. Mesh systems offer seamless coverage throughout your home. This is particularly helpful for larger spaces.
Security First: Shielding Your Wireless Network
Ensure your WiFi network is secure. Use a strong password. This is fundamental. Also, enable WPA3 encryption. This is the latest standard. Furthermore, update your router's firmware regularly. Manufacturers release updates to patch security vulnerabilities.
Consequently, this safeguards your network from unauthorized access. It's also wise to disable WPS (WiFi Protected Setup). WPS can be vulnerable. Moreover, monitor your network activity. Identify suspicious devices. Consider using a firewall.
Troubleshooting the Troubleshooters: When to Seek Help
If all else fails, it's time to seek expert assistance. Contact your internet service provider (ISP). They can assist with diagnosing issues with your internet connection. They might need to troubleshoot from their end.
Additionally, consider consulting a computer repair professional. They have the expertise to diagnose complex problems. They can identify hardware failures. Don't hesitate to ask for help. Many issues aren't easily fixed on your own.
The Guarantee: A Stronger, More Stable Connection
By implementing these strategies, you can drastically improve your laptop's WiFi. You'll experience a more reliable connection. Enjoy seamless browsing and streaming today. You can undoubtedly resolve your WiFi woes. So, take action now.
Laptop WiFi Dead? Other Devices Work? FIX IT NOW!Laptop WiFi Nightmare? FIX It NOW! (Guaranteed!)
Alright, folks, let's be honest. We've all been there. You're nestled in, laptop perched on your lap (or maybe precariously balanced on a stack of books – no judgment here!), ready for a binge-watching session, a crucial work presentation, or just a good, old-fashioned scroll through the internet. And then… BOOM! The dreaded WiFi symbol – a little signal strength bar with a big, fat X through it. A laptop WiFi nightmare has struck!
It's like being stranded on a digital island, cut off from the world. Emails can’t be sent. Streaming buffers relentlessly. Everything takes forever. Seriously, it’s enough to make you want to throw your laptop out the window (don't do that, though – we can fix this!).
This isn’t just a minor inconvenience; it’s a full-blown digital crisis. But fear not, because we're diving headfirst into the trenches of WiFi woes and emerging victorious. We’re going to diagnose, dissect, and demolish those connectivity conundrums, so you can get back to doing what you do best – browsing, working, and, yes, even procrastinating.
Let's roll up our sleeves and get started!
1. The Silent Symptom: Recognizing Your WiFi Woes
Before we can find a cure, we need to identify the disease. What are the telltale signs of a laptop WiFi nightmare? It's a frustrating tapestry of problems. Slow internet speeds. Frequent disconnects. Websites that stubbornly refuse to load. The dreaded "no internet access" message. Think of it like a leaky faucet – small issues can quickly escalate into a flood.
Sometimes, it's a gradual decline, like a car losing horsepower over time. Other times, it's a sudden, jarring halt, like hitting a brick wall. Knowing the symptoms is half the battle. Are you experiencing any of these things? If so, you're definitely in the right place.
2. The Usual Suspects: Common Culprits Behind WiFi Failure
Now, let's get to the detective work. What are the most common reasons your laptop might be playing hide-and-seek with your WiFi? We'll explore the usual suspects, the digital delinquents that often sabotage your connection.
- Router Blues: Your router is the gatekeeper of your internet. Is it old and outdated? Is it placed in a location blocked by walls or furniture? Is it overheating? Like a grumpy old man, a faulty router can wreak havoc.
- Driver Disasters: Your WiFi adapter relies on drivers to translate the language of the digital world. Corrupted, outdated, or missing drivers can lead to all sorts of connection calamities. Think of it like a misaligned engine – the car (your laptop) just won't run smoothly.
- Obstacle Course: Physical obstructions like walls, concrete, and even some appliances can interfere with the WiFi signal. Imagine trying to shout across a busy street – that’s what your router is doing, and any interference makes the ‘shout’ inaudible.
- Too Many Cooks (or Devices): Too many devices connected to your WiFi simultaneously can overload the network, causing slowdowns and disconnections. Like a crowded party, too many guests can make it hard for everyone to enjoy themselves.
- Interference Interference: Other electronic devices, such as microwaves or cordless phones, can interfere with your WiFi signal. It’s like trying to listen to the radio during a thunderstorm – static everywhere!
3. Reboot Remedy: The Simple First Aid for WiFi
Before we dive deep into the technical stuff, let's start with the basics – the first line of defense against a WiFi crisis. We're talking about the good old reboot. It's the digital equivalent of taking a deep breath.
- Restart Your Laptop: This clears out temporary files and refreshes the system, often resolving minor glitches.
- Reboot Your Router: Unplug it from the power source for 30 seconds, then plug it back in. This restarts the router and allows it to re-establish its connection to your internet service provider (ISP). It’s often the easiest fix, like hitting the reset button on a video game console.
- Restart Your Modem (if applicable): If you have a separate modem, rebooting it is as crucial as your router.
4. Driver Detective: Updating Your WiFi Adapter Drivers
Drivers are the unsung heroes of your digital world. They're the software that allows your laptop to communicate with your WiFi adapter. Outdated drivers are often the root cause of WiFi problems.
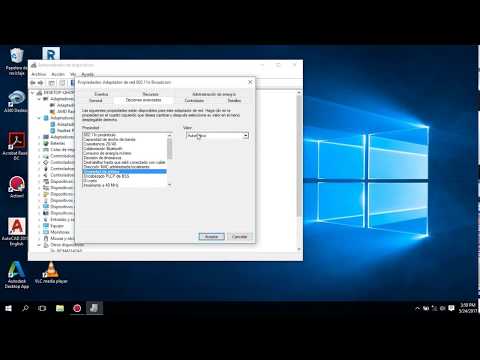
- How to Update Drivers: Go to the Device Manager (search for it in the Windows search bar). Expand the "Network adapters" section, right-click on your WiFi adapter, and select "Update driver." Windows will automatically search for and install the latest drivers.
- Manufacturer’s Website: If Windows can't find the latest drivers, visit the manufacturer's website (e.g., Intel, Realtek, Broadcom) and download the drivers for your specific WiFi adapter model.
5. Location, Location, Location: Optimizing Router Placement for Maximum Signal Strength
Where you place your router makes a world of difference. It's like picking the right spot for your picnic blanket – you want to be in the sun but away from the ants!
- Elevate & Centralize: Place your router in a central location in your home, away from walls, metal objects, and appliances.
- Height Matters: Elevate your router. Placing it on a shelf or table helps it broadcast its signal more effectively.
- Avoid Obstacles: Keep your router away from walls, mirrors, and anything that could interfere with the signal.
6. The Bandwagon: Choosing the Right WiFi Band (2.4 GHz vs. 5 GHz)
Your router broadcasts on different frequency bands, much like different radio stations. Knowing the difference can significantly improve your connection.
2.4 GHz: Offers a wider range but is slower and more susceptible to interference. Ideal for general browsing and devices that are further away from the router.
5 GHz: Faster speeds and less interference, but a shorter range. Great for streaming, gaming, and devices closer to the router.
How to Choose: If your router supports both bands, connect your laptop to the 5 GHz network for better performance. If you're further away from the router, the 2.4 GHz band might provide a more stable connection.
7. Network Navigator: Troubleshooting Connection Issues in Windows
Windows offers several built-in tools to help you troubleshoot WiFi problems. They're like having a digital mechanic ready to diagnose and fix the issue!
- Network Troubleshooter: Open the Settings app (Windows key + I), go to "Network & Internet," and click "Troubleshoot." Windows will automatically diagnose and attempt to fix any connection problems.
- Network Reset: In the "Network & Internet" settings, you can also "Reset network settings." This will reset all network adapters to their default settings. Just make sure you have your WiFi password handy!
8. Channel Chicanery: Finding the Best WiFi Channel
WiFi routers broadcast on different channels. Like different broadcast frequencies in a radio, it is essential to determine the best one to prevent interference.
- WiFi Analyzer Apps: Download a WiFi analyzer app on your smartphone or laptop. These apps scan the channels and identify the least congested ones.
- Router Settings: Log into your router's settings (usually by typing its IP address into your web browser) and change the WiFi channel to the recommended one.
9. Virus Vigilance: Checking for Malware Interference
Malware can sometimes interfere with your network connection. It’s like a secret agent sabotaging your digital world.
- Run a Scan: Run a full system scan using your antivirus software.
- Spyware Removal: Consider using a reputable anti-spyware scanner to remove any malicious software.
10. Firewall Finesse: Ensuring Your Firewall Isn't Blocking Access
Your firewall is a digital gatekeeper that protects your computer from unauthorized access. But sometimes, it can accidentally block legitimate network traffic.
- Check Firewall Settings: Check your firewall settings to ensure it's not blocking your Internet connection.
- Allow Exceptions: If necessary, add exceptions for your web browser and other applications that need Internet access.
11. Hardware Hurdles: Checking Your WiFi Adapter
Sometimes, the problem isn't software – it's the hardware itself. Is your WiFi adapter working properly?
- Device Manager Check: In Device Manager, look for any error messages or yellow exclamation marks next to your WiFi adapter.
- Test with Another Device: If possible, test your WiFi adapter with another device to see if the problem persists.
12. Beyond the Basics: Advanced Troubleshooting Techniques
If none of the above steps work, it’s time to get a little more technical. Don't worry, we'll guide you through it.
- Flush DNS Cache: This clears DNS cache, which can sometimes cause connection problems. Open the Command Prompt (search for
cmdin the Windows search bar) as an administrator and typeipconfig /flushdnsthen hit Enter. - Change DNS Servers: You could try using alternative DNS servers like Google's (8.8.8
Como Aumentar al MAXIMO Seal WIFI En WINDOWS 10 Sin programas

By Master Tutos 93 Como Aumentar al MAXIMO Seal WIFI En WINDOWS 10 Sin programas by Master Tutos 93
Como ACELERAR Al MAXIMO Tu INTERNET En Tu PC Windows 10 y 11

By TheChris Como ACELERAR Al MAXIMO Tu INTERNET En Tu PC Windows 10 y 11 by TheChris
Seal Wifi dbil Windows 10-Solucin Rpida
By Libardomm Seal Wifi dbil Windows 10-Solucin Rpida by Libardomm

Title: COMO HACER QUE TU WIFI VAYA MS RPIDO informatica tecnologia lifehack ordenador hack tip pc
Channel: rafatatay
COMO HACER QUE TU WIFI VAYA MS RPIDO informatica tecnologia lifehack ordenador hack tip pc by rafatatay
Laptop Wifi Hotspot
The Ultimate Guide to Fermenting Your Own Delicious Kombucha
The world of fermented foods has exploded in popularity, and for good reason! These culinary creations are not only delicious and diverse in flavor, but also boast a fascinating array of potential health benefits. At the forefront of this fermentation frenzy stands kombucha, a fizzy, tangy, and often fruity beverage exploding with probiotics. If you're ready to delve into the exciting world of homemade kombucha, you've come to the right place. This guide is designed to provide you with everything you need to become a kombucha brewing master, from understanding the fundamental principles to mastering advanced techniques and flavor combinations.
Understanding the Fundamentals: What is Kombucha and Why Brew Your Own?
Kombucha is essentially a fermented tea. It's created by adding a symbiotic culture of bacteria and yeast (SCOBY) to sweetened tea. This SCOBY consumes the sugar and produces a variety of beneficial compounds, including organic acids, enzymes, and probiotics. These probiotics are the stars of the show, contributing to gut health and potentially bolstering the immune system.
The allure of brewing your own kombucha extends beyond potential health benefits. It's a rewarding craft! You gain complete control over the ingredients, allowing you to tailor the flavor profile precisely to your taste. You can experiment with countless tea bases, fruit additions, and flavoring agents, creating a bespoke beverage that’s entirely your own. Furthermore, brewing at home is significantly more cost-effective than purchasing kombucha from the store, potentially saving a substantial amount of money over time. Finally, the process of fermentation itself is a fascinating journey, connecting you to a tradition that spans cultures and centuries.
Assembling Your Kombucha Brewing Arsenal: The Essential Equipment
Embarking on your kombucha brewing adventure requires a few essential pieces of equipment. These items work in tandem to create the perfect environment for your SCOBY to thrive and transform sweet tea into a bubbly elixir.
The Brewing Vessel: A glass jar is the gold standard. A one-gallon glass jar is a popular size, accommodating manageable batches. Avoid metal containers as they can react with the kombucha and potentially harm the SCOBY. Wider-mouth jars are easier to clean and allow for better airflow. Ensure your jar is meticulously clean before starting.
The SCOBY and Starter Tea: The SCOBY is the heart of the operation—a living, breathing colony of bacteria and yeast. You will also need a portion of the starter tea, which is kombucha from a previous batch. This starter tea is acidic and helps to protect the new batch from unwanted mold and bacteria.
Breathable Cover: A crucial component. Use a tightly woven cloth, such as muslin or tightly woven cotton fabric, to cover the jar's opening. Secure it with a rubber band. This allows air to circulate while preventing fruit flies and dust from entering. Coffee filters can also act as a more cost-effective alternative.
Bottles for Secondary Fermentation: These are where you’ll infuse your kombucha with fizz and flavor. Use airtight bottles, such as flip-top bottles designed for brewing beverages or bottles with tight-fitting caps. Ensure they are thoroughly sanitized.
Thermometer: Maintaining a consistent temperature is key to successful kombucha brewing. A stick-on thermometer affixed to the side of your brewing vessel is sufficient, allowing you to easily monitor the temperature of the kombucha.
Funnel (optional): A funnel can aid in transferring the kombucha from the brewing vessel to the bottles, minimizing spills.
Cultivating Your SCOBY: Acquiring and Caring for Your Culture
Your SCOBY is a living organism, and its health is paramount to a successful kombucha brew. You can obtain a SCOBY from a friend, a local supplier, or online. You can also grow a SCOBY from unflavored store-bought kombucha that has been pasteurized.
Initial Setup: When you receive your SCOBY, it will likely be accompanied by starter tea. The starter tea is the liquid in which the SCOBY has been residing and should be used to begin your first batch.
Feeding and Maintenance: The SCOBY needs regular "feeding" in the form of sweetened tea. Prepare a batch of sweetened tea, using black or green tea, and allow it to cool. Once cooled, pour the tea into your brewing vessel, add the starter tea, and carefully place the SCOBY on top.
Optimal Environment: Place your brewing vessel in a location that is out of direct sunlight and has a consistent temperature between 70-75°F (21-24°C). Fluctuations in temperature can impact fermentation.
Signs of a Healthy SCOBY: A healthy SCOBY will appear translucent or slightly opaque. It may grow in thickness with each batch. Brown stringy pieces are normal and are yeast strands. A small, new SCOBY might form on top of the existing one.
Identifying Problems: Mold is the enemy. It usually appears as fuzzy, colorful growths on the surface. If you see mold, discard the entire batch, sanitize your equipment, and start again with a fresh SCOBY or purchase a new one. Other issues that may appear include fruit flies.
The Primary Fermentation Process: Transforming Sweet Tea into Kombucha
The primary fermentation is where the magic happens. The SCOBY consumes the sugar in the tea and produces the characteristic kombucha flavor.
Brewing the Tea: Brew a strong batch of tea. Use black or green tea, as these are the most common and reliable options for SCOBYs. Boil water, add tea leaves, and steep for 10-15 minutes. Consider using a tea bag ratio of 1-2 bags of tea per gallon of water.
Sweetening the Tea: Remove the tea leaves or tea bags. Add sugar to the hot tea and stir until dissolved. The amount of sugar needed depends on the size of your batch, but a general rule is 1 cup of sugar per gallon of tea. Start with Cane sugar, but other sugars like brown sugar may also be used.
Cooling the Tea: Allow the tea to cool to room temperature (around 70-75°F / 21-24°C). This is critical. Pouring hot tea directly onto the SCOBY can kill it.
Combining Ingredients: Once the tea has cooled, pour it into your sanitized glass jar. Add the starter tea to the jar, the acidic environment protects the new batch from harmful mold.
Adding the SCOBY and Covering: Gently place the SCOBY on top. Cover the jar's opening with your breathable cloth and secure it with a rubber band.
The Waiting Game: Place the jar in a dark, well-ventilated area at a consistent temperature (ideally 70-75°F / 21-24°C). The fermentation process usually takes 7-30 days, depending on the temperature, humidity, and strength of the SCOBY.
Secondary Fermentation: Infusing Flavor and Carbonation
The secondary fermentation is where you add flavor and carbonation to your kombucha. This is where your creativity can truly shine!
Testing Your Kombucha: You'll notice your kombucha begin to develop a tart flavor as it ferments. Taste-test your kombucha after the first week or so. Use a clean straw, being careful not to contaminate the batch. The ideal taste is a balance between sweetness and tartness, with a slight vinegar-like tang.
Bottling and Flavoring: Once your kombucha has reached your desired taste, it’s time to bottle it. Pour the kombucha into your airtight bottles, leaving about an inch of headspace at the top. This space is essential for carbonation.
- Fruit: Add fresh or frozen fruit to the bottles. Berries, ginger, citrus, and other fruits work marvelously. Consider muddling the fruit or cutting it in pieces before adding.
- Juice: Add your favorite juices. Freshly squeezed or high-quality store-bought juices work well.
- Herbs and Spices: Experiment with fresh herbs, such as basil, mint, or rosemary, and spices, such as ginger, cinnamon, or cloves.
- Other Flavorings: Consider adding ingredients such as honey, or maple syrup.
The Carbonation Phase: Seal the bottles tightly and allow them to sit at room temperature (around 70-75°F / 21-24°C) for 1-3 days. During this time, the remaining sugar in the kombucha will be consumed by the SCOBY, producing carbon dioxide and carbonation.
Monitoring and Tasting: Carbonation can vary greatly. Start testing your bottled kombucha after the first day by briefly opening a bottle. Be prepared for a fizzy eruption! If the kombucha is not fizzy enough, reseal and allow it to ferment for another day.
Refrigeration: Once the kombucha has reached your desired level of carbonation, refrigerate the bottles. This slows down the fermentation process and prevents over-carbonation. Refrigeration also enhances the flavor.
Troubleshooting Common Issues and Maintaining Your Kombucha
Even with meticulous care, occasional roadblocks can arise. Here's how to address common problems.
- Mold: If you discover mold, discard the entire batch immediately. The most common mold types are blue, black, or green fuzz. Thoroughly sanitize all equipment and start again with a
