issues with laptop wifi card

Title: how to solve windows 10 wifi issue
Channel: Solve4 U
how to solve windows 10 wifi issue by Solve4 U
problem with laptop wifi adapter, how do i know if my laptop wifi card is bad, laptop wifi card not working, wifi card issues
Laptop WiFi Nightmare? Solved!
Laptop WiFi Woes Vanquished: Your Ultimate Troubleshooting Guide!
Ever felt the frustration of a sluggish laptop connection? The digital world grinds to a halt, doesn’t it? Indeed, a frustrating WiFi experience can make your day miserable. But fret no more! This guide is designed for you. We will explore common culprits and effective solutions. So, prepare to reclaim your online freedom!
The Silent Assassin: Identifying the Problem's Source
First, let's diagnose the issue. Your WiFi woes could stem from various sources. Therefore, we need to narrow down the possibilities. Is it an issue with your laptop itself? Or is it your home network? Because knowing the source is crucial. Begin by checking other devices. Do they connect to the internet without trouble? If yes, the problem likely resides within your laptop. However, if all devices suffer, then the problem points to your router or internet service.
Router Reboot Ritual: The First Line of Defense
A simple reboot can often work wonders. Think of it as a digital reset button. Before you do anything else, restart your router and modem. Unplug both devices. Wait for about 30 seconds. Then, plug the modem back in first. Allow it to fully power on. Next, plug your router back in. Give them both a few minutes to re-establish their connection. After that, test your laptop's WiFi again. Usually, this simple step clears up many connectivity glitches.
Wireless Interference: The Invisible Enemy
Wireless interference can significantly impact your WiFi signal. Numerous devices emit radio waves. They can all interfere with your wireless signal. Microwaves, cordless phones, and even Bluetooth devices contribute. Try moving your laptop closer to the router. Eliminate potential obstructions like thick walls and metal objects. Change your router's channel in the settings. This can often bypass congestion. Using a WiFi analyzer app can help you identify the least congested channel.
Driver Dilemmas: The Software Side
Outdated or corrupted network drivers can cause significant problems. These drivers are essential software components. They allow your laptop to communicate with the WiFi adapter. Therefore, ensure your drivers are up-to-date! Here's how:
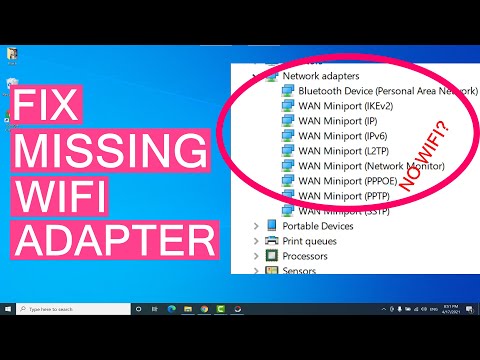
- Windows: Search for "Device Manager" in the Windows search bar. Expand "Network adapters." Find your wireless adapter. Right-click it. Select "Update driver." Choose "Search automatically for drivers."
- macOS: Click the Apple menu. Select "System Preferences." Click "Network." Select your WiFi connection. Click the "Advanced" button. Check for any available updates.
If updating doesn't help, try uninstalling and reinstalling the driver.
Troubleshooting Tools: Your Digital Toolkit
Windows and macOS offer built-in troubleshooting tools. They can detect and fix common WiFi problems. These tools guide you through the process. Here’s how to access them:
- Windows: Right-click the WiFi icon in the system tray. Select "Troubleshoot problems."
- macOS: Open "Network Preferences." Select your WiFi connection. Click "Assist Me." Follow the prompts.
These tools often offer quick fixes. They are an easy first step to resolving connectivity issues.
Security Settings: Avoiding Misconfiguration
Incorrect security settings can lock you out. Double-check your WiFi password. Ensure you're entering it correctly. Additionally, verify your router's security protocol. WPA2 or WPA3 are the most secure options. Do not use older, insecure protocols like WEP. Make sure your router isn't blocking your laptop's MAC address. Check your router's settings to confirm that.
Hardware Hurdles: When All Else Fails
Sometimes, the issue lies with the hardware itself. Your WiFi adapter might be faulty. Perhaps your laptop's antenna is damaged. If other devices connect flawlessly, yet your laptop still struggles, consider these steps:
- External Adapter: Purchase a USB WiFi adapter. This bypasses your laptop's internal adapter.
- Professional Help: Consider taking your laptop to a reputable repair shop.
- Factory Reset: As a last resort, consider resetting your laptop to factory settings. This eliminates any software conflicts.
The Final Victory: Maintaining a Smooth Connection
Once you've solved the problem, maintain a stable connection. Regularly update your drivers and firmware. Keep your router in a central and open location. Consider optimizing your network signal. These proactive steps will help prevent future WiFi nightmares.
Now, you're equipped to conquer those frustrating WiFi issues. Enjoy your fast and reliable connection! Your online world awaits!
Laptop Wifi Not Connecting? This SHOCKING Trick FIXED Mine!Laptop WiFi Nightmare? Solved!
Let's be honest, we've all been there. That sinking feeling when your laptop stubbornly refuses to connect to the internet. The frustration mounts, the deadlines loom, and suddenly, your shiny, powerful laptop transforms into a glorified paperweight. We call it the "Laptop WiFi Nightmare," and it can turn even the most patient amongst us into snarling, technology-averse cave dwellers. But fear not, fellow digital travelers! We're here to guide you through the tangled web of wireless woes and emerge victorious. We'll unravel the mysteries of dropped connections, sluggish speeds, and those infuriating "no internet access" messages. So, grab a coffee, settle in, and let's conquer this WiFi beast together!
1. The Phantom Connection: Why Your Laptop's WiFi Vanishing Act is Happening
Imagine your laptop's WiFi card as a tiny, overworked mail carrier. It's trying its best to deliver those precious packets of data, but sometimes, the delivery route is blocked. This blockage could be caused by a multitude of gremlins, from simple software glitches to more serious hardware hangups. We're talking outdated drivers, interference from other devices, or plain old router issues. Let's face it; technology goes sideways all the time. Think of it like a temperamental car; sometimes, it just needs a little TLC.
2. Your First Line of Defense: The Simple Reboot – Trust Me, It Works (More Than You Think!)
Yes, we know, it sounds ridiculously simple, but hear us out. Rebooting your laptop (and your router!) is like hitting the reset button on your brain. It clears out temporary files, refreshes the connection, and often resolves those pesky little hiccups that cause WiFi headaches. We've lost count of the times a simple reboot has saved the day! Think of it like a digital nap. Sometimes, all your laptop needs is a good night's sleep (a.k.a. a restart) to get back on track.
3. Checking the Obvious: Is Your WiFi Even Turned On? (Don't Laugh, It Happens!)
Okay, this one is a bit embarrassing, but even the most tech-savvy among us have been caught out. Sometimes, the WiFi switch is accidentally turned off! Take a quick glance at your laptop’s keyboard. Does it have a dedicated WiFi key? If so, make sure it’s illuminated. If you don’t have a dedicated key, check your network settings. It's like realizing you've been trying to start your car without the keys in the ignition. Simple, but easily overlooked.
4. Router Reboot Redux: The Often-Overlooked Savior
The router is the heart of your home network, and just like any heart, it can get tired. A simple reboot can often breathe new life into a sluggish connection. Unplug your router (and your modem if they're separate) for about 30 seconds. Plug them back in, wait for them to boot up, and then see if your laptop can connect. We swear, it's magic! For further information on Router Maintenance, check out articles online.
5. Driver Dilemmas: Keeping Your WiFi Card Up-to-Date
Your laptop’s WiFi card relies on a special piece of software called a driver to communicate with your network. Outdated drivers can be a major source of connection problems.
- How to Update Your Drivers:
- Windows: Search for "Device Manager" in the Start Menu. Expand "Network adapters," right-click your WiFi adapter, and select "Update driver."
- Mac: Usually, updates are handled automatically through the software update feature in System Preferences.
Keeping your drivers current is like giving your WiFi card a tune-up – it keeps everything running smoothly.
6. Interference Intrusion: Battles Against the WiFi Wraiths
Your WiFi signal is like a radio wave, and, unfortunately, it can be easily crowded out. Other devices, microwaves, baby monitors, and even Bluetooth devices can interfere with your connection.
- Troubleshooting Interference:
- Move Your Router: Place your router away from walls, metal objects, and other electronic devices.
- Change the Channel: Your router broadcasts on a specific channel. Experiment with different channels in your router settings.
7. Password Perplexities: The Forgotten Key to the Kingdom
Double-check your WiFi password! It’s easy to mistype a character, and a wrong password means no connection. It's just like not having the right key to unlock a door.
8. The Hidden Killer: Weak WiFi Signal Strength
Distance is the enemy of a strong WiFi signal. The further you are from your router, the weaker the signal becomes.
- Boosting Your Signal:
- Move Closer: If possible, physically move closer to your router.
- Use a WiFi Extender: These devices amplify your signal, extending its reach.
9. Examining Your Network Settings: A Deep Dive
Dive into your laptop's network settings. Ensure everything is configured correctly. Is your laptop trying to connect to the right network? Are the security settings correct (WPA2/WPA3)? Taking a look at the setup can make a real difference.
10. Router Reconfiguration: A More Hands-On Approach
If the simple fixes aren't working, it might be time to delve a little deeper into your router settings. Access your router's administrative panel (usually by typing its IP address into your browser) and check the following:
- Firmware Updates: Ensure your router's firmware is up-to-date.
- Channel Optimization: Experiment with different WiFi channels to find the one with the least interference.
11. The Troubleshooting Toolkit: Running Diagnostics
- Windows: Use the built-in Network Troubleshooter. Right-click the WiFi icon in your system tray and select "Troubleshoot problems."
- Mac: Use the Wireless Diagnostics tool. Hold down the Option key and click the WiFi icon in the menu bar.
12. The Hardware Hurdle: When to Consider a Hardware Problem
If all else fails, a hardware issue might be the culprit. This could include a faulty WiFi card or a damaged router.
- Common Hardware Issues:
- Laptop WiFi Card Failure: Requires repair or replacement.
- Router Malfunction: Consider a new router.
13. Seeking External Assistance: The Tech Support Cavalry
Don't be afraid to ask for help! Contact your internet service provider (ISP) or a local computer repair shop. They can provide expert guidance and may be able to pinpoint the problem more efficiently. We've all needed a helping hand at some point.
14. Security Safeguards: Keeping Your Network Safe
A secure WiFi network is crucial. Ensure your network is protected with a strong password and WPA2/WPA3 encryption. This protects your data from prying eyes. Be wary of unfamiliar networks!
15. The Aftermath: Keeping Your WiFi Healthy
Once you've solved your WiFi woes, it's essential to implement strategies to prevent future issues. This includes regular driver updates, router maintenance, and staying vigilant against interference. It’s like taking care of a plant; regular care ensures it thrives.
The Relief: Your WiFi Nightmare is Over!
We hope these tips and tricks have armed you with the knowledge to conquer your laptop's WiFi woes. Remember, troubleshooting WiFi issues can be a process of elimination. Be patient and persistent, and you'll eventually find the solution. Now go forth and stream, surf, and connect with confidence! Welcome back to the world of seamless connectivity. What are you waiting for? Your internet awaits!
FAQs: Frequently Asked Questions
Q1: My computer says "no internet access," even though my WiFi is connected. What gives?
A: This usually indicates a problem with your internet connection, not your WiFi itself. Check your router and modem. Reboot them both. Contact your ISP if the problem persists.
Q2: My WiFi is slow. What can I do to speed it up?
A: First, check your internet speed using an online speed test. Then, try the troubleshooting steps outlined above: move closer to the router, reduce interference, and consider a WiFi extender.
Q3: My laptop connects to my neighbor's WiFi, but not mine. Why?
A: This suggests a problem with your router or your network settings. Double-check your password, network name (SSID), and router configuration.
Q4: Can interference really affect my WiFi?
A: Absolutely! Microwaves, cordless phones, and other wireless devices can interfere with your WiFi signal. Try moving your router away from these potential sources of interference.
Q5: How often should I update my WiFi drivers?
A: It's a good practice to update your WiFi drivers periodically, especially if you experience connection problems. Check for updates when you update your operating system or graphics card drivers.
1) Principal Keywords: Laptop WiFi, Solve, Troubleshoot. 2) SEO Headline: Laptop WiFi Problems? Simple Solutions to Fix It! 3) Pathway: Laptop WiFi Fix 4) Meta Summary: Facing Laptop WiFi issues? Troubleshoot and solve network problems with our guide. Learn simple steps for a stronger, faster connection. 5) Image Alt Text: A person
Lenovo WiFi Fix: Get Your Laptop Online NOW!Wifi Not Connecting Problem in Windows Solve100 Wifi Not Working Problem Fix macniteshwifi

By Mac Nitesh Wifi Not Connecting Problem in Windows Solve100 Wifi Not Working Problem Fix macniteshwifi by Mac Nitesh
Windows laptop not connecting to Wi-Fi Method 1 shorts windows laptop wifi fix

By Tuto2Info Videos Windows laptop not connecting to Wi-Fi Method 1 shorts windows laptop wifi fix by Tuto2Info Videos
How To Fix Low WI-FI Signal Strength on Windows

By Speedy Tutorials How To Fix Low WI-FI Signal Strength on Windows by Speedy Tutorials
Title: How To Fix Wireless Adapter Missing In Windows 10 Get WiFi Adapter Back
Channel: Sandeep Singh
How To Fix Wireless Adapter Missing In Windows 10 Get WiFi Adapter Back by Sandeep Singh
Laptop Wifi Connect
The Definitive Guide to Mastering the Art of Sourdough Bread Baking at Home
We've all gazed longingly at the crusty perfection of a freshly baked sourdough loaf, its tangy aroma filling the air, promising a delightful experience. But the thought of cultivating a starter, the lengthy bulk fermentation, and the seemingly complex process often keeps us from pursuing this culinary adventure. Fear not, aspiring bakers! This guide provides a comprehensive and approachable roadmap to mastering the art of sourdough bread baking in your own kitchen, transforming you from a bread enthusiast to a confident artisan. We'll delve into every crucial step, from nurturing your starter to achieving that coveted open crumb.
Cultivating Your Sourdough Starter: The Foundation of Deliciousness
The heart and soul of sourdough bread is, without a doubt, the starter. It's a living culture of wild yeasts and beneficial bacteria that provides the leavening and characteristic flavor of sourdough. Building a robust and active starter is the first, and arguably most crucial, step.
The Initial Days: Nurturing Your Wild Yeast Colony
Your journey begins with flour and water. The exact type of flour (unbleached all-purpose, whole wheat, or a blend) will influence the flavor of your starter, but any unbleached, high-quality flour will work. Combine one part flour (e.g., 50 grams) with one part non-chlorinated water (e.g., 50 grams) in a clean glass jar. Stir thoroughly until a thick, shaggy mixture forms. Cover the jar loosely (a lid placed ajar or a cloth secured with a rubber band allows for air circulation) and let it rest in a warm spot (ideally between 70-75°F/21-24°C).
For the next few days (typically 5-7), observe your starter daily. You might see no activity at first. On days 2 and 3, discard about half of the starter and feed it with equal parts flour and water as before. You will likely notice subtle bubbling and a slight sour smell after a few days. This is a good sign – your wild yeast army is beginning to take hold.
The Feeding Schedule: Establishing a Routine
As your starter matures, the feeding schedule becomes incredibly important. By days 5-7, it may exhibit more vigorous bubbling and doubling (or even tripling) in size within a matter of hours after feeding. Discard roughly half of the starter just before feeding and replace it with equal weights of fresh flour and water. For instance, if you have 100 grams of starter, discard 50 grams, and then add 25 grams of flour and 25 grams of water. A key principle here is consistency; maintain the same schedule and flour/water ratios. A 1:1:1 feeding ratio (starter:flour:water) is a common and effective practice.
Recognizing a Ripe and Active Starter
A mature, active starter is the cornerstone of excellent sourdough. Look for these signs of readiness:
- Doubling in Size: The starter should reliably double (or even triple) in size within 4-8 hours after feeding.
- Bubbles, Bubbles Everywhere: The starter should be filled with numerous, evenly distributed bubbles. The activity should be robust.
- A Pleasant Aroma: The starter should have a sweet, slightly tangy, and pleasant smell. Avoid any unpleasant odors like acetone or mold.
- The Float Test: This is a simple test for readiness. Take a spoonful of starter and gently place it in a glass of water. If it floats, it’s active and ready to bake.
Maintaining and Storing Your Starter
Once your starter is active, you’ll move to a more manageable maintenance routine. There are two primary storage methods:
- Refrigeration: The most common method involves storing your starter in the refrigerator. Refrigeration slows down the activity, allowing you to feed it less frequently. Feed your starter once a week, or even less often. Before baking, take your starter out of the refrigerator and feed it at least once (or twice) to revitalize it.
- Room Temperature: For frequent bakers, storing your starter at room temperature and feeding it every 12-24 hours (depending on the climate and the health of your starter) is an option. This requires more attention and will make your sourdough baking even quicker.
Mastering the Sourdough Bread Recipe: From Ingredients to Baking
With your starter flourishing, it's time to embark on the bread-making journey. This section details a classic sourdough recipe that is a phenomenal starting point.
Ingredients and Preparation: The Building Blocks of Bread
Here’s a simple, yet effective, sourdough bread recipe:
- 500 grams (approx. 4 cups) bread flour: Bread flour has a higher protein content than all-purpose flour, which promotes gluten development and creates a better rise.
- 350 grams (approx. 1 ½ cups) water: Preferably, non-chlorinated. The temperature of the water can influence the dough’s fermentation. Around 80-85°F (27-29°C) is typically ideal.
- 100 grams (approx. ½ cup) active sourdough starter: Make sure your starter is at its peak activity.
- 10 grams (approx. 2 teaspoons) salt: Salt controls the fermentation, strengthens the gluten, and enhances flavor.
The Mixing Process: Developing the Dough's Structure
- Autolyse (Optional but Recommended): In a large bowl, combine the flour and water. Mix until just combined. Cover and let rest for 30-60 minutes. This allows the flour to fully hydrate, which will improve gluten development and make the dough easier to handle.
- Adding the Starter and Salt: Add the active starter to the autolysed dough. Gently mix until the starter is incorporated. Then, add the salt. Mix well to integrate everything.
- Initial Mixing: With your hands or a stand mixer, gently mix the dough until it just comes together. At this early stage, the dough will still be shaggy and a bit sticky.
Bulk Fermentation: The Rise and Fall of Flavor
Bulk fermentation is the crucial step where the dough develops flavor and structure.
- Stretch and Folds: Over the next 4-6 hours (depending on room temperature), perform a series of stretch and folds. Wet your hands to prevent sticking, gently pull one side of the dough upwards and stretch it outwards, then fold it over onto itself. Rotate the bowl and repeat this process with the other sides. This strengthens the gluten and incorporates air into the dough. Perform these stretches and folds every 30-60 minutes for the first 2-3 hours, and then as needed.
- The Bulk Fermentation Environment: Place the dough in a lightly oiled bowl, cover it, and let it rest in a warm place. The ideal temperature for this process is approximately 75-80°F (24-27°C).
- Observing the Dough: During bulk fermentation, pay close attention to the dough. It should increase in volume by about 30-50% and develop bubbles throughout. You can gently touch the dough; it should feel airy and bouncy. The length of bulk fermentation will depend on the temperature and activity of your starter.
Shaping and Proofing: Preparing for Baking
- Pre-Shaping: Gently turn the dough out onto a lightly floured surface. Gently shape the dough into a pre-shape, round. Let it rest for 20-30 minutes covered.
- Final Shaping: Shape the dough into either a boule (round) or a batard (oval). To do this, gently stretch the dough into a rectangle. Fold the top third down, and then the bottom third up. The main goal is to create tension on the surface of the dough.
- Proofing: Place the shaped dough in a well-floured proofing basket (banneton), seam-side up. A bowl lined with a floured towel can also be used. Cover and place in the refrigerator for 12-18 hours for a slower, colder proof. Cold proofing develops more complex flavors in the bread.
Baking: From Oven to Crusty Perfection
- Preheating: Preheat your oven to 450-500°F (232-260°C) with a Dutch oven inside. The Dutch oven provides steam and creates the perfect baking environment.
- Scoring: Carefully remove the hot Dutch oven from the oven. Gently invert the proofed dough into the Dutch oven. Use a sharp knife or a lame to score the top of the loaf. Scoring controls the expansion of the loaf during baking and adds a beautiful visual element.
- Baking with Steam: Cover the Dutch oven and bake for 20-25 minutes.
- Uncovered Baking: Remove the lid from the Dutch oven and continue baking for another 20-30 minutes, or until the crust is a deep golden brown. The internal temperature should reach 200-210°F (93-99°C).
- Cooling: Remove the bread from the Dutch oven and place it on a wire rack to cool completely before slicing. This is crucial; the bread continues to bake internally as it
