how do i know what wifi card my laptop has

Title: How to Know if My Desktop PC Is Equipped for Wireless Know Your Computer
Channel: eHowTech
How to Know if My Desktop PC Is Equipped for Wireless Know Your Computer by eHowTech
how to know what wifi card my laptop has, how to check what wifi card my laptop has, how to see what wifi card my laptop has
Unlock Your WiFi Mystery: Find Your Laptop's Hidden Card!
Unveiling the Wireless Wonder: Decoding Your Laptop's WiFi Secret
Alright, tech enthusiasts! Let's dive headfirst into a fascinating digital labyrinth. We're talking about that invisible lifeline: your laptop's Wi-Fi card. Ever felt like you're wrestling with a phantom signal? Or maybe you just want to get under the hood. Because, believe me, there’s a hidden card waiting to be discovered. It’s a journey into the heart of your wireless world.
The Invisible Architect: What Is This Card, Anyway?
Think of the Wi-Fi card as your laptop's personal radio antenna. It’s the unsung hero. It transmits and receives signals to connect you to the internet. You can imagine it as a tiny, dedicated communication center. Without it, you are marooned in an offline desert. Consequently, understanding it unlocks a world of possibilities.
Digital Detective Work: Locating the Elusive Card
Finding this hidden component can feel like solving a puzzle. Firstly, you don't need to be a computer whiz. Secondly, you will get to learn something new. Your laptop's manual is a fantastic starting point. However, it may not always hold all the keys. Because it's usually simpler than you think.
Next, explore your operating system. Windows and macOS offer ways to unveil hardware details. In Windows, dig into the Device Manager. You'll unearth a list of devices, including your network adapters. Then, look for something that mentions "Wi-Fi" or "Wireless Network Adapter."
Alternatively, on a Mac, go to "System Information." Then, click "Network." You’ll find your Wi-Fi card listed alongside other network hardware. Therefore, these tools offer valuable insights.
Decoding the Specs: Understanding What You've Found
Now it's time to decipher the jargon. The name of your Wi-Fi card will appear. You might see a brand name and a model number. Indeed, this information is crucial. It helps you search for drivers or troubleshoot potential issues. Also, it allows you to upgrade in the future.
The card's specifications reveal its capabilities. Does it support the latest Wi-Fi standards (like Wi-Fi 6 or 6E)? Because, this defines your connection. Does it have dual-band capabilities (2.4 GHz and 5 GHz)? Since, this provides more bandwidth. Thus, knowledge is power in this domain.
Troubleshooting the Wireless Blues: When the Signal Fades
Even the mightiest Wi-Fi cards can encounter problems. Perhaps your connection is slow or unstable? Maybe you can't connect to the internet at all. Here, we investigate common culprits.
First, check your router. Is it powered on? Is it within range? Moreover, try restarting both your laptop and your router. Sometimes, a simple reboot is all it takes. But of course, that is not always it.
Driver issues often cause problems. Ensure your Wi-Fi card drivers are up-to-date. Visit the manufacturer's website. Download the latest drivers for your specific card. Or, you can update them in Device Manager or System Information. Thus, keeping your drivers current is essential.
Physical obstructions can also interfere. Walls, metal objects, and electronic devices can weaken the signal. Consequently, experiment by moving your laptop closer to the router. Also, make sure there is minimal interference.
Upgrading Your Connection: Boosting Your Wireless Arsenal
Ready to level up your Wi-Fi experience? Consider upgrading your Wi-Fi card. This is a great option. For some laptops, this is not possible. However, for others, it's a relatively easy process.
First, ensure your laptop supports an upgrade. Research your model. See if the card is accessible. Then, carefully open your laptop. Locate the existing Wi-Fi card. Usually, it's a small card. It's held in place by screws.
Next, install the new card. Make sure the connection is secure. Reassemble your laptop. Then, install the new card’s drivers. After that, reboot your computer. Ultimately, this may involve a little technical know-how. However, the reward can be a faster, more reliable connection.
Protecting Your Wireless Fortress: Security Essentials
Your Wi-Fi card is a gateway to your network. Therefore, security is paramount. Always use a strong password for your Wi-Fi network. And, also, consider enabling WPA3 encryption. That provides the best security.
Moreover, keep your Wi-Fi router's firmware updated. These updates often include security patches. Furthermore, be cautious about connecting to public Wi-Fi networks. They often lack robust security. Thus, protect yourself when online.
Conclusion: Embracing the Wireless Future
Congratulations! You’ve journeyed through the hidden world of your laptop's Wi-Fi card. Consequently, you know more now than before you started. You’re equipped with the knowledge to troubleshoot problems. You also understand the potential for upgrades. Thus, the wireless world awaits!
Get Blazing-Fast Laptop WiFi: Rent Now!Unlock Your WiFi Mystery: Find Your Laptop's Hidden Card!
Ever felt like you're lost in a digital jungle, desperately trying to connect to the internet but your laptop just isn't cooperating? We all know the feeling – that frustrating moment when the Wi-Fi symbol on your laptop is either stubbornly grayed out or just plain missing. Believe me, I've been there, staring at my screen like it's a cryptic map, utterly bewildered! Today, we're going on a journey to demystify one of the biggest culprits behind this tech torment: your laptop's Wi-Fi card. Prepare to unlock the secrets of your laptop's hidden network adapter!
1. The Invisible Hero: What is a Wi-Fi Card, Anyway?
Think of your Wi-Fi card as the unsung hero of your digital life. It's the piece of hardware that acts as the translator between your laptop and the wireless world. It's the reason you can binge-watch your favorite shows in bed, video call your family across the globe, and basically, live a connected life. Without this little card, you're stuck with the digital equivalent of a dial-up connection (remember those?). It's like having a car but no engine – beautiful, but utterly useless.
2. Why Isn't My Laptop Connecting? The Usual Suspects and Beyond
So, why isn't your laptop singing the sweet tune of Wi-Fi? Well, there are several potential suspects. The most common are:
- Incorrect Wi-Fi password: A classic, right? Double-check those capitalization and special characters!
- Router issues: Sometimes, it's not your laptop, but the router itself that's acting up.
- Driver problems: Your Wi-Fi card relies on drivers (software) to function. Outdated or corrupted drivers are a frequent cause of connection woes.
- Hardware malfunction: Sadly, sometimes the card itself might be the issue.
But what about those times when you can't even find the Wi-Fi option? When the networks list is empty? That’s where the hidden card comes into play.
3. Spotting the Missing Link: Diagnosing a Missing Wi-Fi Card
If your Wi-Fi is MIA, the first step isn’t panicking (though I understand the urge!). Let's investigate. We can use this cool trick to locate the Wi-Fi adapter.
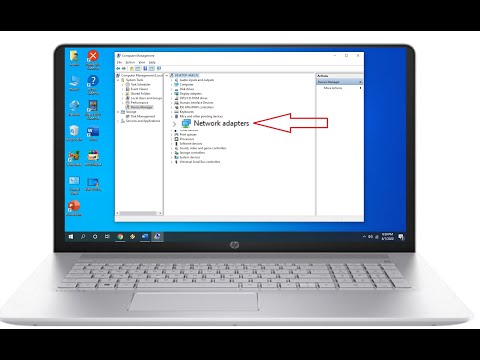
- Check the Device Manager (Windows): This is your digital detective agency. Search for "Device Manager" in the Windows search bar and open it. Look for "Network adapters". If the Wi-Fi card is present, you should see something like "Wireless Network Adapter" or "Wi-Fi Adapter" listed. No network adapter? Hmm… we have a mystery!
- Check the System Information (Windows): Type "System Information" into the Windows search bar and open it. Look for "Network" on the left-hand side, then expand it. It provides detailed information about your network adapters.
- Use Terminal Commands (macOS/Linux): On macOS, you can use the "System Information" app (search for "System Information" in Spotlight). On Linux, the command
iwconfig(in a terminal) is a quick way to check for wireless interfaces. - Physical Inspection (Laptop): If you're comfortable with it (and the laptop is unplugged!), you can often see the Wi-Fi card under a cover on the bottom of your laptop. But opening your laptop can void the warranty so be careful.
4. Windows Device Manager: Your Wi-Fi Detective Headquarters (Windows Only)
Let's delve deeper into the Device Manager, the nerve center for Windows hardware.
- No Adapter Listed: If no Wi-Fi adapter is listed, it's a strong indicator that the card might be disabled, malfunctioning, or not detected by the operating system.
- Warning Symbol: A yellow exclamation mark beside your Wi-Fi adapter indicates driver issues or conflicts.
- Grayed-Out Adapter: This often signifies a disabled adapter.
5. The Driver Dilemma: Why Outdated or Corrupted Drivers Frustrate Us
Drivers are the essential software bridges that allow your operating system to speak to your hardware. Outdated or corrupted drivers are, in my opinion, like trying to order pizza in a language the delivery guy doesn't understand.
- Updating Drivers: Right-click on the Wi-Fi adapter in Device Manager and select "Update driver."
- Reinstalling Drivers: If updating doesn't work, uninstall the driver and then reinstall it. Download the drivers from your laptop manufacturer's website.
6. Enabling the Invisible: How to Activate a Disabled Wi-Fi Card
Sometimes, your Wi-Fi card is simply disabled, either by accident or by you.
- Check the Function Keys: Many laptops have a dedicated function key (usually labeled with a Wi-Fi icon) that can enable or disable the Wi-Fi card. Press this key (often with the "Fn" key) to see if it turns on your Wi-Fi.
- Device Manager Again: Right-click on the Wi-Fi adapter in Device Manager and select "Enable device."
7. The Router's Role: Rule Out External Problems!
Before you declare your laptop a lost cause, check your router!
- Restart the Router: Power cycle your router (turn it off, wait 30 seconds, and turn it back on).
- Check the Router's Wi-Fi Settings: Ensure Wi-Fi is enabled on your router.
8. Hardware Check: Is Your Wi-Fi Card Physically Damaged?
Sometimes, a hardware failure is the culprit.
- Laptop Drop: If you've recently dropped your laptop, that could have damaged the Wi-Fi card.
- Loose Connection: (If you're comfortable with DIY and voiding warranty) Physically inspect the card (AFTER power down and battery removal) to see if it's properly seated.
- Professional Repair: If you suspect physical damage, it's time to visit a tech repair shop.
9. BIOS Updates: A Potential Quick Fix
On occasion, updating your laptop's BIOS (Basic Input/Output System) can resolve hardware compatibility issues, including those affecting your Wi-Fi card. But, it is very risky if you’re not familiar, so proceed with caution, and make sure your laptop is plugged in.
10. Airplane Mode: A Surprising Culprit
Don’t dismiss the simple stuff! Airplane Mode disables all wireless connections, including Wi-Fi. Check your system tray (bottom right) for the Airplane Mode icon. If it is on, click it to switch it off.
11. Power Saving Mode: Can it Shut Down Wi-Fi?
Some laptops have power-saving settings that can disable the Wi-Fi card to conserve battery life. Review your power settings to make sure Wi-Fi isn't being automatically shut down.
12. Resetting Network Settings: A Fresh Start
Sometimes, corrupt network configurations can cause problems. In Windows, you can reset your network settings in the Network & Internet settings. This usually involves a restart.
13. Software Conflicts: The Unseen Enemies
Sometimes, conflicting software can interfere with your Wi-Fi. Antivirus programs or VPN clients can sometimes cause issues. Temporarily disabling these can help diagnose the problem.
14. When to Seek Professional Help?
Okay, if you’ve tried all the troubleshooting steps above and your Wi-Fi card is still playing hide-and-seek, it’s time to consider professional help. Don’t worry; it happens to the best of us.
- Hardware Replacement: If the card is physically damaged, or if you've exhausted all software-based solutions, a replacement Wi-Fi card may be necessary.
- Expert Diagnosis: A tech repair shop can provide a proper diagnosis and determine the root cause of the problem.
15. The Final Victory: Reclaiming Your Wi-Fi Connection!
By systematically following these troubleshooting steps, and with a little perseverance, you'll be back online in no time! You've now equipped yourself with the knowledge to tackle the "hidden card" mystery, and maybe even fix it yourself.
In Closing…
Dealing with Wi-Fi issues can be frustrating, but knowledge is power. By understanding your laptop's Wi-Fi card, you can diagnose and often fix these problems yourself! Remember, it is a process of detective work. So, take a deep breath, be patient, and follow the steps. With a little effort, you'll be surfing the internet like a pro. Now, go forth and conquer those Wi-Fi woes!
FAQs
1. My Wi-Fi card is listed, but I can't connect to the internet. What do I do?
- Start by checking your Wi-Fi password, restarting your router, and updating your Wi-Fi drivers. Also, check your laptop's Wi-Fi settings, airplane mode, and power saving mode. If this doesn’t work, consider a full system reset.
2. How do I update my Wi-Fi drivers?
- Go to Device Manager, find your Wi-Fi adapter, right-click it, and select "Update driver." You can choose to update from your computer or search
How To Check Inbuild Wi-Fi Card Supports Monitor Mode With cmd In Windows 10

By EtHaRay How To Check Inbuild Wi-Fi Card Supports Monitor Mode With cmd In Windows 10 by EtHaRay
How to find out which Wireless Card is present in your laptop

By TheWindowsClub How to find out which Wireless Card is present in your laptop by TheWindowsClub
How to Get Back Missing Network Adapter from Device Manager in Windows 1087
By MJ Tube How to Get Back Missing Network Adapter from Device Manager in Windows 1087 by MJ Tube

Title: How to Easily Upgrade Your Laptop to WIFI 6
Channel: Chavez DIY
How to Easily Upgrade Your Laptop to WIFI 6 by Chavez DIY
Laptop Wifi Connect
Here’s the title: The Ultimate Guide to Mastering Authentic Neapolitan Pizza at Home
The Ultimate Guide to Mastering Authentic Neapolitan Pizza at Home
Our journey into the heart of Neapolitan pizza begins not in a bustling pizzeria, but in your own kitchen. Forget the pre-made dough, the rushed toppings, and the electric oven's relentless hum. We're aiming for something more: the blistered crust, the vibrant sauce, the perfect balance of flavors that define true Neapolitan pizza. This isn’t just about following a recipe; it's about understanding the principles, the ingredients, and the patience required to craft a culinary masterpiece that will rival anything found in Naples itself.
The Foundation: The Art of Authentic Neapolitan Dough
The soul of any Neapolitan pizza resides within its dough. It's not just a base; it's a living, breathing entity that dictates the final product’s character. The ingredients are deceptively simple: flour, water, salt, and yeast. Yet, the execution demands precision and a deep respect for the process. Let’s delve into the specifics.
Choosing the Right Flour: The Cornerstone of Crust
The very foundation of authentic Neapolitan pizza dough lies in the type of flour used. We are aiming for "00" flour, specifically designed for this very purpose. You want a flour that is finely milled, with a high protein content (typically between 12.5-14%), and a low ash content. This allows for a delicate yet strong gluten structure. The "00" designation refers to the fineness of the milling process, contributing to the dough’s characteristic softness and elasticity. Look for brands like Caputo 00 pizzeria flour; it is a popular selection among pizza enthusiasts. Avoid using all-purpose flour, as it lacks the necessary strength and finesse to achieve the signature airy crust.
The Hydration Equation: Achieving the Perfect Dough Consistency
Hydration refers to the ratio of water to flour. Authentic Neapolitan pizza dough often boasts a high hydration level, typically around 60-70%. This high water content is crucial for creating the open crumb structure and those distinctive air pockets that characterize the pizza. However, working with high-hydration dough can be challenging. It is sticky and requires a gentle touch. Start with a lower hydration level the first time you attempt your dough. As you gain confidence, gradually increase the hydration to the desired level. When working, you must add your water slowly and ensure that the flour is evenly hydrated.
The Power of Yeast: Unleashing the Rising Magic
We are talking about fresh yeast for authenticity. Fresh yeast provides a cleaner flavor profile. Instant dry yeast is an acceptable alternative, but it does affect the dough's taste. The amount of yeast needed depends on the resting time of the dough. For a longer ferment, use less yeast. Always proof your yeast. Combine it with a small amount of lukewarm water and a pinch of sugar. If it foams within 5-10 minutes, it is active and ready to use.
The Essential Salt: A Flavor and Texture Enhancer
Salt is not just for flavor; it also plays a crucial role in controlling the fermentation process and strengthening the gluten network. Use fine sea salt for the best results. Add the salt after the gluten has started to develop, typically after the first few minutes of mixing. This prevents the salt from interfering with gluten formation.
The Mixing Process: Hand Kneading vs. Stand Mixer
Authentic Neapolitan pizza dough is traditionally hand-kneaded. The process allows you to feel the dough's texture and develop a connection with it. However, a stand mixer with a dough hook is perfectly acceptable, particularly if you're new to dough making or are making a large batch. Whether hand-kneaded or machine-mixed, the key is to develop a smooth, elastic dough that pulls away from the sides of the bowl (or your hands) cleanly. Hand-kneading requires approximately 10-15 minutes of vigorous work. Rest the dough after the initial kneading, then knead a second time. The mixing time is dependent on your machine.
The Fermentation: Patience is a Virtue
Fermentation is where the magic truly happens. This process allows the yeast to consume sugars, producing carbon dioxide and alcohol, which gives the dough its rise and flavor. Neapolitan pizza dough requires a long, slow fermentation, typically 12-24 hours at room temperature (around 70-75°F or 21-24°C), or even longer in the refrigerator (up to 72 hours). During fermentation, the dough should be kept in a lightly oiled container, covered with plastic wrap or a damp cloth, to prevent it from drying out.
Crafting the Perfect Sauce: Simplicity at its Finest
The sauce is a testament to the beauty of simplicity. With just a few high-quality ingredients, you can achieve a vibrant, flavorful sauce that perfectly complements the dough and toppings.
The Essence of Tomato: San Marzano, the Star
The choice of tomatoes is paramount. San Marzano tomatoes, grown in the volcanic soil of the Agro Sarnese-Nocerino region of Italy, are the gold standard. These tomatoes have a low acidity, a concentrated flavor, and a fleshy texture, making them ideal for pizza sauce. You can commonly find them canned in the grocery store.
No Cooking Required: Preserving the Freshness
Authentic Neapolitan pizza sauce is never cooked. The goal is to preserve the fresh, vibrant flavor of the tomatoes. Simply crush the San Marzano tomatoes by hand (or with the help of a food mill), either whole or roughly chopped. Alternatively, you can use a food processor.
The Subtle Seasoning: Enhancing the Natural Flavors
The seasoning should be minimal, allowing the quality of the tomatoes to shine. Add a pinch of fine sea salt and a small amount of extra virgin olive oil. Some recipes incorporate a few fresh basil leaves, torn by hand, for an added layer of complexity. Avoid over-seasoning or adding garlic or herbs, as these can overpower the delicate balance of flavors.
Selecting Your Toppings: Quality Over Quantity
Neapolitan pizza is about quality ingredients and balanced flavors. Less is often more. Choose toppings that complement the dough and sauce, rather than competing with them.
The Cheese: Fresh Mozzarella, the Classic Choice
Fresh mozzarella cheese is the quintessential topping for Neapolitan pizza. It should be made from buffalo milk (Mozzarella di Bufala) or cow's milk. The cheese should be fresh, milky, and have a slightly salty flavor. Slice the mozzarella into thin, even pieces. Avoid pre-shredded mozzarella, as it often contains additives and doesn't melt as well.
Other Topping Considerations: Embracing Simplicity and Quality
Consider other classic toppings, such as high-quality Italian tomatoes. You can add small amounts of vegetables, but avoid overloading the pizza, preserving the balance between crust, sauce, cheese, and selected toppings. Remember, the focus is on highlighting the fresh flavors.
The Ultimate Bake: Achieving the Perfect Crust
The most challenging aspect of making authentic Neapolitan pizza at home is replicating the high heat of a wood-fired oven. However, with the right techniques, you can achieve a crust that is blistered, tender, and charred.
The Oven Setup: Maximizing Heat and Simplicity
The ideal oven temperature for Neapolitan pizza is between 800-900°F (427-482°C). This is difficult to achieve in a home oven, but you can get close. Preheat your oven to its highest setting (typically 500-550°F or 260-288°C). Use a pizza stone or a pizza steel. The pizza stone or steel absorbs and retains heat, and it helps to create a crispy crust. Place the stone or steel in the oven during preheating to ensure it reaches the correct temperature.
The Stretching Technique: Preserving Air Pockets
The way you stretch the dough is crucial. Avoid using a rolling pin, which can deflate the dough. Instead, gently stretch the dough by hand, using your fingertips. This helps to preserve the air pockets that create the characteristic airy crust. Work from the center outwards, stretching the dough into a round or oval shape, about 10-12 inches in diameter. The edges should be slightly thicker, to form the cornicione (the raised edge).
Assembly and Firing: A Symphony of Speed
Once everything is prepped, the pizza making process is swift. First, lightly flour a pizza peel. Place the stretched dough on the peel. Then, add a thin layer of sauce and evenly distribute the mozzarella and chosen toppings. Slide the pizza onto the hot pizza stone or steel in the preheated oven. Bake for 60-90 seconds. The pizza is ready when the crust is blistered and charred, the cheese is melted, and the edges have a golden brown appearance.
The Presentation: A Touch of Finishing
Remove the pizza from the oven using the pizza peel. Transfer it to a cutting board. Slice it and enjoy it immediately. A drizzle of extra virgin olive oil and a few fresh basil leaves (if desired) can add a final touch of elegance.
Troubleshooting and Refinement: Your Path to Pizza Perfection
Mastering authentic Neapolitan pizza takes practice. Don't be discouraged if your first attempts aren't perfect. Here are a few common issues and how to address them.
