laptop wifi hotspot vista

Title: Make your laptop a HotSpot VISTA
Channel: MarkusHelps
Make your laptop a HotSpot VISTA by MarkusHelps
Laptop WiFi Hotspot Vista: The SHOCKING Secret to Blazing-Fast Speeds!
Unlocking Warp-Speed WiFi: The Unexpected Power of Your Laptop’s Hotspot
Ever felt like your internet speed is stuck in the dial-up era? You’re not alone. We've all been there, staring at that buffering wheel, yearning for a connection that feels less like a trickle and more like a torrent. Because let's be honest, slow internet is the bane of our digital existence, isn't it? But what if there’s a secret, a hidden gem right under your nose, promising to unleash blazing-fast speeds? Prepare to be amazed.
The Hidden Champion: Your Laptop's Secret Weapon
Most of us think of our laptops simply as workhorses. We use them to craft emails, browse the internet, and binge-watch our favorite shows. However, lurking within, especially if you are a Vista veteran, lies a power source you may have overlooked: the built-in WiFi hotspot capability. It's a game-changer, trust me! It's a hidden feature that can transform your laptop into a personal WiFi powerhouse. In fact, it can be the key to resolving those frustrating slowdowns.
Bypassing the Bottleneck: Understanding the WiFi Ecosystem
Before we dive into the nitty-gritty, let's quickly understand why your laptop's hotspot can be so effective. Picture this: Your home router is like a central distribution center. It’s sending internet signals to every device in your home. Naturally, each device competes for bandwidth. Consequently, this creates bottlenecks. Your laptop's hotspot, on the other hand, can create a more focused, dedicated connection. Since you are using your laptop as a personal router, it does not have external interference. Therefore, it creates a direct and streamlined link.
Setting Up Your WiFi Hotspot: A Simple Guide
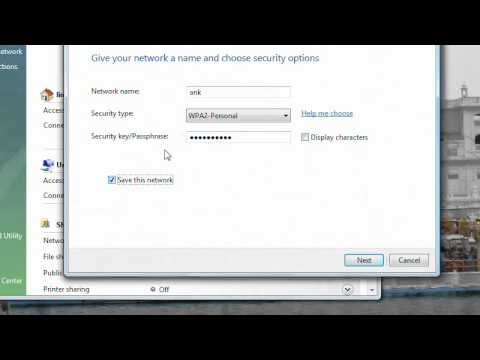
Now, here's where the magic begins. The setup process is surprisingly straightforward. First, ensure your laptop is already connected to the internet. This can be accomplished via an Ethernet cable or your existing WiFi network. Then, navigate to your network settings. You’ll likely find an option to "Share your internet connection" or "Create a mobile hotspot." From there, you should give your hotspot a name (SSID). Then, set up a strong password. Finally, turn it on! In essence, you're crafting a personal wireless network, tailor-made for your needs.
Troubleshooting Common Issues: Smooth Sailing Ahead
Sometimes, you may encounter a few minor hiccups. However, don't be discouraged! For instance, if your devices aren’t connecting, double-check your password. Ensure that you are using the correct one. Moreover, make sure your laptop's firewall isn't blocking the connection. Additionally, check your drivers to ensure they are up to date. In most cases, these simple fixes will resolve any issues. If your speeds are still slow, experiment with your laptop's placement. Position it in a location with better signal strength.
Boosting Performance Tricks: Maximizing Your Speeds
Want to squeeze even more performance out of your hotspot? Indeed, there are a few tricks you can employ. First, limit the number of devices connected. The fewer the devices, the more bandwidth available to each one. Secondly, ensure your laptop is running on AC power, not battery. This allows it to utilize its full processing power. Furthermore, close unnecessary applications and tabs on your laptop. Moreover, to keep things tidy, consider using a wired connection for devices that don't require mobility.
Security Matters: Protecting Your Personal Network
Security is paramount when creating a personal hotspot. Always use a strong, unique password to prevent unauthorized access. Furthermore, keep your laptop's operating system and security software updated. These updates often include important security patches. Also, monitor your hotspot for any suspicious activity. If you see any unknown devices connected, immediately change your password. In short, staying vigilant is key.
**The Vista Enigma: Why It Matters (and How to Overcome) **
Now, concerning Vista, although it's an older operating system, the core hotspot functionality remained. However, you might encounter some compatibility issues with more modern devices. Therefore, always ensure your drivers are up to date. If needed, consider upgrading to a more current operating system if you have a modern computer. Likewise, ensure that your laptop's network card is compatible with the latest WiFi standards.
Is Your Laptop Hotspot Right for You? Weighing the Pros and Cons
Ultimately, deciding whether to use your laptop's hotspot depends on your individual needs. It's ideal for short-term scenarios. For instance, when traveling or when your regular router is down. However, it’s not a perfect replacement for a dedicated home network. The pros are its simplicity and convenience. The main con is the potential impact on your laptop's battery life. Moreover, it can slightly decrease the overall performance.
Conclusion: Unleash the Potential
So, there you have it. Your laptop’s built-in hotspot is not just a tech afterthought. It’s a hidden tool. With thoughtful configuration, you can experience faster, more reliable internet speeds. Therefore, unlock the potential of this often-overlooked feature. Prepare to enjoy a seamless digital experience. You'll be surprised. You might just rediscover the joy of lightning-fast browsing.
Laptop to Xfinity WiFi: The SHOCKING Secret They DON'T Want You to Know!Laptop WiFi Hotspot Vista: The SHOCKING Secret to Blazing-Fast Speeds!
Hey there, tech enthusiasts! Ever felt the frustration of a sluggish Wi-Fi connection, especially when you're trying to share your laptop's internet? We've all been there. You're picturing that crucial Zoom call, the online game night with friends, or even just streaming your favorite show, and suddenly, buffering becomes your new nemesis. But what if I told you there's a secret, a hidden gem lurking within the Vista operating system (yes, that Vista!) that can unlock blazing-fast speeds for your laptop's Wi-Fi hotspot? Prepare to be amazed, because we're about to dive deep into the world of Laptop WiFi Hotspot Vista, and uncover the trick to supercharge your connection.
1. The Frustrating Reality: Slow Hotspots and Why They Happen
Let's be honest, setting up a Wi-Fi hotspot on your laptop can sometimes feel like wrestling an octopus. You click, you configure, and then…nothing. Or worse, a connection that's slower than molasses in January. Why is this? Well, a few culprits are often at play.
- The Bandwidth Bottleneck: Your laptop's Wi-Fi card has a limited capacity. Sharing that bandwidth between your laptop (the source) and all the connected devices can quickly lead to a traffic jam. Imagine a single lane highway trying to handle the rush hour commute!
- Hidden Background Processes: Your laptop is a multitasking marvel, but all those background processes – updates, syncing, running apps – are also vying for bandwidth. They're like hungry toddlers demanding snacks while you're trying to cook dinner.
- The Vista Factor (…Maybe?): While Vista gets a bad rap (we’ll get to why!), its network configuration can, in some cases, be a bit…clumsy. It doesn't always optimize hotspot settings as effectively as more modern operating systems.
2. Unearthing the Vista Hotspot Secret: A Glimpse into the Past
Now, before you start rolling your eyes and thinking, "Vista? Seriously?", hear me out. Believe it or not, buried within the depths of the Vista operating system is a setting that, when tweaked correctly, can dramatically improve the performance of your laptop's Wi-Fi hotspot. It's not magic, but it feels pretty close. This secret isn't some complicated, complex code; it's a simple, often overlooked adjustment that can make a real difference.
3. Decoding the Underlying Technology: How Hotspots Really Work
To understand the secret, we need a tiny bit of tech talk. Your laptop acts as a mini-router when creating a hotspot. It receives internet from your primary connection (Wi-Fi, Ethernet, etc.) and then broadcasts that signal as a separate Wi-Fi network. Think of it as a radio transmitter, sharing your internet signal with nearby devices. Vista, in its wisdom (or lack thereof, depending on your perspective!), managed this process in a certain way.
4. The Shocking Truth: The Hidden Setting You've Been Missing
Here's the big reveal! The "shocking secret" lies in the Wireless Network Adapter Properties settings.
- Go to your Control Panel.
- Select Network and Internet and then Network and Sharing Center.
- Click on Change adapter settings.
- Locate your active wireless network adapter (the one connected to the internet).
- Right-click on it and select Properties.
- Find Configure.
- In the "Advanced" tab, you'll usually find a setting relating to the Wireless Mode/802.11 Mode (or similar wording). It might have options like "Auto," "802.11b/g," or "802.11a/b/g." And here lies the magic: Choose a mode that supports the fastest speeds supported by your devices.
This single adjustment can dramatically boost speeds, especially for newer devices that support faster protocols like 802.11n or 802.11ac. It's like upgrading your laptop's Wi-Fi card, without actually upgrading anything!
5. Why Vista? The Unexpected Advantage
Now, you're probably wondering, "Why Vista? Isn't it old and outdated?" That's a fair question, and it's true that Vista isn't the most modern operating system. However, this particular setting, often overlooked in later systems, can sometimes allow for surprisingly good performance. The older architecture can, paradoxically, be a bit more direct in its handling of the connection.
6. Step-by-Step Instructions: Reaching Blazing-Fast Speeds with Vista!
Alright, let's get practical. Here's a step-by-step guide to tweaking your Vista hotspot settings:
- Access Network Connections: Open the Control Panel and go to "Network and Sharing Center."
- Adapter Settings: Click “Change adapter settings.”
- Identify Your Wireless Adapter: Locate your Wi-Fi adapter (it typically has a name like "Wireless Network Connection").
- Properties: Right-click on the wireless adapter and select "Properties."
- Configure: Click on "Configure."
- Advanced Tab: Navigate to the "Advanced" tab.
- Select Wireless Mode/802.11 Mode: Find the setting for Wireless Mode or 802.11 Mode.
- Optimize: Select the fastest mode supported by your devices. If your devices support 802.11n, choose that. If they support 802.11ac, even better!
- Apply & Restart: Click "OK" to apply the changes. You might need to restart your laptop for the changes to take full effect.
7. Troubleshooting Common Hotspot Issues
Even with the secret weapon, you might encounter a few hiccups. Here's how to handle them:
- Slow Speeds: Double-check that you've selected the correct wireless mode. Also, ensure you have a strong internet signal from your primary connection. Consider your distance from the router on the connected device to your laptop.
- Connection Drops: Weak signals and interference from other devices can cause dropouts. Try moving your laptop closer to the device(s) it is sharing with, or changing the channel on your router.
- Devices Can't Connect: Verify that you’ve correctly entered the password for your Wi-Fi hotspot and that the devices are within range. Test with a different device to identify the issue.
8. Comparing Speeds: Before and After Tweaking
Before you start, speed test your hotspot. Then, after making the changes, check your speeds again. You should see a noticeable improvement. You can use an online speed test (like Speedtest.net) on a connected device to measure it easily.
9. Beyond Vista: Applicable to Other Operating Systems?
Even if you're not on Vista, these principles are helpful. The key takeaway is to always check your wireless adapter settings and optimize the wireless mode. While the exact steps vary depending on your operating system, the underlying concept remains the same. The secret is in the settings!
10. Security First: Securing Your Vista Hotspot
Don't forget about security! Always use a strong password for your Wi-Fi hotspot. This protects your data and prevents unauthorized users from stealing your bandwidth. You can set the password during the hotspot configuration process. Think of it as the lock on your front door.
11. Addressing the Elephant in the Room: Vista's Reputation
Let's be honest, Vista has had a rough go of it. Many people remember it as a slow, buggy operating system, but sometimes, despite its flaws it still possessed some hidden advantages. This is one of those scenarios.
12. The Power of the Router: Additional Ways to Optimize
While we focused on the laptop, remember to also optimize your main router.
- Keep Your Router Updated: Router firmware updates can improve performance and security.
- Choose the Correct Channel: Wi-Fi channels can get congested. Use a Wi-Fi analyzer app to find the least crowded channel.
- Router Placement: Place your router in a central, elevated location, away from walls and obstructions.
13. Beyond Speed: Other Benefits of a Strong Hotspot
A fast hotspot isn't just about streaming videos. It can also:
- Enhance Productivity: Faster downloads and uploads mean more time for work and less time waiting.
- Enable Online Gaming: A stable connection is critical for online gaming.
- Support Multiple Devices: A faster connection can handle more devices simultaneously.
14. Alternatives to Native Hotspots: Third-Party Options
Consider third-party hotspot software if you're still struggling. Some tools offer more advanced features and often provide better performance than the built-in Vista hotspot.
15. Final Thoughts: Unleashing the Vista Hotspot Powerhouse!
So there you have it! You might be surprised by how much better your Wi-Fi hotspot can perform with just a few minor adjustments. By focusing on the settings on your laptop, we can dramatically improve the speeds your devices will share.
#
Laptop WiFi Hack: FREE Internet Access Now!vista Laptop As wifi hotspot

By deadlyheart4u vista Laptop As wifi hotspot by deadlyheart4u
Cara Membuat Laptop Jadi Hotspot WiFi Di Windows 10 11

By GAPTEK AMATIR Cara Membuat Laptop Jadi Hotspot WiFi Di Windows 10 11 by GAPTEK AMATIR
Laptop sebagai Hotspot WiFi 2025 Panduan Lengkap

By ReviewQuasar Laptop sebagai Hotspot WiFi 2025 Panduan Lengkap by ReviewQuasar
Title: Turn your windows vista into wifi hotpsot
Channel: Ankit bhatia
Turn your windows vista into wifi hotpsot by Ankit bhatia
Wifi Not Found
Here's the article:
Title: Unveiling the Enigmatic Allure of the Northern Lights: A Comprehensive Guide to Witnessing Nature's Grand Spectacle
The Aurora Borealis, or Northern Lights, has captivated human imagination for millennia. These ethereal curtains of light, dancing across the night sky, have inspired myths, legends, and scientific inquiry. The experience of witnessing the Northern Lights is often described as transformative, a moment of profound connection with the natural world. This comprehensive guide offers an in-depth exploration of the phenomenon, equipping you with the knowledge and resources to plan and execute your own Aurora adventure.
Understanding the Science Behind the Spectacle: Unmasking the Cosmic Ballet
The Northern Lights are a product of the sun's activity, specifically, solar flares and coronal mass ejections, which release vast quantities of charged particles into space. These particles, carried by the solar wind, eventually reach Earth's magnetic field. The Earth's magnetic field acts as a shield, deflecting most of these particles. However, some charged particles are funneled towards the poles, where they collide with atoms and molecules in the upper atmosphere.
These collisions excite the atmospheric gases, causing them to release energy in the form of light. The color of the light depends on the type of gas that is excited and the altitude at which the collision occurs. Oxygen, for example, produces green and red light, while nitrogen produces blue and purple light. The complex interplay of these factors creates the stunning variety of shapes, colors, and movements that characterize the Aurora Borealis. The dynamic nature of these displays is what makes each sighting unique and unforgettable. The intensity of the aurora, determined by the level of solar activity, is measured using the Kp index. This numerical scale, ranging from 0 to 9, helps to predict the likelihood of seeing the lights. A Kp index of 0 indicates minimal activity, while a Kp index of 9 signifies an extremely powerful aurora.
Optimal Viewing Locations: Charting Your Course to Aurora Encounters
Several regions on Earth are particularly well-suited for viewing the Northern Lights. These locations, situated within the auroral oval, offer the highest probability of witnessing this incredible natural phenomenon. The most popular destinations are in close proximity to the Arctic and the Arctic Circle.
- Alaska, USA: The vast landscapes of Alaska, away from light pollution, provide ideal backdrops for Aurora viewing. Popular viewing locations include Fairbanks, Anchorage, and Denali National Park.
- Canada: The expansive wilderness of Canada, particularly the Yukon Territory, Northwest Territories, and northern Alberta, offers numerous opportunities for aurora viewing. Whitehorse and Yellowknife are particularly favored.
- Iceland: Iceland's unique geography and infrastructure blend with its high latitude to make it one of the most popular destinations. The island nation offers easy access to viewing locations, with Reykjavik offering convenient amenities.
- Norway: Northern Norway, including the Lofoten Islands and Tromsø, is easily accessible by air. Norway offers a variety of tour operators and accommodations designed to facilitate your Aurora hunting pursuit.
- Sweden: Swedish Lapland, with its vast, relatively empty wilderness and minimal light pollution, is an excellent location. Abisko, known for its "Aurora Sky Station," is a particular favorite.
- Finland: Finnish Lapland is a remarkable location. The many resorts and wilderness cabins provide excellent conditions for dark skies and the potential for Aurora viewing.
- Greenland: Greenland, which has vast remote areas, is another prime location, given its high latitude.
- Russia: Russia, particularly the Murmansk region, is a known viewing location.
Planning Your Expedition: Essential Preparations for a Successful Aurora Hunt
Successful aurora viewing requires careful planning and preparation. Consider these crucial factors:
- Timing is Everything: The Northern Lights are most visible during the winter months, from September to April, when the nights are long and dark. However, do not disregard the fall and spring seasons, it is possible to see the lights then too. You also need clear, cloudless skies. Therefore, check the weather forecast regularly. The best viewing times are usually between 10 PM and 2 AM.
- Monitoring Solar Activity: Utilize online resources, such as the Space Weather Prediction Center of NOAA, to monitor the Kp index and predict aurora activity.
- Choosing the Right Gear: Warm clothing is absolutely essential. You will need layers of thermal underwear, insulated pants and jacket, a warm hat, gloves, and waterproof boots. Do not forget a camera with a manual exposure, a sturdy tripod, and a wide-angle lens for capturing the beauty of the aurora.
- Accommodation and Transportation: Reserve accommodations in advance, especially during peak season. Consider the ease of access to your chosen destination and the availability of transportation options, like car rentals or guided tours.
- Managing Light Pollution: Light pollution dramatically impacts your chances of seeing the aurora. Choose viewing locations away from cities and other sources of artificial light. Wilderness areas offer the darkest skies.
- Embrace Patience: The Northern Lights are a natural phenomenon and their appearance is not guaranteed. You may need to wait for hours, or even days, to see them. Bring snacks, drinks, and entertainment.
- Safety First: Always be aware of the weather conditions and the terrain in your chosen viewing location. Inform someone of your plans and carry a fully charged cell phone. Watch out for wildlife.
Camera Settings and Techniques: Capturing the Aurora's Majestic Splendor
Photographing the Northern Lights can be a rewarding experience, but it requires specific camera settings and techniques.
- Use a Tripod: This is essential for long exposures, as the aurora is often faint.
- Manual Mode: Switch your camera to manual mode for total control over settings.
- ISO: Start with an ISO of 800 and adjust accordingly. Increase the ISO if the aurora is faint and lower it if the light is intense.
- Aperture: Use a wide aperture, such as f/2.8 or f/4, to let in as much light as possible.
- Shutter Speed: Experiment with shutter speeds between 5 and 30 seconds. The ideal shutter speed will vary depending on the intensity of the aurora.
- Focus: Manually focus your lens to infinity. Use a bright star as a reference point.
- Composition: Frame your shots carefully. Include foreground elements to add depth and interest to your images.
- Remote Shutter Release: Using a remote shutter release or the camera's self-timer, will prevent camera shake.
- Batteries: Batteries drain quickly in cold weather. Have several spare batteries.
- Lens Cleaning: Keep your lens clean and dry.
- Post-Processing: Use photo editing software to enhance your images. Adjust the white balance, exposure, contrast, and clarity.
Etiquette and Respect: Preserving the Natural Wonder
Witnessing the Northern Lights is an experience that should be enjoyed responsibly. Remember the following:
- Leave No Trace: Pack out everything you pack in, including trash.
- Respect Wildlife: Maintain a safe distance from wild animals. Do not feed or approach them.
- Minimize Light Pollution: Use a red flashlight when walking around. Avoid using headlights.
- Be Mindful of Noise: Keep noise levels down to avoid disturbing others and wildlife. Be respectful of other viewers.
- Respect Local Cultures: Learn about local customs and traditions.
- Educate Others: Share your knowledge and experiences about the aurora with others, helping to promote responsible tourism.
Beyond the Lights: Enriching Your Arctic Adventure
The Northern Lights are undoubtedly the main attraction, but the Arctic and subarctic regions offer many more experiences. Consider these supplementary activities:
- Dog Sledding: Experience the thrill of gliding across a snowy landscape pulled by a team of sled dogs.
- Snowmobiling: Explore the vast wilderness on a snowmobile.
- Ice Fishing: Enjoy a relaxing day of ice fishing on a frozen lake or river.
- Wildlife Viewing: Look for local wildlife, such as reindeer, seals, and whales.
- Hiking and Snowshoeing: Explore the stunning scenery on foot.
- Visiting Local Communities: Learn about the traditions and cultures of indigenous peoples.
- Relaxing in Saunas: Indulge in a traditional sauna, a popular activity in many Nordic cultures.
Common Misconceptions and Frequently Asked Questions: Debunking the Myths
- Misconception: The Northern Lights can only be seen in the winter. While winter is the peak season, you can view the lights from September through April.
- Misconception: You need a telescope to see the Northern Lights. The lights are visible with the naked eye.
- Misconception: The Northern Lights are always green. They can appear in various colors, including red, blue, and purple.
- FAQ: How can I predict the aurora? Monitor the Kp index.
- FAQ: What time of day are the Northern Lights visible? They are most visible at night.
- FAQ: What is the best camera to use? Any camera with manual settings and a tripod will work.
- FAQ: Is it always cold? Yes, it is cold, which makes the experience all the more rewarding.
- FAQ: How long do the lights last? The lights can last from several minutes to several hours.
**Conclusion: Embracing the Magic of the
