can i use my laptop as wifi hotspot windows 7

Title: How to Create a WiFi Hotspot with Windows 7
Channel: 1stepatatime
How to Create a WiFi Hotspot with Windows 7 by 1stepatatime
Turn Your Windows 7 Laptop into a WiFi Hotspot: The Ultimate Guide (Secret Trick Inside!)
Unleash Your Inner WiFi Guru: Turning Your Windows 7 Laptop into a Hotspot (It's Easier Than You Think!)
Ever wished you could share your internet connection, even when a physical wire wasn't around? Perhaps your phone is out of data, or maybe you're traveling and need to connect multiple devices. Well, don't fret! You're in the right place. We're about to embark on a journey. Furthermore, we'll transform your trusty Windows 7 laptop into a powerful WiFi hotspot. This guide will be your ultimate companion. Get ready to learn a secret trick, too!
Setting the Stage: What You'll Need
First things first, let's gather our essentials. Luckily, the requirements are quite straightforward. You will need a Windows 7 laptop, of course. A working internet connection is also a must. That's kind of the whole point, right? Finally, a little patience and a curious spirit won't hurt. You're already off to a great start! Now, let’s dive in.
Step 1: The Magic Begins - Accessing the Command Prompt
Now, prepare to become a tech wizard! We begin by opening the Command Prompt. Think of this as the secret portal. You can find it easily. Click on the Windows "Start" button. In the search bar, type “cmd.” Right-click on "cmd.exe" and select "Run as administrator." A black window will appear; this is your workspace.
Step 2: Configuring the Virtual WiFi Adapter
Next, we must perform a crucial step. This step will bring our hotspot to life. We'll use a simple command. It essentially tells your laptop to share its internet connection. Type the following command carefully: netsh wlan set hostednetwork mode=allow ssid=YourHotspotName key=YourPassword Replace "YourHotspotName" with your desired hotspot name. Also, replace "YourPassword" with a strong password of at least eight characters. For instance, instead of YourHotspotName, try LaptopWiFi. Likewise, choose a complex password. Press “Enter.” The command executes the magic!
Step 3: The Key to Activation: Starting the Hosted Network
Now that we’ve configured the settings, it's time to activate our newly created network! We need another command. This instruction starts the hosted network. Type: netsh wlan start hostednetwork and press "Enter." If it all works correctly, you should see a confirmation message. If you don't, double-check the previous steps. In fact, typos are the most common culprits!
Step 4: Sharing the Internet Connection: The Grand Finale
We’re nearing the finish line! Next, we need to share your internet connection with other devices. Go to the "Network and Sharing Center." You can find this in the Control Panel. Alternatively, right-click the network icon in your system tray. Then, select "Open Network and Sharing Center." Now, look for "Change adapter settings" on the left.
A window displaying your network adapters will appear. Now, find your active internet connection. Generally, it's labeled "Local Area Connection" or something similar. Right-click on your connection. Choose "Properties." In the "Sharing" tab, check the box that says, "Allow other network users to connect through this computer’s Internet connection." Select your hosted network from the dropdown menu. Click “OK.”
Step 5: The Secret Trick Unveiled: Troubleshooting and Optimization
Sometimes, things don't go as planned. Therefore, here's a bonus tip! If your hotspot isn't working, don't panic. Firstly, ensure your internet connection is active. Secondly, double-check your commands for typos. Finally, rebooting your laptop often resolves minor glitches. Moreover, consider updating your network drivers if you continue to encounter issues.
Step 6: Connecting Your Devices: The Moment of Truth
Finally, the moment you've been waiting for! Go to your phone, tablet, or other device. Search for available WiFi networks. You should see your hotspot name. Enter your password. If everything is successful, congratulations! You've successfully transformed your Windows 7 laptop into a WiFi hotspot. In other words, enjoy your newfound connectivity.
Troubleshooting Common Issues
If you run into problems, don’t be discouraged. Furthermore, common issues have straightforward solutions.
- Hotspot Not Showing Up: Ensure your hosted network is started (Step 3). Verify that your network adapter is enabled.
- No Internet Access on Connected Devices: Double-check that you've correctly shared your internet connection (Step 4). Consider restarting your laptop and the connected devices.
- Slow Connection: The speed depends on your internet plan. It also depends on how many devices are connected.
Conclusion: You Are Now a WiFi Master!
You did it! You’ve unlocked the secrets of creating a WiFi hotspot with your Windows 7 laptop. You can now share your internet connection wherever you go. Now, you can connect multiple devices. This is super useful for traveling. Besides, it’s a handy trick for home use. So, go forth and share the WiFi! You're now a certified WiFi master. Remember, practice makes perfect. With a little patience, anyone can master this skill.
Laptop to LG TV Wireless: The SHOCKINGLY Easy Trick!Turn Your Windows 7 Laptop into a WiFi Hotspot: The Ultimate Guide (Secret Trick Inside!)
Hey there, fellow tech adventurers! Ever found yourself in a Wi-Fi desert with a laptop that’s practically begging to share its internet connection? Or maybe you're like me, constantly juggling multiple devices and yearning for a quick and convenient way to get them all online? Well, good news, because we're diving into the awesomeness of turning your Windows 7 laptop into a Wi-Fi hotspot, and trust me, it’s easier than you think. Today, We’re not just going to give you a run-of-the-mill guide; we’re unlocking the secrets, the hidden tactics, and that secret trick to get you connected and staying connected, wherever you roam. Buckle up, because this is going to be fun!
1. Why Turn Your Windows 7 Laptop into a Hotspot? The Perks!
Let's be honest: we live in a world glued to the internet. From streaming your favorite shows to answering urgent emails, a solid internet connection is a necessity. But what about those times when Wi-Fi is scarce, or nonexistent? That's where the magic of a laptop hotspot comes in, acting like a personal Wi-Fi router. Think of it as your digital Swiss Army knife. You can connect your phone, tablet, gaming console, or even another laptop. It’s like having a miniature internet cafe in your pocket. And let’s not forget the cost savings. Instead of paying for multiple Wi-Fi plans, you can share the connection from your laptop. It's a win-win situation.
2. Before We Begin: What You'll Need
Before we jump into the nitty-gritty, let's make sure you’ve got your ducks in a row. You'll need:
- A Windows 7 Laptop: Obviously! This guide is specifically for Windows 7, so if you’re running something else, the steps might slightly differ.
- An Active Internet Connection: Be it through Ethernet, a 3G/4G/5G USB dongle, or any other broadband connection. Your laptop needs to get the internet before it can give it.
- Slight Tech Savvy: Don't worry, we'll keep it simple. This is not rocket science, so there is no need to be overwhelmed.
- Patience: Sometimes, things can go a little haywire. But with a bit of patience, we'll get you online.
3. The Standard Method: Using the Built-in Feature (and Why It's a Pain!)
Windows 7 offered a built-in method for creating a hotspot, and you might have stumbled upon it. You'd typically go into the Network and Sharing Center, then set up a new connection, and choose "set up a wireless ad-hoc network." Sounds simple, right? In theory, yes. But in practice, it's often a frustrating experience. It’s like trying to herd cats; the connection drops, the security is iffy, and it's generally unreliable. We've all been there, right? The Ad-Hoc system, It's not always the best for consistent, long-term use.
4. Enter the Secret Weapon: The Command Prompt Method (and Why It's Superior!)
Fear not! We're ditching the clunky built-in method and embracing the elegant solution: the command prompt. This is where the secret trick comes in, and trust me, it's a game changer. It's reliable, secure, and gives you much more control.
5. Step-by-Step Guide: Creating Your Wi-Fi Hotspot with Command Prompt
Here’s how you do it, step-by-step. Don't worry, we'll break it down into bite-sized, easy-to-follow chunks:
Step 1: Open Command Prompt as Administrator: Hit the Windows key, type "cmd," then right-click on "Command Prompt" and select "Run as administrator." This is crucial because you need administrator privileges to make network changes.
Step 2: The First Command – Setting Up the Virtual Adapter: Type the following command and press Enter:
netsh wlan set hostednetwork mode=allow ssid="YourHotspotName" key="YourPassword"Replace "YourHotspotName" with the name you want for your Wi-Fi hotspot (e.g., "MyLaptopWiFi"). Replace "YourPassword" with a strong, secure password. Remember this information, because it is what you will use to subsequently connect your other devices to the hotspot.
Step 3: Start the Hosted Network: Type the following command and press Enter:
netsh wlan start hostednetworkStep 4: Sharing Your Internet Connection: This is the crucial step that links your internet connection to the hotspot.
- Go to Network and Sharing Center (search it in the Start Menu).
- Click on "Change adapter settings" on the left-hand side.
- Locate the adapter that shows your active internet connection (e.g., your Ethernet connection or your Wi-Fi connection if you're using a Wi-Fi adapter to connect to the internet).
- Right-click on that adapter and select "Properties."
- Go to the "Sharing" tab.
- Check the box that says "Allow other network users to connect through this computer's Internet connection."
- In the "Home networking connection" drop-down menu, select the "Microsoft Hosted Network Virtual Adapter" (it should be the one associated with your hotspot).
- Click "OK."
Step 5: Connecting Your Devices: Search for your new hotspot name with your phone, tablet, or other devices, enter your password, and enjoy your internet!
6. Troubleshooting Common Issues: When Things Go Wrong (and How to Fix Them!)
Let’s be honest, not everything always goes according to plan. Here are some common issues and how to tackle them:
- "The Hosted Network Couldn't Be Started": This usually means there's a driver issue. Make sure your wireless adapter is up-to-date. Go to Device Manager (search in the Start Menu), expand "Network adapters," right-click on your wireless adapter, and select "Update driver."
- "Can't Connect to the Internet": This almost always points to a problem with the sharing settings. Double-check steps 4 and ensure you've selected the correct adapter and that the "Allow other network users to connect…" box is checked.
- "Security Issues": Ensure you have a strong password for your hotspot, and consider using WPA2 encryption for the best security.
- "Slow Speeds": Numerous devices connected simultaneously could drastically reduce bandwidth.
7. Maximizing Performance: Speed and Security Tips
Now that your hotspot is up and running, let’s ensure you’re getting the best performance possible:
- Choose the Right Channel: If you have issues with interference, try changing the Wi-Fi channel for your hosted network. This can be done using a third-party software.
- Keep it Strong: Make sure your laptop is in a location where it can receive the best signal of your internet source.
- Limit Connected Devices: The more devices, the slower the internet. If you're experiencing issues, consider limiting the number of connected devices.
- Update Drivers: Keep your wireless adapter drivers up to date to ensure the best possible performance.
- Password protect: Make sure you have a strong password
- Use Strong Encryption: Select WPA2 or WPA3 encryption for your network.
- Check Your Firewall: Ensure the Windows firewall is not blocking the connection.
8. Security Considerations: Protecting Your Data and Privacy
Creating a hotspot means you're essentially opening a door to your internet connection. Security is paramount. Here are some essential security tips:
- Use a Strong Password: This is your first line of defense. Go beyond the simple passwords.
- Enable Encryption: Always use WPA2 or WPA3 encryption. Avoid using WEP, as it's too easily cracked.
- Keep Your Software Updated: Ensure your operating system and antivirus software are up-to-date.
- Monitor Connected Devices: Check which devices are connected to ensure no unauthorized users are piggybacking on your connection.
- Be Aware of Public Wi-Fi: Avoid using your hotspot in public places, as the risk of unauthorized access is higher.
9. Comparing Methods: Command Prompt vs. Built-in Ad-Hoc
We've already touched on this, but let's have a direct comparison:
| Feature | Command Prompt Method | Built-in Ad-Hoc Method | | ---------------- | ------------------------------------------------------ | -------------------------------------------- | | Reliability | High, more stable and dependable | Low, prone to disconnections and issues | | Security | More secure and customizable | Lower, weaker security than the command prompt | | Ease of Use | Requires a few command lines, but once setup, it’s easy | Simple setup, but often fails or struggles | | Customization | Greater control over
HP Laptop Hotspot: Instant WiFi Anywhere!Turn Your Windows 7 Laptop into a WiFi Hotspot 2
By AvoidErrors Turn Your Windows 7 Laptop into a WiFi Hotspot 2 by AvoidErrors
Turn Your Windows 7 Laptop into a WiFi Hotspot

By AvoidErrors Turn Your Windows 7 Laptop into a WiFi Hotspot by AvoidErrors
Turn Your Windows 7 Laptop into a WiFi Hotspot
By AvoidErrors Turn Your Windows 7 Laptop into a WiFi Hotspot by AvoidErrors

Title: How to turn your Windows 7810 Laptop or PC into a WiFi Hotspot UpdatedHD
Channel: iTech
How to turn your Windows 7810 Laptop or PC into a WiFi Hotspot UpdatedHD by iTech
Laptop Wifi Hotspot
Turn Your Windows 7 Laptop into a WiFi Hotspot: The Ultimate Guide (Secret Trick Inside!)
In an age where connectivity reigns supreme, turning your Windows 7 laptop into a WiFi hotspot can be a true lifesaver. Whether you're stranded in a hotel with exorbitant internet fees, sharing your internet with a friend in need, or simply extending your home network's reach, the ability to create a personal hotspot is invaluable. This comprehensive guide will navigate you through every facet of transforming your laptop into a wireless gateway, ensuring a seamless and secure experience. We'll delve into the standard methods, uncover a hidden trick that offers enhanced performance and, most importantly, empower you to become a WiFi hotspot master. Forget relying on flaky public networks; embrace the freedom and control of your very own portable wireless network.
Understanding the Basics: Why Turn Your Laptop into a Hotspot?
Before we dive into the mechanics, let's explore the core benefits of converting your Windows 7 laptop into a WiFi hotspot. Primarily, it offers unparalleled convenience. Imagine needing to connect multiple devices – a tablet, a smartphone, perhaps even another laptop – to the internet simultaneously. A hotspot eliminates the need for separate connections and tangled wires.
It also provides significant cost savings. Instead of paying for multiple internet subscriptions or expensive mobile data plans, you can leverage your existing internet connection (either wired or through a compatible USB modem) to create a single, shareable WiFi network.
Furthermore, a personal hotspot provides enhanced security. Public WiFi networks are notorious for vulnerabilities. With your own hotspot, you control the network's security settings, protecting your data from prying eyes. Finally, a hotspot is a boon for travel. It is a superb option for travelers seeking a network connection.
Method 1: The Hosted Network – Your First Step to Wireless Sharing
Windows 7 offers a built-in feature called "Hosted Network," an intuitive way to share your internet connection. This method, while straightforward, might prove less reliable compared to the secret tip we'll unveil shortly. However, it’s a solid foundation for understanding the process.
The key is to utilize the Command Prompt, the gateway to Windows' underlying functionality. Begin by opening the Command Prompt as an administrator. To do this, navigate to the Start menu, type "cmd" in the search bar, right-click on "cmd.exe," and select "Run as administrator." This step is essential because creating and managing a hosted network requires elevated privileges.
In the Command Prompt window, carefully type the following command and press Enter:
netsh wlan set hostednetwork mode=allow ssid="YourHotspotName" key="YourPassword"
- Replace
"YourHotspotName"with your desired network name (e.g., "MyLaptopHotspot"). This name will be visible to other devices searching for WiFi networks. - Replace
"YourPassword"with a strong password of at least eight characters. This password is crucial for securing your network and preventing unauthorized access. Choose a password that is difficult to guess but easy for you to remember.
After executing this command, you've essentially configured the parameters for your hotspot. However, it's not yet active. Now, you must start the hosted network. Within the same Command Prompt window, enter the following command and press Enter:
netsh wlan start hostednetwork
If all goes as planned, you should see a confirmation message indicating that the hosted network has started successfully. But the internet connection still needs to be shared. You're almost there.
Now, proceed to the Network and Sharing Center. You can access it in one of two ways. First, click on the network icon in your system tray, then click "Open Network and Sharing Center." Alternatively, go to the Control Panel, select "Network and Internet," and then click "Network and Sharing Center."
Within the Network and Sharing Center, you'll see a list of your network connections. Identify the connection you're using to access the internet (e.g., Ethernet, WiFi if connected to another wireless network, or a Mobile Broadband adapter). Right-click on this connection and select "Properties."
In the Properties window, navigate to the "Sharing" tab. Check the box that says "Allow other network users to connect through this computer's Internet connection." Under "Home networking connection," select your hosted network from the dropdown menu. This will typically be identified by the virtual WiFi adapter you created. Click "OK" to save your changes.
At this point, your Windows 7 laptop should be broadcasting a WiFi signal. You can search for the network on your other devices using the "ssid," and enter the "key" when prompted.
Troubleshooting Common Hosted Network Issues
While generally reliable, the Hosted Network feature in Windows 7 can sometimes encounter snags. It's vital to have a troubleshooting strategy ready.
- "The hosted network couldn't be started" Error: This error usually stems from driver issues. Update your wireless network adapter drivers. Go to the Device Manager (search "Device Manager" in the Start menu), expand "Network adapters," right-click on your wireless adapter, and select "Update driver software." Choose the option to automatically search for updated driver software. If this fails, try downloading the latest drivers from your laptop manufacturer's website.
- "Unable to share Internet connection" Error: This problem often arises if the Internet Connection Sharing (ICS) service is disabled. To start it, press Win + R, type "services.msc" in the Run dialog box and press Enter. Locate "Internet Connection Sharing (ICS)" in the list and double-click it. Set the "Startup type" to "Automatic" then click “Start.,” and click "OK."
- Slow Connection Speeds: This is often due to signal interference or limitations of your wireless adapter. Try moving your laptop closer to the devices connecting to it and try switching wireless channels in the adapter properties.
- Hotspot Disconnecting Frequently: This can be caused by power-saving settings or conflicts with other network devices.
Method 2: The Secret Trick – Unleashing Ultimate Hotspot Performance
The Hosted Network feature is excellent, but it does possess certain limitations. The "Secret Trick" will show how to overcome the hurdles using a powerful tool to create a virtual WiFi adapter dedicated as an independent hotspot.
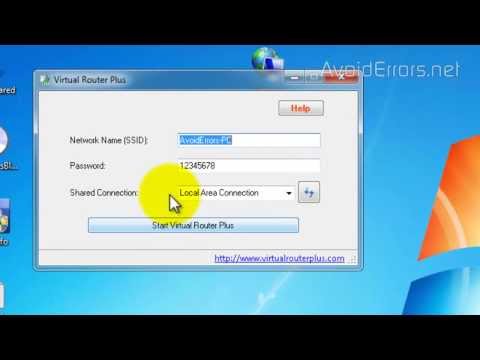
The "Secret Trick" is to leverage Virtual Router Manager, a free, open-source software that simplifies the hotspot creation process. This software offers a more user-friendly interface and, in many cases, improved stability and performance compared to the built-in Hosted Network feature.
Download Virtual Router Manager from a reputable source (search online for "Virtual Router Manager," making certain to download the software from a trusted site). Installation is typically straightforward, following the standard Windows installation process. After installation, launch Virtual Router Manager.
You'll be presented with a simple, intuitive interface. The first step is to select your internet connection from the "Internet Connection" dropdown menu. This is the connection your hotspot will share (e.g., your wired Ethernet connection or your existing wireless connection).
Next, enter your desired "Network Name (SSID)" and "Password." Choose a strong password to secure your hotspot. Click the "Start Virtual Router" button.
Virtual Router Manager will take care of the underlying commands, enabling your hosted network. If everything is running correctly, you'll see the status change to "Running," and your hotspot should be broadcasting.
The success of this method often lies with your wireless hardware's capabilities. Because it creates a dedicated virtual adapter, this software can, on many systems, side-step driver issues that may affect the Hosted Network and increase connection speed.
Advantages of Using Virtual Router Manager
- User-Friendly Interface: The graphical interface makes the configuration process much easier than using the Command Prompt.
- Improved Stability: Virtual Router Manager tends to be more stable and reliable than the built-in Hosted Network feature, especially on some older laptops.
- Simplified Configuration: It streamlines the process of setting up and managing your WiFi hotspot.
- Automatic Startup: The software can automatically start your hotspot upon system boot.
- Monitoring: Virtual Router Manager provides information about connected devices, data usage, and other useful statistics.
Enhancing Your Hotspot Experience: Optimizing Performance and Security
Once your hotspot is up and running, there are several things you can do to optimize performance and security, guaranteeing a smooth and secure experience for everyone connected.
- Choose a Strong Password: This is paramount for security. Use a complex password with a mixture of uppercase and lowercase letters, numbers, and symbols. Avoid using easily guessed information, such as birthdays or common words.
- Monitor Connected Devices: Keep track of the devices connected to your hotspot. Virtual Router Manager displays this information clearly. If you see any unauthorized devices, immediately change your password.
- Limit the Number of Connected Devices: The more devices connected to your hotspot, the slower the internet speed will be for each device. Limit the number of devices based on bandwidth needs.
- Update Your Wireless Adapter Drivers: Regularly update your wireless adapter drivers to ensure optimal performance and security. It's one of the best practices.
- Position Your Laptop Strategically: The location of your laptop affects the signal coverage. Position it in an open area, away from walls and obstructions. If possible, elevate your laptop to improve signal propagation.
- Consider Dual-Band Wireless Adapters: If your laptop has the capacity, utilize a dual-band wireless adapter that supports the 5 GHz band. This will provide faster speeds and less interference, and this can greatly improve data transfer.
- Configure Firewall Settings:
