how to activate wifi in windows 8.1 laptop

Title: How to Connect to WiFi on Windows 8
Channel: HOWTECH
How to Connect to WiFi on Windows 8 by HOWTECH
how to connect wifi in windows 8 laptop, how to connect wifi in windows 8.1 dell laptop, how to connect wifi in windows 8 hp laptop, how to connect wifi to windows 8.1 laptop, how to turn on wifi in windows 8 dell laptop, how to enable wifi in laptop windows 8, how to connect wifi in hp laptop windows 8.1, how to connect wifi in toshiba laptop windows 8, how to connect wifi in dell laptop windows 8, how to turn on wifi on windows 8 laptop
Unlock Your WiFi! Windows 8.1 Laptop Fix (Secret Trick Inside!)
WiFi Woes? Conquer Your Windows 8.1 Laptop's Wireless Woes!
Have you ever faced the frustrating reality of a laptop refusing to connect to WiFi? It's a digital dilemma we've all encountered. Especially, a Windows 8.1 machine might be stubbornly refusing access. Don't worry! We'll explore some fixes that could get you back online.
Spotting the Symptoms: Is Your WiFi Really Down?
First, let's identify the problem accurately. Before diving in, perform some basic troubleshooting steps. Is the WiFi icon in your system tray showing a red "X" or a limited connectivity symbol? Can your phone connect? These clues will help us determine the issue. In addition, is it just your laptop, or other devices too?
The Usual Suspects: Restarting & Refreshing
Often, a simple restart can work wonders. Shut down your laptop completely. Then, power it back on. Sometimes, this is enough to clear any temporary glitches. Subsequently, consider restarting your router and modem. Unplug both devices for about 30 seconds. Plug them back in. Wait for the lights to stabilize. This is the initial 'reset' for your network.
Digging Deeper: Driver Dilemmas & Device Manager
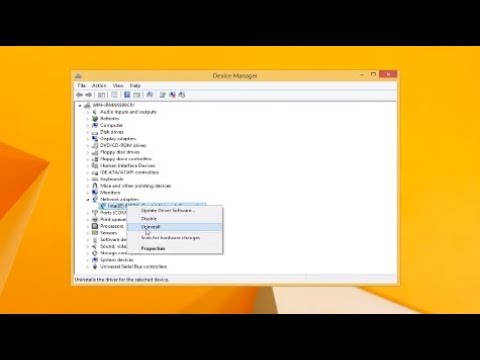
If a restart fails, we’ll delve deeper. We must check your network adapter drivers. Press the Windows key + X. Select "Device Manager" from the menu. Expand the "Network adapters" section. If you see a yellow exclamation mark, the driver has issues. Right-click your WiFi adapter. Then, select "Update driver." Choose "Search automatically for drivers." Now the system will search for the latest driver.
Advanced Tactics: The Hidden Wireless Profile
Sometimes, the hidden culprit lies within your WiFi profile. Windows can store incorrect network settings. First, let's access the Network and Sharing Center. You can find this in the Control Panel. Click "Manage wireless networks" on the left side. Delete your WiFi network profile. Then, reconnect to your network. Enter your password again.
Static IP Address Troubles?
Now, let’s explore static IP address conflicts. These can sometimes disrupt connectivity. Go back to Network and Sharing Center. Click "Change adapter settings." Right-click your WiFi adapter. Select "Properties." Double-click "Internet Protocol Version 4 (TCP/IPv4)." Ensure "Obtain an IP address automatically" is selected. Also, confirm "Obtain DNS server address automatically" is chosen.
The Secret Weapon: Command Prompt & Advanced Diagnostics
Ready for a slightly more technical approach? Open the Command Prompt as an administrator. You can find this by searching for "cmd" in the search bar. Right-click the app. Select "Run as administrator." Now it is time for a few commands.
ipconfig /release: This releases your current IP address.ipconfig /renew: Then, we renew your IP address.ipconfig /flushdns: This resets your DNS cache.
After running these, restart your laptop. Check if the problem is resolved.
Firewall Fiascos? Check Your Security Settings
Your firewall might occasionally be the cause. Sometimes, it can block your WiFi connection. First, go to the Control Panel. Select "Windows Firewall." Click "Allow an app or feature through Windows Firewall." Verify your WiFi adapter is checked. If not, enable it. Consider temporarily disabling your firewall. This is only for testing purposes. Remember to re-enable it afterward.
Hidden Power Settings Impacting Your WiFi
Your power settings could be interfering. These often affect your WiFi adapter. Go to Device Manager again. Expand "Network adapters." Right-click your WiFi adapter. Select "Properties." Navigate to the "Power Management" tab. Uncheck "Allow the computer to turn off this device to save power."
Hardware Hurdles: Examining Your Adapter
In some instances, the hardware itself is the issue. Check if your laptop's WiFi adapter is physically enabled. There is often a physical switch on the side. Sometimes, it is a function key combination (e.g., Fn + F2). Check your laptop’s manual. A hardware failure is less common. But, it is necessary to consider it.
The Final Resort: System Restore (Use with Caution)
If all else fails, consider a System Restore. This will revert your system to a previous point. This won’t erase your files. However, it could resolve the issue. Search for "Create a restore point" in the Windows search bar. Click "System Restore." Choose a restore point before the problem began. Be aware, this can remove recent software installations.
Success! Now Enjoy Your Seamless Connection!
Hopefully, these steps have helped you. Your Windows 8.1 laptop should now connect. Therefore, you’re ready to browse the internet. Download those files. Stream your favorite shows. Remember, technology can be frustrating. But also, it is usually fixable.
Connect to Killer WiFi: Laptop Speed Hacks You NEED!Unlock Your WiFi! Windows 8.1 Laptop Fix (Secret Trick Inside!)
Hey everyone! Ever stared at your Windows 8.1 laptop, feeling like it's mocking you with its lack of internet access? Don't worry, we've all been there! That blinking "No internet connection" icon can be the bane of our existence, especially when you’re jonesing for a Netflix binge or need to finish that important work email. But fear not! We're diving deep into the trenches of Windows 8.1 WiFi woes and uncovering the secrets to get you back online faster than you can say "router reboot." So, grab your coffee, settle in, and let's get this WiFi party started!
1. The WiFi Woes: Why is My Windows 8.1 Laptop Giving Me the Cold Shoulder?
First things first: let's figure out what's actually going on. Is it your laptop, your router, or something else lurking in the digital shadows? A simple analogy helps here. Think of your WiFi like a bridge. Your laptop is trying to cross the bridge (connect to the internet), and your router is the bridge's gatekeeper. If the bridge is broken, the gatekeeper is asleep, or there’s a troll blocking the way (okay, maybe not a troll!), you're not getting across. Common culprits include:
- Driver issues: Your WiFi adapter's “instructions” might be out of date or corrupted.
- Router problems: The router itself could be struggling, needing a reboot or a configuration tweak.
- Hardware failure: Sadly, sometimes the adapter itself has simply given up the ghost. (Don't panic yet!)
- Incorrect settings: Misconfigured network settings on your laptop can lock you out.
- Interference: Other devices, like microwaves or even thick walls, can disrupt the signal.
2. First Steps: The Quick and Dirty Checks (Easy Wins!)
Before we get into the techy stuff, let's try some quick fixes. These are like the digital equivalent of checking if your car has gas before calling a mechanic.
- Reboot everything: Yes, it's the cliché, but it works! Restart your laptop and your router. Power cycling often clears out temporary glitches. Imagine your router is a grumpy old man needing a nap to function properly.
- Airplane mode: Make sure Airplane mode is off. It’s easy to accidentally toggle it on.
- Check the physical switch: Many laptops have a physical WiFi switch. Make sure it's in the "on" position. Sometimes, the simplest things get overlooked!
- Look at the network icon: Is there a red "X"? A yellow exclamation point? These provide clues. A red "X" almost always means no connection. A yellow exclamation point might mean a connection, but with limited or no internet.
3. Delving into the Device Manager: Your WiFi Adapter's Report Card
Okay, if the quick fixes didn't work, it's time to get a little more hands-on. The Device Manager is where we’ll check on your WiFi adapter. Think of this as your laptop's internal doctor's office.
Press the Windows key + X, then select Device Manager.
Find Network adapters and expand it. You should see your WiFi adapter listed (e.g., "Wireless Network Adapter" or something similar).
Look for any errors: Are there yellow exclamation points or red crosses next to your adapter? These indicate trouble.
Right-click on the adapter:
- Update driver: Choose "Update driver software." Select "Search automatically for updated driver software." Windows will try to find the latest version.
- Uninstall and reinstall: If updating doesn't work, try uninstalling the adapter (right-click, then "Uninstall"). Restart your laptop. Windows will hopefully reinstall it automatically.
- Roll back driver: If you recently updated the driver and your WiFi stopped working, try rolling back to the previous version (right-click, "Properties," "Driver" tab, "Roll Back Driver").
4. Network Troubleshooter: Your Digital Detective
Windows 8.1 has a built-in Network Troubleshooter that can often identify and fix common WiFi problems. It's like having a digital detective on your side!
- Go to the Control Panel (search for it from the Start screen).
- Click on Network and Internet then Network and Sharing Center.
- Click on Troubleshoot problems.
- Select Internet Connections or Network Adapter. Follow the on-screen prompts.
5. The IP Address Shuffle: Making Sure You're Not Blocked
Your IP address is like your digital home address. Sometimes, it can get jumbled or conflict with another device on your network. Here's how to reset it:
Open the Command Prompt (search for "cmd" from the Start screen).
Type the following commands, pressing Enter after each:
ipconfig /releaseipconfig /renewipconfig /flushdns
These commands release your current IP address, request a new one, and flush the DNS cache (which can sometimes cause connection issues).
6. The "Secret Trick": Troubleshooting the Hidden Settings
Now, for the "secret trick"! We are going to explore settings that are often overlooked.
Open the Control Panel again (search from the Start screen, if you haven't already).
Go to Network and Internet then Network and Sharing Center.
Click on Change adapter settings (on the left side).
Right-click on your wireless network adapter, then select Properties.
In the window that opens, make sure the following are checked (ticked):
- Client for Microsoft Networks
- File and Printer Sharing for Microsoft Networks
- QoS Packet Scheduler
- Internet Protocol Version 4 (TCP/IPv4)
- Internet Protocol Version 6 (TCP/IPv6)
If IPv4 is selected, click Properties on it.
- Make sure "Obtain an IP address automatically" and "Obtain DNS server address automatically" are selected.
- If those are both already set, and you are still having trouble, you can try manually assigning an IP address. For example:
- IP address: 192.168.1.100 (This can vary depending on your router. Check your router's settings to see the IP range it uses.)
- Subnet mask: 255.255.255.0
- Default gateway: 192.168.1.1 (This is usually your router's IP address.)
- Preferred DNS server: 8.8.8.8 (Google DNS)
- Alternate DNS server: 8.8.4.4 (Google DNS)
Click OK on all the windows.
7. Router Rendezvous: Checking and Changing Your Router Settings
Your router is the gatekeeper, remember? We need to make sure the gate is open.
Access your router's settings: Usually, you type your router’s IP address into your web browser (e.g., 192.168.1.1 or 192.168.0.1 - check your router’s manual). You'll need your router's username and password (also in the manual).
Check the WiFi settings:
- Is WiFi enabled? (Yep, it sounds silly, but…)
- Is the network broadcasting? (It should be.)
- Security settings: Make sure you're using a secure security protocol, like WPA2 or WPA3. WEP is highly insecure.
- Channel: Experiment with different WiFi channels. Sometimes, interference from other networks can disrupt your signal.
- MAC address filtering: Make sure your laptop's MAC address isn't blocked. (This is less common, but worth checking.)
8. Consider a USB WiFi Adapter: A Backup Plan
If all else fails, consider a USB WiFi adapter. They're inexpensive and can bypass your built-in adapter entirely. Plug it in, install the driver, and see if it works. It is like getting a new key to a locked door!
9. The "Reset Network Settings" Option (Use with Caution!)
Windows 8.1 has an "Reset network settings" option, but this is a more drastic measure and should be a last resort because it removes and reinstalls all your network adapters and resets their settings to their default values. This is an "atomic bomb" approach to your WiFi problems.
- Open the Control Panel (search from the Start screen).
- Type in "Network Reset" in the search bar.
- Follow the prompts.
10. Hardware Check: Assessing Potential Physical Damage
It's a
Dell D600 WiFi Driver: Download & Fix Your Connection NOW!Windows 8.1 - No Internet Connection Available
By MDTechVideos Windows 8.1 - No Internet Connection Available by MDTechVideos
Connecting Manually to a Wireless Network in Windows 8 HP Computers HP Support

By HP Support Connecting Manually to a Wireless Network in Windows 8 HP Computers HP Support by HP Support
How To Download And Install WIFI Driver In Windows 8.1

By AjTechSolution How To Download And Install WIFI Driver In Windows 8.1 by AjTechSolution

Title: Wifi option not showing on window 8 Easy Fix 100 Working
Channel: Vishal
Wifi option not showing on window 8 Easy Fix 100 Working by Vishal
Change Wifi Settings
Unlock Your WiFi! Windows 8.1 Laptop Fix (Secret Trick Inside!)
It's a familiar frustration: your Windows 8.1 laptop, a trusty companion for work and leisure, stubbornly refuses to connect to the internet. The WiFi signal bars mock you from the system tray, promising connectivity that never materializes. Hours of productivity are lost, streaming services stutter to a halt, and the digital world seems to shrink to the confines of your offline machine. But fear not, fellow travelers of the digital realm! We're here to guide you through a series of meticulously crafted solutions to banish those WiFi woes and restore seamless internet access to your Windows 8.1 laptop. Prepare to unlock the hidden potential of your device and reclaim dominion over your online experience.
Troubleshooting WiFi Connectivity: A Diagnostic Approach
Before unleashing the full arsenal of fixes, it's crucial to understand the nature of the problem. Is the issue a complete lack of WiFi detection, intermittent drops, limited connectivity, or something else entirely? Careful observation and a systematic approach are key.
1. The Obvious Checks: A Foundation of Reliable Connectivity
Let's start with the fundamentals. Often, the simplest solutions are the most effective.
- Physical Switch: Many laptops, particularly those of the era, feature a physical WiFi switch on the side or front of the device. Ensure this switch is in the "on" position. A seemingly innocuous flip can be the culprit behind hours of frustration.
- Airplane Mode: One of the most persistent sources of WiFi confusion stems from Airplane Mode. Verify that Airplane Mode is disabled. You can usually find this setting in the system tray by clicking on the WiFi icon or within the Windows settings. Airplane Mode disables all wireless communication, including WiFi.
- Router Reboot: Your internet originates from a router. Sometimes, the router itself is experiencing a temporary glitch. Unplug your router and modem (if separate) from their power sources for at least 30 seconds. Then, plug the modem back in, wait for its lights to settle, and then plug in the router. This can often resolve connectivity issues.
2. The Network Adapter: The Gateway to the Web
The network adapter is your laptop's dedicated hardware for WiFi communication. Issues here are common and often easily rectified.
Driver Status: Right-click on the "Start" button (or press the Windows key + X) and select "Device Manager." Expand the "Network adapters" section. Look for your WiFi adapter (it will usually be named something like "Wireless Network Adapter" or specific to your manufacturer, e.g., "Intel Wireless"). If there's a yellow exclamation mark or a red 'X' overlaying the adapter icon, there's likely a driver problem.
- Driver Reinstallation: Right-click on the adapter and select "Uninstall." Then, restart your laptop. Windows typically attempts to reinstall the driver automatically. If not, you can try updating the driver.
- Driver Update: While in Device Manager, right-click the adapter and select "Update driver." Choose "Search automatically for updated driver software." If Windows fails to find an update, visit the website of your laptop manufacturer (e.g., Dell, HP, Lenovo) and download the latest driver from their support page, taking a note of your Laptop's model number.
Enable/Disable: Right-clicking on the WiFi adapter in Device Manager also allows you to "Enable" or "Disable" it. Ensure the adapter is enabled. Disabling and then re-enabling can sometimes kickstart a stubbornly unresponsive adapter.
3. Network Configuration: A Deep Dive
Sometimes, the problem lies not in the physical hardware but in the settings which govern your internet connection.
IP Configuration: Your computer needs an IP address to connect to the internet. Occasionally, the automatic configuration (DHCP) can fail.
- Obtain IP Automatically: Right-click on the WiFi connection icon in the system tray and select "Open Network and Sharing Center." Click on the name of your WiFi network, then "Wireless Properties." Click "Networking" and select "Internet Protocol Version 4 (TCP/IPv4)." Ensure that both "Obtain an IP address automatically" and "Obtain DNS server address automatically" are selected.
- Manual IP Configuration (Advanced): If you're familiar with network settings, you can try setting a static IP address, though this is less common. This requires knowing the IP address range of your router and the DNS server addresses. It usually involves entering the same information into the same window, but selecting “Use the following IP address” and entering your static IP address, subnet mask, default gateway and DNS server addresses.
Forget and Reconnect to the Network: One simple trick is to make Windows "forget" your WiFi network and then reconnect. In the Network and Sharing Center, click "Manage wireless networks." Right-click on your WiFi network and select "Remove network." Then, search for your WiFi network again and re-enter the password. This can reset any corrupted network profiles.
4. Advanced Troubleshooting: Unveiling the Secrets
If the basic checks don't solve the problem, it's time to employ some more sophisticated techniques.
Network Troubleshooter: Windows 8.1 includes built-in network troubleshooters. Right-click the WiFi icon in the system tray and select "Troubleshoot problems." Let the troubleshooter run and see if it can identify and fix any issues.
Command Prompt Commands: The Command Prompt can be a powerful diagnostic tool. Open it by pressing Windows key + X and selecting "Command Prompt (Admin)." Then, type the following commands, pressing Enter after each:
ipconfig /release(Releases the current IP address)ipconfig /renew(Requests a new IP address)netsh winsock reset(Resets Winsock, which manages network connections)netsh int ip reset(Resets the TCP/IP stack)ipconfig /flushdns(Flushes the DNS cache)
Restart your laptop after running these commands.
Check Your Router's Settings: Login to your router (often by typing its IP address, which you can search for) in a web browser. You may need to see the password. Verify that your WiFi network is enabled and broadcasting. Make sure no MAC address filters are blocking your laptop. Check for firmware updates for the router.
5. The Secret Trick: Leveraging Power Management and Hidden Settings
And now, for the promised secret trick! This can often prove to be the magic bullet in resolving stubborn WiFi issues.
- Power Management for the WiFi Adapter: Go back to Device Manager (Windows key + X then Device Manager). Expand "Network adapters," right-click on your WiFi adapter, and select "Properties". Go to the "Power Management" tab. Uncheck the box that says "Allow the computer to turn off this device to save power." Click "OK." This setting can sometimes cause the adapter to disconnect intermittently.
- Wireless Adapter Settings in the System Settings: In the Search Bar, search for Power Settings. Then, hit Enter. Click choose what the power buttons do. Click change settings that are currently unavailable. Under "Shutdown settings", uncheck "Turn on fast startup (recommended)". Click 'Save changes'.
6. Hardware Considerations: Beyond Software Solutions
While the above steps address software and configuration issues, hardware problems can also be the culprit.
- Internal Hardware Problems: If you suspect a hardware problem, consider taking your laptop to a qualified technician. It is possible the WiFi adapter has failed or is damaged.
- External Interference External interference could also be affecting your connection. Move your laptop closer to the router. Try to eliminate potential sources of interference, such as microwave ovens, cordless phones, or Bluetooth devices, that may be operating in the same frequency range.
Final Thoughts: Reclaiming Your Digital Life
WiFi connectivity is no longer a luxury; it's a necessity. With these troubleshooting steps, you should be able to diagnose and resolve most WiFi issues on your Windows 8.1 laptop. Remember to be patient and methodical. Work through the checks systematically, starting with the simplest and progressing to the more advanced. There is a world of information at your fingertips, just waiting for the moment you connect to the internet, and it starts here.
