how to replace wifi card in acer laptop
Title: How to Replace a Faulty Laptop WIFI Card ACER
Channel: Jake Billing
How to Replace a Faulty Laptop WIFI Card ACER by Jake Billing
how to replace wifi card in acer laptop, can you replace wifi card laptop, cost to replace wifi card in laptop, can you change wifi card in laptop
Acer WiFi Card Replacement: The SHOCKINGLY Easy Guide!
Unleash Your Acer's Speed: A Surprisingly Simple WiFi Card Upgrade!
Ever felt like your Acer laptop’s Wi-Fi connection was stuck in the dial-up era? You're not alone. Slow speeds and dropped connections are incredibly frustrating. Fortunately, there's a solution that’s easier than you think. Replacing your Acer’s Wi-Fi card is a fantastic way to breathe new life into your device. It is easier than it might seem.
Why Upgrade Your Acer's WiFi? The Need for Speed Explained!
Modern internet demands are significant. Streaming video, video calls, and online gaming require fast, reliable Wi-Fi. Older Wi-Fi cards often struggle with these demands. They can hold your Acer back. Upgrading to a newer card will make a big difference. Moreover, it’s a cost-effective upgrade compared to buying a new laptop. Think of it like giving your Acer a performance boost. So, what are the benefits then? Enhanced speed is first. You'll also experience improved range. And, of course, it boosts overall reliability.
Gathering Your Arsenal: Tools and Parts Before You Start!
Before diving in, preparation is key. You’ll need a few things. First, obtain the correct replacement Wi-Fi card. Research the compatible models for your specific Acer model. Otherwise, you might end up with an incompatible card. Next, gather your tools. You'll need a small Phillips head screwdriver. Also, you'll need a non-magnetic tool for prying. A plastic spudger works well. A static wrist strap is crucial. This protects your components from electrical damage. Finally, have a clean, well-lit workspace. A flat surface is best. In fact, this is crucial for a successful upgrade.
Step-by-Step: The Astonishingly Simple Installation Process!
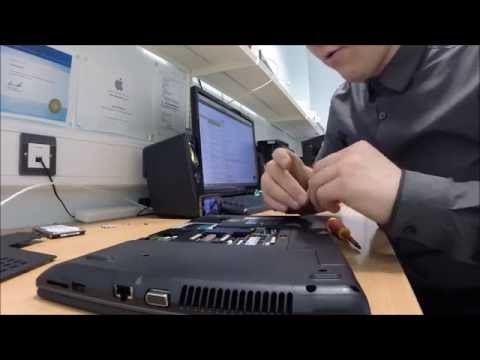
Alright, let’s get started. First, power down your Acer. Then, disconnect the power adapter. Next, remove the battery. This ensures safety during the process. Locate the access panel for your Wi-Fi card. Usually, this is on the bottom of the laptop. Consult your Acer's manual to be sure. If you are unsure, search online. Usually, it's held in place by screws. Carefully unscrew the panel. Store the screws in a safe place. Now, gently remove the panel revealing the card.
Next, you'll disconnect the antenna cables. These tiny wires attach to the Wi-Fi card. They can be tricky. Gently detach each one. Take note of which connector each wire came from! This step is critical for reassembly. Use your non-magnetic tool to do this. Then, unscrew the Wi-Fi card. Next, carefully remove the old card. Now, it is time to install the new card.
Carefully align the new Wi-Fi card. Secure it with the screw. Reconnect the antenna cables. Ensure they click into place. Once everything is connected, replace the access panel. Secure it with the screws. Next, reinsert the battery. Then, power on your Acer.
Confirmation and Troubleshooting: Ensuring a Smooth Connection!
After you turn on your laptop, it should recognize the new card. Often, new drivers are automatically installed. However, you may need to install drivers manually. Usually, you can download them from the Acer website. Open Device Manager to verify the installation. Then, connect to your Wi-Fi network. If you encounter issues, don't panic. Ensure all connections are secure. Double-check the antenna cables. Also, verify you have the correct drivers installed. If the problem persists, consult Acer's support or seek professional help. So, troubleshooting is usually easy.
Maximizing Your Wireless Experience: Beyond the Upgrade!
Upgrading your Wi-Fi card is just the beginning. To optimize your connection, consider a few additional steps. First, position your router strategically. Avoid obstructions like walls and metal objects. In addition, update your router's firmware. This can improve performance and security. Moreover, minimize interference from other devices. Microwaves and Bluetooth devices can disrupt your Wi-Fi signal. Finally, consider using a dual-band router. This can help with congestion. So, you have a strong foundation for optimal performance.
Final Thoughts: Embracing a Faster, More Reliable Acer!
Replacing your Acer's Wi-Fi card is a project that's within reach. By following these steps, you can upgrade your network experience. You'll boost your laptop's performance and reliability. In fact, many people are now taking this task on. So, don't let slow Wi-Fi hold you back. Take control of your Acer's connectivity. You'll be surfing the web with ease. You'll also experience faster downloads. With these steps, you're well on your way. Good luck!
Acer WiFi Card Replacement: The SHOCKINGLY Easy Guide!
We've all been there. That infuriating moment when your internet connection decides to take an impromptu vacation, leaving you staring blankly at your screen, disconnected from the digital world. And sometimes, the culprit isn't your internet service provider; it's your Acer laptop's WiFi card, stubbornly refusing to cooperate. But before you panic and think about a costly repair, let me tell you something: replacing an Acer WiFi card is, surprisingly, a breeze. Trust me, we're not talking brain surgery here. Think of it more like changing a lightbulb – a slightly more involved lightbulb, but still manageable. So, buckle up, buttercups, because we're about to delve into the wonderfully simple world of Acer WiFi card replacement!
1. Why Replace Your Acer WiFi Card? The Clues You Can't Ignore!
First things first, why are we even here? What are the signs that your Acer WiFi card is on its last legs? Well, there are a few telltale clues. Imagine your laptop as a grumpy old friend. Sometimes, they're just in a bad mood, and other times, they need a little TLC. If your WiFi is acting up, here are some indicators:
- Weak or Spotty Connection: This is the classic symptom. You’re in the same room as your router, but your signal strength is weaker than a kitten's meow. Pages load at a glacial pace, and streaming becomes a painful slideshow.
- Complete Disconnection: One minute you're surfing the web, the next, you're staring at a "no internet connection" message. Poof! Your digital tether has snapped.
- Error Messages: Your Acer might be kind enough to give you a heads-up with error messages related to WiFi adapter problems. Pay attention to those!
- Inability to Find Networks: Your laptop used to see a plethora of WiFi networks, but suddenly, it sees…nothing. It's like your laptop has gone blind to the digital signals around it.
- Slow Upload/Download Speeds: Even when connected, speeds are reduced to snails' pace.
If you're experiencing any of these, there's a high probability your WiFi card needs a refresh.
2. Gathering Your Arsenal: What You'll Need Before You Begin
Before we dive in, let's get our ducks in a row. Replacing a WiFi card is straightforward, but you need the right tools. Think of it like preparing for a DIY project – you wouldn't start painting without a brush, right? Here’s your essential equipment:
- A New WiFi Card: This is the star of the show! Make sure it's compatible with your Acer model. Check your laptop's manual or search online for your specific model's compatible cards. Consider upgrading to a newer standard (like Wi-Fi 6E) for faster speeds.
- A Small Phillips Head Screwdriver: You'll need this to remove the screws holding your laptop together. A magnetic screwdriver is a lifesaver!
- A Non-Conductive Spudger or Plastic Opening Tool: This is a fancy name for a plastic pry tool. It’s crucial for gently separating the laptop's components without causing damage. A guitar pick can work in a pinch!
- An Anti-Static Wrist Strap (Optional, but Recommended): This will ground you and prevent static electricity from frying your laptop's delicate internal components. Think of it as a seatbelt for your electronics.
- A Clean, Well-Lit Workspace: Lay out a soft surface (like a towel) to protect your laptop from scratches. Good lighting is a must-have!
3. The Crucial First Step: Powering Down and Preparing Your Acer
Safety first! Before we even think about touching the inside of your laptop, we need to make sure it's completely powered down and safe.
- Shut Down Your Laptop: Completely shut down your Acer. Don't just put it to sleep or hibernate. A full power-off is essential.
- Unplug the Charger: Unplug the power adapter from both the laptop and the wall outlet.
- Remove the Battery (If Possible): Many newer Acer laptops have built-in batteries, if yours doesn’t, take it out! This is another critical safety measure. Discharge any stored electrical charge.
4. Unveiling the Beast: Opening Your Acer Laptop
Now for the fun part – cracking open the laptop! Don't worry, it’s less intimidating than it sounds.
- Locate the Access Panel: The WiFi card is usually located under a small access panel on the bottom of your laptop. Find it. It's often marked with a WiFi symbol or a small screw.
- Remove the Screws: Using your screwdriver, carefully remove the screws securing the access panel. Place them in a safe place, like a small bowl.
- Pry Open the Panel: Gently pry the access panel open using your spudger or opening tool. Start at a corner and work your way around. Be patient and don’t force anything!
5. Locating the WiFi Card: You're Almost There!
Once the access panel is open, you should be able to see the WiFi card. It's usually a small, green circuit board with two or three antennas attached. It almost always looks a little like a miniature highway.
6. Detaching the Antennas: Delicate Work is Key
Before you can remove the old WiFi card, you need to disconnect the antennas. These are the wires that connect to your laptop's WiFi signal.
- Identify the Antenna Connectors: Look for small, gold-colored connectors attached to the WiFi card.
- Carefully Detach the Connectors: Use your spudger or opening tool to gently pry the antenna connectors away from the card. They usually snap on, so they should come off with a little pressure. Don’t bend or damage the wires!
7. Unscrewing the Old WiFi Card: Time to Say Goodbye
Now it's time to release the old WiFi card from its moorings.
- Remove the Screw: There's usually a small screw holding the WiFi card in place. Unscrew it. Be careful not to lose it!
- Gently Remove the Card: The card will usually be held in place by a small clip or slot. Gently slide the card out. It often pops up at a slight angle when this screw is removed.
8. Installing the New WiFi Card: Rebirth of the Signal
It's time to breathe new life into your laptop!
- Align the Card: Align the new WiFi card with the slot and any guides inside your laptop.
- Insert the Card: Carefully slide the new card into the slot. It should fit snugly.
- Secure with the Screw: Replace the screw to hold the card in place.
9. Reconnecting the Antennas: The Final Connection
Now, reconnect the antennas to the new card.
- Align the Connectors: Match the antenna connectors to the corresponding ports on the new WiFi card.
- Snap the Connectors into Place: Gently press the connectors onto the card until they click.
10. Closing Up Shop: Reassembly Time
We're almost there!
- Replace the Access Panel: Carefully align the access panel with the laptop's base.
- Screw in the Screws: Replace the screws to secure the access panel.
11. Powering Up and Testing: The Moment of Truth
Time to see if our handiwork paid off!
- Replace the Battery (If Applicable): If you removed the battery, put it back in.
- Plug in the Charger: Plug in your laptop and turn it on.
- Connect to WiFi: Go to your network settings and search for available networks. Hopefully, you'll see your own!
12. Drivers, Drivers, Everywhere: Software Solutions
Sometimes, you might need to install or update drivers for your new WiFi card. Drivers are like the instruction manual for your hardware.
- Check Device Manager: Search for "Device Manager" in the Windows search bar.
- Locate the Network Adapters: Expand the "Network adapters" section.
- Update Drivers (If Needed): If your new WiFi card is listed with a yellow exclamation mark, right-click on it and choose "Update driver." You can choose to search automatically online for the latest drivers.
13. Troubleshooting Tips: What If It Doesn't Work?
Did something go wrong? Don’t worry, even the best of us stumble. Here are some quick troubleshooting tips:
- Double-Check Connections: Make sure all the antenna connectors are securely attached.
- Reseat the Card: Take the WiFi card out and put it back in, just in case.
- Check for Driver Issues: Make sure the drivers are installed correctly.
- Consult Your Laptop's Manual: It may have specific instructions for your model.
14. Upgrading Your WiFi: Consider Wi-Fi 6/6E
While you're at it, why not upgrade your WiFi to the latest and greatest? Wi-Fi 6 and 6E offer faster speeds, better performance, and improved security. It
How To Replace Wifi Bluetooth Card - Acer Aspire 3 A315-23 Laptop Computer

By PC Monkey How To Replace Wifi Bluetooth Card - Acer Aspire 3 A315-23 Laptop Computer by PC Monkey
How to Replace Wi-Fi Card in Acer Aspire E5 Laptop Fix Wireless Issues

By How-FixIT How to Replace Wi-Fi Card in Acer Aspire E5 Laptop Fix Wireless Issues by How-FixIT
Replacing the WiFi Card on Acer Aspire 8943G - 6782

By Bogdan V Replacing the WiFi Card on Acer Aspire 8943G - 6782 by Bogdan V

Title: How to Replace Laptop Wifi Card Acer Swift 3 - Fix, Install, Repair SF314-52G SF314-52-55UF
Channel: LaptopRepairHelp
How to Replace Laptop Wifi Card Acer Swift 3 - Fix, Install, Repair SF314-52G SF314-52-55UF by LaptopRepairHelp
Acer WiFi Card Replacement: Your Ultimate, Stress-Free Guide
Are you experiencing frustratingly slow internet speeds on your Acer laptop? Perhaps you're plagued by constant disconnections or a complete inability to connect to the Wi-Fi network. The culprit might be your aging or faulty Acer WiFi card. Fortunately, replacing it is a task far less daunting than you might imagine. We’re here to guide you through the process, step-by-step, ensuring a seamless upgrade that will have you back online and enjoying blazing-fast internet in no time. Forget the technical jargon and complex instructions; this is a straightforward, user-friendly guide designed for anyone, regardless of their technical background. Let's get started!
Understanding the Importance of a Reliable WiFi Card
In today's interconnected world, a stable and fast internet connection is not a luxury, but a necessity. It's the lifeline of your productivity, entertainment, and communication. Many underestimate the critical role of the WiFi card in their laptop's overall performance. A failing card can lead to buffer issues while watching streaming video, frustrating lag during online gaming, and a general feeling of sluggishness when browsing the web. Upgrading your WiFi card can dramatically improve your online experience, unlocking faster download and upload speeds, and a more reliable connection.
Preparing for the Acer WiFi Card Replacement: What You'll Need
Before we dive into the actual replacement process, let's gather everything you'll need. Having your tools and components readily available will ensure a smooth and efficient operation.
Here's your checklist:
- A New Acer Compatible WiFi Card: This is, of course, the most crucial item. Ensure the card is compatible with your specific Acer laptop model. We'll provide some guidance on how to identify the right card later in this guide. Consider exploring WiFi 6 or 6E cards for the latest in wireless technology, offering significant speed and performance boosts.
- Small Phillips Head Screwdriver: A set of precision screwdrivers is highly recommended. Having a variety of sizes will ensure you can remove even the smallest screws without damaging them.
- Anti-Static Wrist Strap: This is an essential tool for protecting your laptop’s sensitive electronic components from electrostatic discharge.
- Small Container or Ziploc Bag: To store the screws you remove. This prevents them from getting lost.
- Non-Marring Spudger or Plastic Opening Tools: These are helpful for safely prying open the laptop's case without scratching or damaging it.
- A Well-Lit, Clean Workspace: Choose a well-lit area with a flat surface to work on. A clean workspace is crucial to prevent accidental damage to your Acer laptop.
- (Optional) Compressed Air: For cleaning dust and debris from the laptop's interior.
Identifying Your Acer Laptop Model and WiFi Card Compatibility
The compatibility of your new WiFi card depends on your Acer laptop model. This is arguably the most important step prior to purchase. Here is a strategy for identifying your model, and the kind of WiFi card needed:
- Locate Your Laptop’s Model Number: The model number is typically printed on a sticker located on the bottom of your Acer laptop. It might also be found in the battery compartment or under a service door. Look for something like "Model No.:" followed by a series of letters and numbers (e.g., "Acer Aspire A515-51").
- Research Compatible WiFi Cards: Once you have your model number, search online for "Acer [Your Model Number] WiFi card replacement." This will provide targeted results, often showing cards other users have successfully installed.
- Check the Card Form Factor: Most modern Acer laptops use either an M.2 (NGFF) or a PCIe form factor for their WiFi cards. M.2 cards are small and rectangular. PCIe cards, though less common, may be similar in appearance and size to M.2 cards.
- Review Your Laptop’s Service Manual: If you can locate the service manual for your Acer laptop model (available online, often via Acer's website or third-party sites), it will specify the exact type of WiFi card your laptop supports. It may even provide instructions on how to perform the replacement.
- Consider Dual-Band or Tri-Band Cards: Upgrading from a single-band WiFi card to a dual-band (2.4 GHz and 5 GHz) or tri-band card will greatly increase performance.
Step-by-Step Acer WiFi Card Replacement Guide
Now, we get to the exciting part—the actual replacement! Follow these steps meticulously, and you'll have your Acer laptop back up and running with a new WiFi card.
- Power Down and Unplug Your Laptop: This is the first and most important safety precaution. Ensure your Acer laptop is completely shut down and unplugged from the power adapter.
- Ground Yourself: Attach the anti-static wrist strap to your wrist and connect the other end to a metal part of your laptop chassis (such as a screw) or another grounded metal object. This prevents static electricity from damaging sensitive components.
- Remove the Battery (If Possible): Some Acer laptops have removable batteries. If yours does, remove it before proceeding. This offers an added layer of safety.
- Open the Laptop Case: Depending on your Acer model, you'll need to remove screws securing the bottom panel of the laptop. Carefully unscrew them and store them in your small container. Use your spudger or plastic opening tools to gently pry open the bottom panel. Start at a corner or along an edge, working your way around the perimeter of the laptop. Be patient and avoid forcing anything. The panel may be held in place by clips.
- Locate the WiFi Card: The WiFi card is usually a small, rectangular circuit board located near one of the laptop's edges. It will have two or three small antenna wires connected to it and a screw holding it in place.
- Disconnect the Antenna Wires: Carefully disconnect the antenna wires from the WiFi card. These wires are usually clipped or snapped onto the card. You might be able to gently pry them off with your fingernails or a non-marring tool. Pay close attention to how the wires are connected, as you'll need to reconnect them to the same points on the new card.
- Remove the Screw: Unscrew the small screw that secures the WiFi card to the motherboard.
- Remove the Old WiFi Card: The card should now be easy to remove. Gently slide it out of its slot. Sometimes, the card will be slightly angled. If so, lift the card from the outer edge first.
- Install the New WiFi Card: Align the new WiFi card with the slot and slide or insert it at an angle, if required. Secure it with the screw you removed earlier.
- Reconnect the Antenna Wires: Carefully snap or clip the antenna wires onto the corresponding connectors on the new WiFi card. Ensure each wire is firmly connected.
- Close the Laptop Case: Carefully align the bottom panel of the laptop and snap it back into place. Reinstall the screws, taking care not to overtighten them.
- Reinstall the Battery (If Applicable): If you removed the battery, now is the time to reinstall it.
- Power On and Test: Plug in your laptop and power it on. The new WiFi card should automatically be recognized. Check to see if your Acer laptop can detect available Wi-Fi networks. Connect to your network and test your internet speed.
- Install Drivers (If Necessary): In some instances, you might need to install drivers for the new WiFi card. These drivers are usually available on the manufacturer's website or through the Acer support website. Follow the on-screen prompts to install the drivers.
Troubleshooting Common Issues
Sometimes, the WiFi card replacement process doesn’t go perfectly. Here are some common challenges and their solutions:
- No Wi-Fi Networks Detected: Make sure the antenna wires are securely connected. Double-check that the WiFi card is properly seated in its slot. Try restarting your laptop.
- Slow Internet Speeds: Ensure you are connecting to the 5 GHz band of your WiFi network (if your router and card support it). Update your WiFi card drivers.
- Intermittent Connection Drops: This may indicate a faulty antenna wire connection or a problem with the WiFi card itself. Check the connections again and consider replacing the antenna wires if necessary.
- Laptop Won’t Power On: Ensure you reconnected the battery correctly and that all screws are tightened. Double-check all connections inside the laptop.
Maximizing Your WiFi Experience After Replacement
You've successfully replaced your Acer WiFi card! Now, let's make the most of your improved connection.
- Optimize Your Router Settings: Configure your router to use the latest wireless standards (802.11ac or 802.11ax/Wi-Fi 6/6E). Adjust the channel width and choose the least congested channel to reduce interference.
- Position Your Router Strategically: Place your router in a central location, away from walls, metal objects, and other potential sources of interference like microwaves or other electronics.
- Update Router Firmware: Regularly update your router's firmware to improve performance and security.
- Consider a Wi-Fi Extender: If you experience weak signal strength in certain areas of your home, a Wi-Fi extender can help boost the
