how to remove wifi antenna from laptop
Title: How to remove and reattach WiFi antenna cables
Channel: James Has Answers
How to remove and reattach WiFi antenna cables by James Has Answers
how to remove wifi antenna from laptop, how to replace wifi antenna on laptop, how to remove wifi from laptop, how to remove wifi network in laptop, how to use wifi antenna on pc
Laptop WiFi Antenna Removal: The SHOCKINGLY Easy Guide!
Laptop WiFi Antenna Removal: A Surprisingly Simple Adventure!
Ever felt like your laptop's Wi-Fi signal was weaker than a whisper? Maybe you've considered an upgrade, but the thought of complex hardware modifications has you paralyzed. Well, banish those fears! This guide unravels the mystery behind laptop Wi-Fi antenna removal. It’s far easier than you might think.
Understanding the Wireless Web: What’s Really Going On?
Before we dive in, let's clear the air. Your laptop's wireless card is the heart of its Wi-Fi prowess. It sends and receives those precious radio waves. But how does it get the signal? The answer: antennas! These often-hidden contraptions grab the Wi-Fi signal. They allow you to browse the internet. They are crucial for communication.
Spotting Your Antenna: The Great Laptop Hunt Begins!
Finding your antenna is often the trickiest part. But don’t worry; it’s not like searching for buried treasure. First, power down and unplug your laptop. That’s a crucial safety step! Next, you'll need to open up your laptop. Carefully examine the internal layout. Consider consulting your laptop's manual. Do this if you’re unsure of the process.
The antennas are usually located near the screen hinge. They may also reside along the edges of the screen panel. They might be inside the screen bezel. They can take various forms. You might find them as small wires. Think of them like tiny, flexible cables. They often end in connectors. Thus, they attach to the Wi-Fi card itself.
The Tools of the Trade: Arming Yourself for Success
What tools do you need? Thankfully, the list is short. It's also pretty simple. A small Phillips head screwdriver is essential. You’ll probably need a plastic pry tool. This is useful for gently separating laptop components. A pair of tweezers can be incredibly handy. Especially for managing those tiny connectors. Finally, a good workspace and plenty of light are crucial. The Removal Expedition: Step-by-Step Unveiled
Alright, adventurer, let’s begin the removal! First, disconnect the power supply. Then, remove the battery. This prevents accidental shorts. Next, unscrew the laptop's bottom panel. Be very careful where you put the screws. Make sure to keep them in a safe place. You do not want to lose them! Once the panel is off, locate the Wi-Fi card. Look for the antennas. They are usually connected by tiny connectors. Gently detach these connectors from the Wi-Fi card. It's like a delicate dance. Carefully trace the antenna wires. Note their path through the laptop. Often, they’re secured with adhesive or small clips. Gently detach these. As a result, the wires become free. Now, carefully remove the antenna wires. Post-Removal: After the Dust Settles
After you've removed the antenna, there’s a critical step. The process is to reassemble your laptop. Replacing the bottom panel completes assembly. Secure all screws. Your laptop is now ready for use. Troubleshooting: Navigating Potential Roadblocks
What if something goes wrong? First, remain calm. Troubleshooting Wi-Fi antenna removal is usually straightforward. If you're having trouble with the connectors, use tweezers. They help with the small wires. If you are struggling to identify components, consult your laptop manual. Double-check all your connections. Test the Wi-Fi after reassembly. If your Wi-Fi still struggles, consider returning to the beginning. Make sure everything is connected correctly. Beyond Removal: Considering Your Next Steps
What should you do after you remove the antenna? Perhaps you want to replace the antenna. Think about upgrading to a better wireless card while you're at it. You can also install a different antenna. Research compatible options. Conclusion: Embracing the Freedom of Wi-Fi
Removing your laptop's Wi-Fi antenna isn’t some daunting task. It’s an accessible procedure. It may seem like a technical challenge. Nevertheless, with the correct tools and knowledge, you can accomplish this. You can improve your laptop's performance. You can also customize it to your exact needs. So, get ready to take control of your device!
Laptop WiFi Antenna Removal: The SHOCKINGLY Easy Guide!
Hey tech adventurers! Ever felt like your laptop's WiFi signal is weaker than a… well, a particularly shy kitten? Been battling dropped connections or glacial download speeds? You're not alone! And guess what? The culprit might just be your laptop's WiFi antenna. Now, before you picture complex circuitry and a sea of tiny screws, let me assure you: Laptop WiFi Antenna Removal isn't as scary as it sounds. In fact, it’s shockingly easy! We're diving headfirst into this often-misunderstood process, and trust me, you'll be surprised at how straightforward it is.
1. Why Bother Removing Your Laptop's WiFi Antenna?
So, why would you even want to remove your laptop's WiFi antenna? Well, there are a few scenarios. Maybe you're upgrading your antenna for a better signal. Or perhaps you're permanently tethered to a wired connection and the antenna is just taking up space (inside the laptop, of course!). Sometimes, in a repair context the antenna is damaged and needs to be replaced. Or maybe you’re paranoid about potential security risks (though let’s be honest, it’s a bit like worrying about a mosquito carrying a piano). Whatever the reason, understanding the why is the first step. It's like deciding if you want to climb Mount Everest – knowing the altitude is essential before you start packing your gear!
2. What You'll Need (Spoiler Alert: It's Not Much!)
Good news! You don't need a NASA-grade workshop to remove your laptop's WiFi antenna. Here's a quick checklist of essentials:
- A Small Phillips Head Screwdriver: This is your primary weapon. Make sure it's the right size for your laptop's screws. Like choosing the right paintbrush for a masterpiece, the right screwdriver prevents frustration and potential damage.
- A Non-Static Work Area: This is crucial for preventing electrical damage. A wooden table or a clean, flat surface is perfect. Avoid carpets, trust me, they generate static like crazy!
- Patience: Sometimes, things don't go according to plan. A little patience goes a long way. It’s like baking a cake, you don't rush the process.
- Optional: A Small Container for Screws: Trust me, you don’t want to lose those tiny screws. They're like the lost keys of the tech world.
- Your Laptop's Model Number: Trust me, it makes finding the right resources easier.
3. Safety First! Disconnecting the Power and Battery.
Before we even think about touching anything inside your laptop, safety is paramount. This is like the pre-flight safety briefing – it’s boring, but essential!
- Power Down Completely: Shut down your laptop. Completely.
- Unplug the Power Adapter: Remove the power cord. No juice means no accidental shocks.
- Remove the Battery: This is arguably the most critical step. Locate the battery release mechanism (usually a latch or a slide). Remove the battery. If you can't remove the battery easily, proceed with caution, and consult your laptop's manual.
4. Locating Your Laptop's WiFi Antenna (It's Usually Not That Hidden!)
Okay, time to play detective! The WiFi antenna is usually located near the top of your laptop’s screen, at the top of the display. Sometimes it may be on the side. The antenna is typically connected to the main board, and, in most laptops, is connected through antenna wires. Locate the area where antenna wires attach. Depending on your laptop model, it may be more accessible than others.
5. Deconstructing the Laptop: Opening the Case.
Ah, the moment of truth! This is where you gently crack open your laptop.
- Flip Over the Laptop: Place your laptop on its back.
- Identify the Screws: Look for screws on the bottom of your laptop. They're usually hidden under rubber feet or stickers. Carefully remove all screws that look like they hold the bottom cover on. Note their locations.
- Pry Open the Case (Gently): Using a plastic pry tool (or a credit card), carefully start prying open the edges of the laptop case. Start with the area you think is least likely to break. Remember, patience is key! The case may click as you progress.
6. Spotting the WiFi Antenna Wires and Connections.
Once the case is open, it's time to hunt for those antenna wires!
- Look for Small Wires: These are very thin, often black or white, and they lead from the WiFi card to the top of the laptop. Think of them as the veins of your laptop's communication system.
- Identify the Connectors: The antenna wires connect to your WiFi card with small, typically snap-on connectors.
- Take a Photo (Optional, but Recommended): A quick snapshot before you disconnect anything can be a lifesaver if you need to put everything back together later. It's like giving yourself a visual map.
7. Disconnecting the Antenna Wires: The Delicate Dance.
This is the tricky part, but don't sweat it! It’s a bit like untangling a necklace - take your time.
- Gently Disconnect the Connectors: Using a small pair of tweezers, or with your fingernails, carefully pry up the antenna connectors from the WiFi card. Be very gentle as you're handling these components. Be careful not to bend pins.
- Note the Placement: On the photo you took, note the locations of where the antennae connects to the WiFi card.
8. Removing the WiFi Antenna Itself (The Grand Finale!)
Now it is time to start removing the antenna!
- Unscrew the Antenna: Locate the screws that secure the antenna to the laptop's frame or screen. Carefully remove these screws.
- Gently Remove the Antenna: Carefully remove the antenna. Sometimes it is taped or glued down. If so, be extra careful to avoid breaking anything.
9. Cleaning Up and Putting it Back Together: The Reverse Process.
You're almost there!
- Make Sure All Components Are Re-secured: Make sure nothing is loose. Re-attach any tape or glue.
- Re-connect the Wi-Fi Card: Make sure your WiFi card is securely installed.
- Close the Case: Carefully snap the laptop case back together. Make sure all parts and screws are reattached.
- Secure the Screws: Put all the screws back in.
10. Testing Your Handiwork (Did it work?).
Plug back in the battery.
- Reinstall the Battery: Insert the battery back into the laptop.
- Boot Up the Laptop: Power on your laptop.
- Test the WiFi: Check your WiFi connection. If, you have installed a new antenna, test its signal strength.
11. Troubleshooting (Help! Something Went Wrong!).
Panic time! (Just kidding!) Let's troubleshoot.
- No WiFi Connection: Double-check all connectors; ensure that all the screws are in place.
- Slow Internet Speed: Ensure any new antennas are correctly connected.
- Laptop Won’t Boot: Double-check any connections that were damaged.
12. Upgrading Your Antenna: A Quick Peek.
Want to boost your signal? Now is an excellent time to upgrade. Just buy a compatible antenna and connect it by following the same steps.
13. Safety Considerations: Things to Keep In Mind.
- Static Electricity: Always work in a non-static environment.
- Force is Not Your Friend: Never force anything. If something feels stuck, stop and re-evaluate.
- Handle Carefully: Electronics are delicate. Be gentle.
14. Alternatives to Removal (Sometimes Less is More).
Sometimes, you don't need to remove the antenna. Consider:
- Disabling the WiFi Card: You can disable the WiFi card in your laptop's settings.
- Using an External Antenna: An external antenna can often provide a stronger signal.
15. The Triumph! You Did It!
Congratulations! You successfully removed (or upgraded!) your laptop's WiFi antenna. Give yourself a pat on the back - you've just conquered a small tech challenge! How does it feel? Empowering, right?
Closing Thoughts
So, there you have it! Laptop WiFi antenna removal: a shockingly easy process you can tackle yourself. We've covered everything from the why to the how, providing you with a comprehensive guide that's as friendly as your favorite tech buddy. Remember, knowledge is power, and a little elbow grease can go a long way. Now go forth and conquer your WiFi woes!
FAQs
1. Is removing my laptop's WiFi antenna dangerous?
As long as you follow the safety precautions (disconnecting the power and battery, working in a non-static environment), removing your laptop's WiFi antenna is generally safe.
2. What if I break something?
Don't panic! If you break a connector or a wire
Replace the Wireless Antenna Cables HP Pavilion Gaming Notebook HP Support

By HP Support Replace the Wireless Antenna Cables HP Pavilion Gaming Notebook HP Support by HP Support
Wifi antenna cable connector repair Kablosuz anten kablosu konnektr onarm

By Merakl Bilgisayarc Wifi antenna cable connector repair Kablosuz anten kablosu konnektr onarm by Merakl Bilgisayarc
HP Pavilion 14-ab166us Network Card and Antenna Upgrade

By TechTube HP Pavilion 14-ab166us Network Card and Antenna Upgrade by TechTube

Title: Laptop Antenna Upgrade 49
Channel: andrew mcneil
Laptop Antenna Upgrade 49 by andrew mcneil
Laptop WiFi Antenna Removal: Your Uncomplicated, Step-by-Step Guide
We’ve all been there: frustratingly slow Wi-Fi speeds, dropped connections during crucial moments, and the nagging suspicion that something, somewhere, is amiss. For many of us, the culprit isn't our internet provider, the router, or even the elusive gremlins of the digital world; it's the laptop's internal Wi-Fi antenna. But what if we told you that troubleshooting and potentially replacing or upgrading that antenna is something you can accomplish with relative ease? Forget expensive tech repair shops and long wait times. This guide is designed to lead you, step-by-step, through the process of accessing, examining, and, if necessary, removing your laptop's Wi-Fi antenna.
Understanding Your Laptop's Wi-Fi Antenna: The Fundamentals
Before we dive in, let's solidify some crucial foundational knowledge. Your laptop's Wi-Fi antenna, often a pair, are small, flexible components usually found within the laptop's display and base. Their primary function is to send and receive radio waves, enabling your laptop to connect to wireless networks. These antennas, like any electronic component, can suffer from diminished performance due to factors such as physical damage, wear and tear, or interference. Identifying potential issues is the first key step. Common symptoms of a problematic antenna include weak signal strength, frequent disconnections, and significantly slower-than-expected internet speeds, especially when near the router.
Safety First: Essential Precautions Before You Begin
Prioritizing safety is paramount. Before launching into any hardware adjustments, here's a checklist to ensure a secure and responsible approach:
- Power Down and Disconnect: Completely shut down your laptop and unplug the power adapter. This prevents any risk of electrical shock or damage to internal components.
- Static Electricity Shielding: Static electricity can be your enemy. Ground yourself before touching any internal components. A simple way is to touch a grounded metal object, like a metal doorknob. Optionally, wear an anti-static wrist strap connected to a grounded surface.
- Workspace Preparation: Choose a well-lit workspace. Lay down a clean, non-static surface, such as a table or desk covered with a cloth. This provides a safe place to work and prevents scratches on the laptop.
- Gather Your Tools: You’ll need a few essential tools. These typically include a set of small Phillips head and Torx screwdrivers (the appropriate size for your laptop’s screws). A plastic pry tool (or a guitar pick) is invaluable for safely separating laptop components. A small container or tray for holding screws is highly recommended to prevent losing them, and make sure there is good lighting.
- Document Everything: Take photographs as you disassemble your laptop. These photos will serve as invaluable visual aids during reassembly. Label any screws or components with their corresponding locations.
Unveiling the Antenna: Disassembling Your Laptop
The precise method of removing the Wi-Fi antenna hinges on your laptop's make and model. However, the general process is usually fundamentally similar. Here's an overview:
1. Accessing the Internal Components:
First, you'll need to open your laptop. Many laptops have access panels on the underside that provide access to the RAM, hard drive, and Wi-Fi card. Refer to your laptop's service manual, which is often available online via the manufacturer's website, for specific instructions. This manual will pinpoint the exact location of the access panel and the proper procedure for removal.
If there is no accessible panel, the entire bottom of the laptop may need to be removed, which is usually held in place by numerous screws of varying sizes. Carefully remove the screws, paying attention to their respective locations so you can reassemble them in the same place.
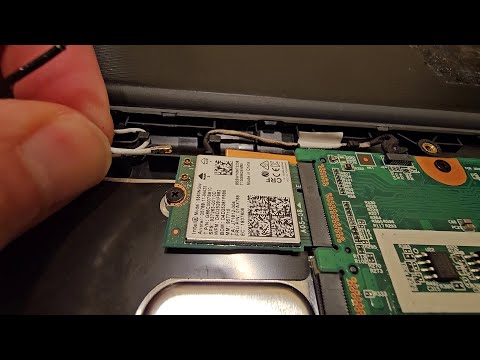
2. Locating the Wi-Fi Card:
Once inside the laptop, the Wi-Fi card is usually a small card plugged into a slot on the motherboard. Typically, two antenna wires run from the Wi-Fi card to the display hinges, or the upper screen bezel.
3. Disconnecting the Antenna Wires:
These wires are connected to the Wi-Fi card via small, often snap-on connectors. Gently pry off the connectors using your fingernail or a non-conductive pry tool. Avoid pulling on the wires themselves, as this could damage them. Note the exact position of each wire. Generally, there are two wires, often color-coded (black and white or black and grey), indicating which connector they attach to.
4. Removing the Wi-Fi Card:
Once the antenna wires are detached, you'll need to remove the Wi-Fi card. This card is usually secured by one or two screws. Unscrew these, and cautiously remove the card from its slot. Be careful not to bend or break any pins on the card or the motherboard.
5. Tracing the Antenna Wires:
Now, follow the antenna wires. They are usually routed through the laptop’s chassis, often tucked under small clips or along the edges. These wires usually go through the display hinges.
6. Accessing the Antenna within the Display (if applicable):
Depending on your laptop design, the antennas may be mounted within the laptop display.
- Remove the Display Bezel: Locate the screws (if any) that secure the display bezel. Use a plastic pry tool to carefully pry the bezel away from the screen. Work slowly and gently, applying pressure gradually to avoid damaging the plastic.
- Find the Antennas: The antennas, which are small flexible pieces of material, are often mounted inside the bezel or glued to the display panel.
7. Carefully Removing the Antenna:
Once you have access to the antennas, they are usually glued or taped into place. Gently detach them. Record how it was mounted so you can reassemble it correctly. Be extremely cautious to avoid damaging the screen or any delicate internal components.
Antenna Inspection and Troubleshooting
With the antenna wires now accessible, perform a thorough inspection.
- Visual Examination: Look for any signs of damage – kinks, bends, fraying, or breaks in the wires. Check the connectors for corrosion or damage.
- Antenna Damage: The antenna itself is often adhered to the display bezel. Check the condition of the antenna, looking for any tears or damage.
Replacement or Upgrade: Considering Your Options
If you find damage or poor performance, here’s how you can proceed:
- Replacement Antennas: Replacement antennas are readily accessible online. Ensure compatibility by matching the antenna type and connector type with your laptop. The laptop model number is essential.
- Upgrade Options: Consider upgrading to a high-gain antenna or a Wi-Fi 6 or Wi-Fi 6E antenna (if your laptop and router support those standards) to increase range and performance. Note that these often come in pairs.
- Professional Repair: If you are uncomfortable with any aspect of the process, do not hesitate to seek professional help.
Reassembly: Putting It All Back Together
Reassembly is the reverse process of disassembly, but with a few key pointers:
- Follow the Diagram: Consult your photos to guide you through the process, ensuring all connectors and screws are replaced in their proper position.
- Secure Connections: Make sure you press the antenna cable connectors back onto the Wi-Fi card securely.
- Test After Reassembly: Before completely closing up the laptop, connect the power adapter and attempt to boot up the system. Once it boots, connect to your Wi-Fi network. Test your internet speeds and connection stability to confirm that the antenna is functioning correctly.
- Final Assembly: Once you’ve confirmed the antenna’s functionality, complete the reassembly process, ensuring all screws are tightened securely but not over-tightened.
Troubleshooting Common Issues
If you encounter problems after reassembly, here are some potential fixes:
- No Wi-Fi Connection: Double-check that all antenna wires are firmly connected to the Wi-Fi card and the Wi-Fi card is fully seated in its slot.
- Weak Signal Strength: Ensure the antenna wires are routed correctly, and not pinched or obstructed. If using replacement antennas are installed correctly.
- Slow Speeds: Test your connection speed near the router. If it is still slow, the issue is possibly the Wi-Fi card, not the antenna. You may check for drivers on your laptop manufacturer website to see if you need to update them.
Conclusion: Taking Control of Your Connectivity
Removing and replacing your laptop's Wi-Fi antenna may seem daunting, but armed with the right tools, guidance, and a bit of patience, it's a task well within reach. By understanding the process, following the steps carefully, and prioritizing safety, you can not only troubleshoot common Wi-Fi issues but potentially enhance your laptop’s wireless performance. This guide offers a clear and concise roadmap, putting you in control of your laptop's connectivity and equipping you with the knowledge to navigate this crucial repair with confidence.
