cara mengaktifkan wifi di laptop windows 10

Title: Cara atasi WiFi tidak bisa connect di laptop not connected
Channel: ijal tutorial
Cara atasi WiFi tidak bisa connect di laptop not connected by ijal tutorial
cara mengaktifkan wifi di laptop windows 10, cara mengaktifkan wifi di laptop windows 10 yang hilang, cara mengaktifkan wi fi di komputer windows 10, cara setting wifi di laptop windows 10, cara aktifkan wifi di laptop windows 10, cara mengaktifkan internet di laptop windows 10, cara mengaktifkan wifi di laptop lenovo windows 10, cara mengaktifkan wifi di laptop asus windows 10, cara mengaktifkan wifi di laptop hp windows 10, cara mengaktifkan internet di komputer windows 10
Unlock Your Windows 10 WiFi: The Secret Trick Nobody's Telling You!
Unleash Your Windows 10 WiFi: The Unspoken Truth You NEED to Know!
Have you ever felt your Wi-Fi connection was a bit… sluggish? Annoyingly slow? You aren’t alone! Many Windows 10 users experience this frustrating phenomenon. But the good news? There's a hidden key to unlocking your WiFi's full potential. Prepare to be amazed. This isn't some complex tech jargon. Instead, it's a simple tweak. It can drastically improve your online experience. Consider this article your personal Wi-Fi whisperer. We'll delve into a secret. It's the secret to faster, more stable internet.
Is Your Wi-Fi Secretly Holding You Back?
Think about it. How often do you rely on your Wi-Fi? Streaming movies? Working from home? Gaming online? A poor connection hampers all these activities. It's like trying to run a marathon with one foot tied behind your back. Therefore, let's be real. A slow WiFi connection is downright infuriating. It can kill productivity and demolish your entertainment. However, there's a common culprit. This is a setting most people overlook. This oversight keeps your Wi-Fi from performing optimally.
The Hidden Windows 10 WiFi Optimization Technique
The secret? It lies within your Windows 10 network adapter settings. Specifically, we're focusing on a single, crucial configuration. It’s a setting that can transform your browsing speed. It can eliminate those annoying buffering interruptions. However, finding it requires a few simple steps. Don’t worry; this is not rocket science. So, prepare to unlock your Wi-Fi’s true power.
Unveiling the Network Adapter Magic
Here's how to access this hidden gem:
- Search and Find: Start by typing "Control Panel" into your Windows search bar. You'll see the Control Panel option. Click it.
- Network and Sharing Center: Within the Control Panel, locate and click on "Network and Sharing Center." This is your central hub for network settings.
- Adapter Options: On the left-hand side, you'll find an option. It's called "Change adapter settings." Click it. This reveals your network adapters.
- Identify Your Adapter: You will see several icons. They represent different network connections. Find the one labeled with your Wi-Fi network. It will likely say "Wi-Fi" or "Wireless Network Connection".
- Properties Time: Right-click your Wi-Fi adapter. Then, select "Properties" from the menu. This will open a new window.
- Configure the Magic: In the Properties window, find the "Configure" button. Click it. A new window will appear. (It's the property pane).
- Advance Settings: Select the "Advanced" tab. Here. you'll find a list of settings. These settings control your adapter's behaviour.
- The Key Setting: Scroll through the list. Look for a setting. It’s usually named "Wireless Mode". (This exact name may vary slightly depending on your specific network adapter).
- Change the Setting: Click on the value beside "Wireless Mode". You'll likely see a dropdown menu. This dropdown features options. Choose the highest possible standard. (e.g., 802.11ax if available, then 802.11ac, etc.). This allows the best connection.
- Apply and Restart: Click "OK" to save the changes. You may need to restart your computer.
Boosting Your Connection in Minutes
You have now optimized your Wi-Fi! Therefore, you’ve potentially boosted the speed and stability of your connection. As a result, you should notice a difference immediately. However, remember that results can vary. This depends on your router and internet service provider. Nevertheless, this simple change is often a crucial step. It unlocks your Wi-Fi's hidden potential. This should noticeably enhance your online experience.
Why This Trick Works (Without Getting Technical)
This trick works because it forces your network adapter to use the latest wireless standards. These standards have higher speeds and better stability. Your adapter might be using an older standard. Older standards are slower. This setting ensures you leverage the most advanced technologies. These are the ones your router supports. The goal is to provide the best possible connection. It gives you a seamless online experience.
Troubleshooting Tips for Persistent WiFi Woes
Sometimes, this setting alone isn't enough. Therefore, here are a few other things. They may help you troubleshoot slow Wi-Fi:
- Router Placement: Make sure your router is centrally located. Avoid obstructions like walls and appliances. These things can interfere with the signal.
- Router Reboot: Rebooting your router is like giving it a fresh start. Restart it regularly.
- Update Drivers: Outdated network drivers can cause problems. Update them through Device Manager.
- Interference: Other devices can interfere with your Wi-Fi signal. Try moving devices away from the router. Examples include microwaves and Bluetooth devices.
- Contact Your ISP: If problems persist, your internet service provider may have issues. Contact them for assistance.
Enjoying a Faster, Smoother Online Experience
So, there you have it! This secret technique can significantly improve your Windows 10 Wi-Fi. Therefore, follow these simple steps. You can unlock the true potential of your internet connection. Embrace faster speeds and a more stable connection. Then, say goodbye to buffering. Say hello to a smoother, more enjoyable online experience! So go forth and maximize your WiFi potential! Enjoy the newfound speed and stability. Happy browsing!
Unlock Your Windows 10 WiFi: The Secret Trick Nobody's Telling You!
Hey there, fellow tech travelers! Ever felt like your Windows 10 WiFi connection is slower than a snail on molasses? We've all been there, right? Scrolling endlessly, buffering videos that feel like they're stuck in the Stone Age, or that download that just won't finish. It’s seriously frustrating! Well, buckle up buttercups, because we're about to crack the code to blazing-fast WiFi – and trust me, the secret trick nobody’s sharing is easier than making instant ramen. (And arguably more satisfying!)
1. The WiFi Blues: Why Is My Windows 10 WiFi So Slow?
Okay, let's get real for a sec. Before we dive into the good stuff, let's acknowledge the problem. Slow WiFi on your Windows 10 device can stem from a myriad of issues. Think of it like a clogged drain; there are many places things can go wrong. Maybe your network adapter is outdated, your drivers are playing hide-and-seek, or you've got too many devices hogging the bandwidth like kids swarming the candy store. We'll explore some common culprits, but don't worry, we're not going to bore you with technical jargon. We'll keep it understandable and relatable, I promise!
2. The Bandwidth Bandit: Understanding Your Network's Traffic
Imagine your WiFi network as a highway. Now, picture everyone on that highway, all connected to your internet. If everyone is streaming 4K movies and downloading massive games, guess what? Traffic jam! That's essentially what happens when your bandwidth gets overloaded. Understanding how much bandwidth you need and how much your other devices are consuming is crucial.
3. Is Your Router The Culprit? A Quick Checkup
Sometimes, the problem isn't your computer at all. Your router, the gateway to the internet, could be the weak link. Ask yourself these questions: Is your router old? Is it placed out in the open, away from interference? Have you restarted it recently? (Yes, the classic "turn it off and on again" trick often works wonders!) Think of it like this: a good router is like a powerful engine. A bad one? Well, let's just say you’ll be crawling.
4. The Hidden Treasure: Drivers, Drivers, Drivers!
Here's the secret ingredient nobody's shouting from the rooftops: updated drivers. Your network adapter's drivers are the software that allows your computer to "speak" to your WiFi. Outdated drivers are like using an old phone to call someone today – the connection is spotty and the audio quality is… well, let's just say it's not ideal.
- How to Find Your Network Adapter's Driver:
- Right-click the Start Menu (the Windows icon).
- Select "Device Manager."
- Expand "Network adapters."
- Look for your WiFi adapter (it'll have a name like "Wireless Network Adapter" or something similar).
- Right-click on it and select "Update driver."
5. The Secret Trick: Resetting Your Network Settings.
Alright, here it is, the moment you've been waiting for – the secret trick! It’s a simple network reset. Think of it like hitting the "reset" button on your computer's operating system, but specifically for your network setup. It clears out any potential glitches that might be slowing things down. It's like giving your network a fresh start, a clean slate.
6. Performing the Network Reset in Windows 10: A Step-by-Step Guide
The process is super easy. Follow these steps, and you'll be back to streaming and downloading in no time:
- Step 1: Open Network Settings: Click the Windows Start button, then click the gear-shaped "Settings" icon. Alternatively, you can search for “Network Settings” in the taskbar’s search field.
- Step 2: Access Network Reset: In Settings, click on "Network & Internet." Then, scroll down and choose "Network reset."
- Step 3: Confirm and Restart: Click "Reset now" and then confirm your decision. Your computer will restart, and your network connections will be reset to their default settings.
7. The Fine Print: What to Expect After the Reset.
After the reset, your computer will forget any custom network settings you've made. This means you might need to re-enter your WiFi password. Don't worry, it's generally painless and well worth the potential benefit of improved speed. Think of it like learning a new WiFi password – a small price to pay for a faster connection!
8. Boost Your Signal Strength: Tips for Better WiFi Reception
Even after the reset, your WiFi might still be sluggish if the signal isn’t strong enough. Think of it like trying to hear someone in a crowded room. If the signal is weak, you will struggle. Here are some tips:
- Location, Location, Location: Place your router in an open area, away from walls, metal objects, and other electronics.
- Antenna Alignment: Experiment with the router's antennas. Sometimes, a slight adjustment can make a huge difference.
- Avoid Interference: Keep your router away from microwaves, Bluetooth devices, and other devices that might interfere with the WiFi signal.
9. Troubleshooting Common WiFi Woes: What If It Still Doesn't Work?
So, you've tried the reset, and your speed is still lacking? No worries! Let's troubleshoot further:
- Restart Everything: Seriously, try restarting your router and your computer. I’m not kidding; it works a surprising amount of the time.
- Check Your Internet Speed: Run a speed test (search "speed test" online). This will tell you if the problem is with your internet service provider (ISP) or your home network.
- Contact Your ISP: If your speed test results are consistently slow, it’s time to contact your ISP. They might be able to identify and fix problems on their end.
10. The Hardware Angle: Considering Upgrades
If you've exhausted all other options, it might be time to consider upgrading your hardware:
- Your Network Adapter: If your network adapter is old, it might not support the latest WiFi standards. A new adapter can dramatically boost your speeds.
- Your Router: An outdated router can become a bottleneck. Consider upgrading to a newer model that supports the latest WiFi protocols (like 802.11ac or Wi-Fi 6).
11. Security First: Protecting Your WiFi Network
While speed is important, don’t forget about security! After all, a fast but vulnerable network isn't worth much. Make sure your network is protected:
- Use a Strong Password: Secure your WiFi network with a strong password that you can't guess.
- Enable Encryption: Make sure your router uses WPA2 or WPA3 encryption.
- Guest Network: Set up a guest network for visitors. This separates their devices from your main network, enhancing security.
12. Avoiding Bandwidth Hogs: Controlling Your Traffic
Control what is eating up your precious bandwidth:
- Limit Background Downloads: Close unnecessary apps and downloads.
- Quality Settings: Lower the quality of streaming videos.
- Monitor Devices: Monitor your network to see which devices consume the most data.
13. Advanced Techniques: Exploring Command Prompt (For the Brave!)
For the tech-savvy folks, you can try a few things:
- Flush DNS: Open Command Prompt (search for "cmd"), run it as an administrator, and type
ipconfig /flushdns. This clears the DNS cache, which can sometimes resolve connection issues. - Renew IP Address: In Command Prompt, type
ipconfig /releasefollowed byipconfig /renew. This forces your computer to request a new IP address from your router.
14. Patience, Grasshopper: The Art of Troubleshooting
Remember, fixing WiFi issues can sometimes be a process, like solving a puzzle. Be patient, experiment with different solutions, and don't get discouraged. Sometimes it takes a few tries to get things right. And remember, we're all in this together!
15. Summing Up: Your WiFi Superpower Awaits!
So there you have it! We've covered everything from the basic culprits behind slow WiFi to the secret weapon of the network reset and some nifty troubleshooting tactics. We’ve also seen how to beef up your signal strength and ensure your internet remains secure. With a few simple tweaks, you can unlock the full speed potential of your Windows 10 WiFi. Go forth, conquer those slow speeds, and enjoy the internet at its finest!
Good luck, and happy surfing!
Principal Keywords: Windows 10 WiFi Speed
SEO Headline: Windows 10 WiFi: Secret Trick to Boost Speed!
Pathway: Windows 10 WiFi
Meta Summary: Tired of slow WiFi on Windows 10? Learn the secret trick nobody tells you to unlock blazing fast internet speed. Simple steps, clear instructions! #Windows10 #WiFi #Speed
Image Alt Text: A Windows 10 laptop displaying a fast WiFi connection with arrows pointing upwards, suggesting a speed
2 Cara Mengaktifkan Wifi di Windows 10

By MexMew Chanel 2 Cara Mengaktifkan Wifi di Windows 10 by MexMew Chanel
Cara Mengaktifkan Wifi di Laptop Windows ASUS LENOVO HP ACER AXIO TOSHIBA

By Multi Talenta Tutorial Cara Mengaktifkan Wifi di Laptop Windows ASUS LENOVO HP ACER AXIO TOSHIBA by Multi Talenta Tutorial
Memperbaiki WiFi yang Tidak Muncul di Pengaturan Windows 10 Memperbaiki WiFi yang Hilang 2025

By Sandeep Singh Memperbaiki WiFi yang Tidak Muncul di Pengaturan Windows 10 Memperbaiki WiFi yang Hilang 2025 by Sandeep Singh
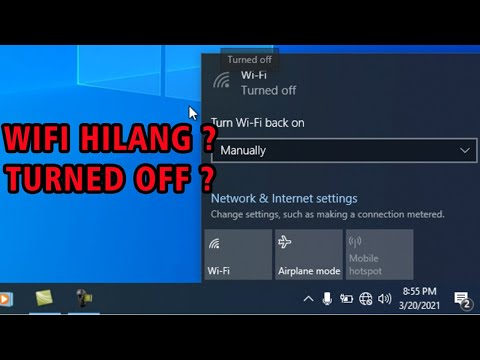
Title: Cara mengatasi wifi yang hilang atau turned of dengan mudah
Channel: Abdul Rohman
Cara mengatasi wifi yang hilang atau turned of dengan mudah by Abdul Rohman
Unlock Your Windows 10 WiFi: The Secret Trick Nobody's Telling You!
We've all been there: staring at the blinking Wi-Fi icon, willing our internet connection to materialize. Frustration mounts as we troubleshoot, restart, and troubleshoot again, only to be met with the dreaded "limited connectivity" or, worse, complete silence. But what if the solution wasn't buried deep within complex network settings or requiring hours of technical support? What if a simple, often overlooked adjustment could dramatically improve your Windows 10 Wi-Fi experience? We believe it can, and we are thrilled to share a hidden gem, a secret trick that often resolves Wi-Fi woes and boosts overall performance.
The Unseen Culprit: Power Management and Your Wireless Adapter
Often, the culprit isn’t the router, the internet service provider, or even a faulty network card. The problem lies within, specifically, how Windows 10 manages power to your wireless adapter. By default, Windows 10 is designed to conserve battery life, and one of the ways it achieves this is by throttling the power supplied to your Wi-Fi adapter. While this approach might seem logical for laptops used on the go, it can be detrimental to desktop users or anyone prioritizing a stable, high-speed Wi-Fi connection. This power-saving feature can introduce latency, reduce throughput, and lead to intermittent disconnections, producing a frustrating experience.
Disabling Power Saving: A Deep Dive
The secret lies in disabling the power-saving features for your wireless adapter. Let's explore the precise steps required:
Accessing Device Manager: Begin by right-clicking the Start menu icon (the Windows logo) located in the bottom-left corner of your screen. From the menu, select "Device Manager." This opens a central console that allows you to view and manage all hardware connected to your computer.
Locating Your Network Adapters: In the Device Manager window, you will see a list of various hardware categories. Expand the "Network adapters" section. This will display a list of all your network adapters, including your Ethernet and Wi-Fi adapters. Your Wi-Fi adapter's name will vary (Intel, Realtek, Broadcom, etc.).
Navigating Adapter Properties: Right-click on your Wi-Fi adapter and select "Properties" from the context menu. This will open a new window containing detailed information and settings for your specific adapter.
Power Management Tab: The Key: In the adapter properties window, click on the "Power Management" tab. If you don't see this tab, it's because this feature is not available for your Wi-Fi adapter.
Uncheck the Power-Saving Option: Within the "Power Management" tab, you'll find a checkbox labeled "Allow the computer to turn off this device to save power." The default setting frequently has this box checked. Uncheck this box to disable power-saving for your Wi-Fi adapter.
Confirm and Apply: Click "OK" at the bottom of the "Power Management" tab to save your changes and then click "OK" again in the adapter properties window.
Restart Your Computer: For the changes to take effect, it's essential to restart your computer. This allows Windows 10 to apply the new power management settings during system initialization.
Beyond the Basics: Advanced Tweaks for Optimal Wi-Fi
While disabling power-saving mode is the core of this trick, we can delve deeper to fine-tune your Wi-Fi experience. These are considered advanced methods to enhance WiFi connections.
Driver Updates: A Foundation for Stability
Outdated or corrupted drivers can cripple your Wi-Fi performance. To ensure your adapter is running smoothly, keep your drivers current.
- Accessing Driver Settings: Return to the Device Manager (as described above).
- Update Driver: Right-click on your Wi-Fi adapter and select "Update driver."
- Automatic Search: Choose "Search automatically for drivers." Windows will search for and install the latest driver for your adapter.
- Manual Installation (If necessary): If Windows can't find a driver, you might need to visit your Wi-Fi adapter manufacturer's website (Intel, Realtek, etc.) and download the latest driver for your specific model. Then, select "Browse my computer for drivers" in the "Update driver" window and provide the path to the downloaded driver files.
Understanding Wireless Adapter Settings: Delving Into the Details
Some Wi-Fi adapters have advanced settings that allow you to fine-tune performance even further. These settings are typically accessible within the adapter's properties:
Adapter Properties (again): Go back to the properties window for your Wi-Fi adapter within Device Manager.
Advanced Tab: Unlocking Potential: Click on the "Advanced" tab. Here, you'll find a list of customizable settings specific to your adapter. These vary depending on the adapter model.
Common Settings and Their Impact:
- 802.11n/ac Mode: If your router and adapter support it, set this to "802.11ac" or the highest available standard. This allows for faster speeds and improved reliability.
- Channel Width: Experiment with different channel widths (e.g., 20 MHz, 40 MHz, 80 MHz) to find the optimal setting for your environment. Wider channels can provide faster speeds but can also be more susceptible to interference.
- Roaming Aggressiveness: This setting controls how aggressively your adapter seeks out stronger Wi-Fi signals. A higher setting might cause more frequent switching between access points, which can be beneficial in environments with multiple Wi-Fi networks.
- Transmit Power: If you're experiencing weak signal strength, consider increasing the transmit power. Be mindful of potential interference with other devices.
Adjusting Settings and Testing: Make changes one at a time, applying them with “OK”, and then testing your Wi-Fi connection after each adjustment. This will help you pinpoint the optimal settings for your specific setup.
Troubleshooting Common Wi-Fi Issues: An Arsenal of Solutions
Even after applying these advanced techniques, occasional Wi-Fi problems can still arise. Here's how to tackle the most prevalent issues:
- Restart Your Router and Modem: This age-old trick remains effective for many connection problems. Unplug your router and modem, wait 30 seconds, plug the modem back in, wait for it to fully boot, and then plug in the router.
- Check for Interference: Other electronic devices—microwaves, cordless phones, Bluetooth devices—can interfere with your Wi-Fi signal. Try moving your router away from these devices or switching to a less congested Wi-Fi channel.
- Increase Router Distance: Place the router away from metallic objects or obstructing walls.
- Run the Windows Network Troubleshooter: Windows 10 has a built-in troubleshooter that can automatically detect and fix common network problems. Right-click the Wi-Fi icon in your system tray and select "Troubleshoot problems."
- Check Your Router's Firmware: Ensure your router's firmware is up-to-date. Outdated firmware can cause compatibility issues or performance bottlenecks. You can typically update your router's firmware through its web interface.
- Consider a Wi-Fi Analyzer: Tools like NetSpot or Acrylic Wi-Fi Home can analyze your Wi-Fi environment and identify optimal channels and potential sources of interference.
- Reset Network Settings (as a last resort): If all else fails, consider resetting your network settings to their default. Go to Settings > Network & Internet > Status > Network reset. Keep in mind that you'll need to re-enter your Wi-Fi passwords after this step.
Reaping the Rewards: The Benefits of Optimized Wi-Fi
Implementing this "secret trick" and applying these advanced techniques can yield a noticeable transformation in your Wi-Fi experience. You can expect:
- Faster Speeds: Optimized power management allows your adapter to operate at its full potential, resulting in higher data transfer rates.
- Increased Reliability: Stable power delivery minimizes dropped connections and intermittent disconnections.
- Reduced Latency: Enjoy a smoother online gaming experience and quicker response times during video conferencing.
- Enhanced Overall User Experience: Spend less time struggling with your connection and more time doing what you enjoy online.
Conclusion: Unlocking Your Wireless Potential
We believe that by understanding and applying the "secret trick" of disabling power-saving for your Wi-Fi adapter, along with a bit of fine-tuning, you can transform your Windows 10 Wi-Fi experience. We encourage you to delve into these advanced settings and experiment with these suggestions to discover the optimal configuration for your setup. You'll find that by taking control of your Wi-Fi connection, you can eliminate frustration and unlock a world of seamless, high-speed wireless connectivity.
