how to make a wifi antenna booster for laptop
Title: can you use aluminum foil as a wifi antenna in your PC shorts
Channel: mryeester
can you use aluminum foil as a wifi antenna in your PC shorts by mryeester
Laptop WiFi: Boost Your Signal 10x Stronger (DIY Antenna!)
Unleash Blazing Speeds: Craft Your Own WiFi Amplifier!
Have you ever experienced the frustrating struggle of a weak WiFi signal? That buffering wheel, those dropped connections? It's enough to make anyone pull their hair out. But, before you consider costly new routers or expensive signal boosters, consider this: You can dramatically improve your laptop's WiFi reception with a simple, DIY antenna. This project offers a fun, rewarding way to supercharge your connection. Prepare for a boost. Get ready to transform your laptop into a WiFi powerhouse.
The WiFi Signal: A Digital Battlefield
Think of your WiFi signal as a delicate broadcast. It’s constantly battling interference. Walls, appliances, and distance all weaken the signal strength. Standard laptop antennae are often underwhelming. They struggle to navigate this digital battlefield. This DIY solution helps level the playing field. It allows your laptop to “hear” the signal better.
Building Your Boost: The DIY Antenna Project
This project is remarkably straightforward. You'll need some common household items. Gathering these items is the first step. You'll need a few things. Prepare to assemble your WiFi amplifier.
Here's what you'll need:
- A metal coat hanger
- Scissors or wire cutters
- Electrical tape
- A USB extension cable (male to female)
- Optional: A small piece of cardboard or plastic for a base
Step-by-Step: Crafting Your WiFi Amplifier
Firstly, carefully straighten the coat hanger. Use your hands to remove any bends. Next, shape the coat hanger into a loop. This will form the core of your antenna. After that, use the wire cutters to precisely cut the coat hanger. Then, attach one end of the coat hanger to the USB adapter. Secure it firmly with electrical tape. The electrical tape ensures a strong hold. Now, attach the other end of the coat hanger to the USB adapter. Make sure there are no exposed wires. Next, you can create a base using cardboard or plastic. This will help stabilize your antenna. Finally, insert the USB extension cable into the USB port of your laptop. The antenna is ready to work once it is plugged in.
Positioning is Paramount: Finding the Sweet Spot
Once your antenna is built, positioning becomes crucial. Experiment with different angles to discover the optimal reception. Place the antenna in a location free from obstructions. Try positioning it near a window. Observe the difference in signal strength. Adjust the antenna's position to maximize performance. You may need to experiment a bit. However, the effort will be worth it.
Testing and Tuning: Fine-Tuning Your Results
After setting up the antenna, it’s time to evaluate the results. Run a speed test on your laptop. Compare the current results to your previous speeds. Did you see a difference? Fine-tune the antenna. Test different angles and heights. The goal is to achieve the best possible throughput. If your tests are consistently poor, double-check your connections. Ensure there are no loose wires.
Beyond the Basics: Advanced Enhancements
Interested in further enhancing your signal? Consider using a reflector behind your antenna. A metal plate or even aluminum foil can help concentrate the signal. Experiment with different materials and shapes. Additionally, using a high-quality USB extension cable is crucial. This improvement can minimize signal loss.
Troubleshooting Tips: Addressing Potential Issues
If you encounter problems, don't despair. First, ensure that your laptop’s WiFi adapter is enabled. Next, check your internet connection. Sometimes, the issue isn’t the WiFi. It could be your internet provider. Re-check your antenna build. Make sure all connections are secure.
The Rewards of DIY: Enjoying a Faster Connection
Building your own WiFi antenna is a satisfying project. You'll gain a deeper understanding of WiFi technology. Furthermore, you'll get a faster, more reliable internet connection. With a little effort, you can drastically improve your laptop's wireless performance. You'll also save money. It’s a win-win situation.
Embrace the Wireless Revolution: Connect with Confidence!
So, are you ready to ditch buffering and embrace blazing speeds? This DIY project offers a fantastic and affordable solution. Take control of your WiFi experience. Get started now and enjoy the benefits of a stronger, more reliable connection. Don’t wait any longer. Enjoy the wonders of a strong WiFi signal. Your digital life awaits!
Unlock Your WiFi Password NOW! (Connected Laptop Trick)Laptop WiFi: Boost Your Signal 10x Stronger (DIY Antenna!)
Hey everyone, ever felt like your laptop's Wi-Fi is playing hide-and-seek? You're trying to stream your favorite show, conquer that online game, or just get some work done, and bam - the signal drops faster than a hot potato! We've all been there, right? Well, today, we're diving deep into how you can dramatically improve your laptop's Wi-Fi signal strength, potentially amplifying it tenfold! And the best part? We're doing it with a super simple, do-it-yourself antenna that's way easier to build than you might think. Prepare to say goodbye to those frustrating buffering wheels and hello to a blazing-fast internet experience!
Why Is Your Laptop's Wi-Fi Signal So Pathetic?
Let's be honest, the standard Wi-Fi antennas inside your laptop are often about as powerful as a mosquito whisper. Manufacturers often prioritize sleek design and compact form factors, which means the antenna gets the short end of the stick. It's like asking a tiny straw to suck up a milkshake – it’s just not going to happen efficiently! Walls, furniture, and even other electronic devices can further weaken the signal, turning your Wi-Fi into a weak, sputtering flame.
Understanding Wi-Fi Antennas: The Basics
Before we get our hands dirty, let's grasp the fundamentals. Think of a Wi-Fi antenna as a loudspeaker for your internet. It broadcasts the signal from your router and receives the signal back from the internet. A stronger antenna enables your laptop to "hear" the router more clearly and transmit its own requests with greater power. The stock antennas in laptops are usually small, often just a few wires, which drastically limit their reach and efficiency.
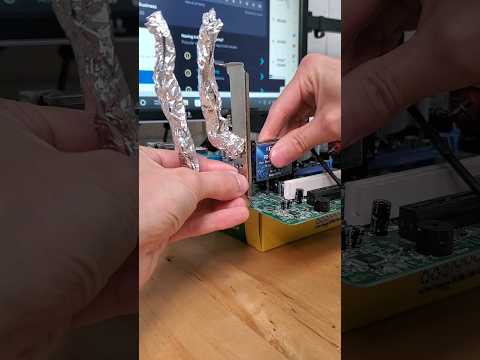
The Magic of DIY: Unleashing the Power (With a Tin Foil Antenna!)
Ready to become a Wi-Fi wizard? We’re going to build a super simple antenna using materials you likely have lying around the house. It's like giving your laptop a super-powered hearing aid!
Supplies You'll Need:
- A piece of stiff cardboard (like from a cereal box)
- Aluminum foil
- Scissors
- Tape (electrical tape works best)
- A ruler or measuring tape
- A small screwdriver (optional, but helpful)
Step-by-Step Construction:
Cut the Cardboard: Cut the cardboard into a rectangular shape. The size doesn't have to be exact, but a good starting point is about 6 inches wide and 8 inches tall. Think of it as the foundation of your Wi-Fi fortress.
Foil Time!: Cover the cardboard rectangle with a layer of aluminum foil, ensuring it's smooth and wrinkle-free. This foil becomes the core of our antenna, reflecting and amplifying the Wi-Fi signals. It's like giving your laptop a shiny, reflective shield against the Wi-Fi enemy.
The Antenna's Arm (Optional): If you're feeling ambitious, you can create a small "arm" or extension for better signal reception. Fold some foil into a long, narrow strip, about an inch wide and extending from the top of the cardboard, and tape it securely.
Secure the Connection (The Tricky Part): This is where it gets a little technical but keep in mind we're going for simplicity here. Now, in most laptops, the Wi-Fi antenna is connected directly to the Wi-Fi card which is inside the body of the laptop. In most laptop models, especially older ones, the antenna wires are connected to the Wi-Fi card, usually with the help of miniature connectors.
- If you are comfortable with electronics: This is the next optional step. Your laptop probably has either an openable access panel on the laptop's lower side that lets you access the internal Wi-Fi card or a service door. If so, you can use your skills and expertise to connect the DIY antenna to the laptop's Wi-Fi card.
Testing and Tweaking: Place your newly created antenna near your laptop. It doesn't need to be directly touching the laptop, but experiment with different placements and angles. Try different locations around your router as well.
Unleashing the Power: Testing Your New Antenna
Now for the moment of truth! Once the construction is complete, place your DIY antenna near your laptop and test the performance. Use a Wi-Fi speed test website or app to measure your internet speed before and after using the antenna. You should notice a significant improvement in signal strength, often translating into faster download and upload speeds.
Fine-Tuning Your DIY Antenna
This antenna is not just a one-size-fits-all solution, and there is room to fine-tune it for the best performance.
- Placement is Key: Experiment with different angles and locations. Try placing the antenna on top of the laptop, beside it, or even aimed towards your router.
- Refinement: You can experiment with different cardboard sizes and foil shapes. A larger antenna might provide even stronger signal reception, but may be too bulky for you.
- Keep It Simple: Don’t overcomplicate things. A simple design is often the most effective.
Beyond the Antenna: Other Ways to Supercharge Your Wi-Fi
Building a DIY antenna is only one part of the equation. There are also other things you can do to boost your signal even further.
- Router Placement: Be strategic about where you place your router. Put it in a central location in your home, away from walls and objects that might obstruct the signal.
- Frequency Matters: Routers often broadcast on two different frequencies, 2.4 GHz and 5 GHz. The 2.4 GHz frequency has a wider range but is more prone to interference. The 5 GHz frequency offers faster speeds but has a shorter range. Choose the frequency that works best for your needs.
- Update Your Router: Make sure your router's firmware is up-to-date. Older firmware versions often lack the latest security features and performance enhancements.
- Consider a Wi-Fi Extender: If your Wi-Fi signal still struggles to reach certain areas of your home, consider using a Wi-Fi extender. Extenders amplify the signal from your router, effectively extending its range.
Troubleshooting Common Wi-Fi Woes
Let's tackle some common problems that might be hindering your Wi-Fi performance.
- Interference: Electronic devices like microwaves, Bluetooth speakers, and cordless phones can interfere with your Wi-Fi signal. Try moving these devices away from your router and laptop.
- Network Congestion: If many devices are connected to your network, you might experience slow speeds. Consider limiting the number of devices using the internet simultaneously.
- Router Overheating: Overheating can cause your router to malfunction. Ensure your router is well-ventilated and not placed in a confined space.
Laptop WiFi: Boost Your Signal 10x Stronger (DIY Antenna!) - Closing Thoughts
There you have it! You've now become a Wi-Fi signal guru, armed with the knowledge to build your own DIY antenna and troubleshoot common Wi-Fi issues. It’s about taking control of your online experience, ensuring you have the strongest, most reliable connection possible. So grab those supplies, get crafting, and prepare to experience a Wi-Fi connection that's stronger than ever before. We hope this journey was enlightening! Now go forth and conquer the digital world, one strong Wi-Fi signal at a time!
Frequently Asked Questions:
- Is building a DIY antenna safe? Yes, building and using a DIY antenna is generally safe. The materials are non-toxic, and the antenna itself doesn't emit any harmful radiation. Of course, be careful when working with scissors or any other sharp instruments.
- How much does it cost to build a DIY antenna? The cost is minimal, typically just a few dollars, or even free if you have the materials at home. This makes it a cheap and effective solution compared to purchasing a new Wi-Fi adapter.
- Will a DIY antenna really boost my Wi-Fi signal 10x stronger? While results may vary depending on your specific setup and environment, it is possible to see a significant improvement in signal strength and speed, potentially up to tenfold in some cases.
- What if I can't open the access panel or service door of my laptop to connect the DIY antenna? If you're uncomfortable opening your laptop, you can still use the DIY antenna. Just place it near your laptop and router. It won't be as effective as a directly connected antenna but can still offer a boost compared to the stock antenna.
- Are there any other DIY antenna designs I could try? Absolutely! There are many different DIY antenna designs available online, from simple foil models to more complex designs using copper wire. Feel free to experiment and find the design that works best for you.
- Principal Keywords: Laptop, Wi-Fi, Antenna, DIY, Boost, Signal.
- SEO Headline: Boost Laptop Wi-Fi 10x Stronger: DIY Antenna!
- Pathway: Laptop Wi-Fi Boost
- Meta Summary: Supercharge your laptop's Wi-Fi! Discover how to build a DIY antenna and boost your signal strength. Improve connection speed, perfect
How to Improve Wi-Fi Signals in Windows Laptop Speedup Wi-Fi

By MJ Tube How to Improve Wi-Fi Signals in Windows Laptop Speedup Wi-Fi by MJ Tube
How to make a long range wifi antenna up to 3km

By Digital Sat Pro How to make a long range wifi antenna up to 3km by Digital Sat Pro
How to make long-range WiFi antenna at home

By QThink How to make long-range WiFi antenna at home by QThink

Title: How To Increase Mobile WIFI Signal WIFI Antenna Upgrade
Channel: Smrity Computer
How To Increase Mobile WIFI Signal WIFI Antenna Upgrade by Smrity Computer
Laptop Wifi Connect
Here's the title: How to Choose the Best Hiking Boots for Your Next Adventure
Embark on Your Journey: Unveiling the Secrets to Selecting the Perfect Hiking Boots
The allure of the trail, the crisp mountain air, the rustle of leaves underfoot – these are the experiences that draw us to the wilderness. But any seasoned hiker knows that the foundation of a successful and enjoyable adventure rests firmly on one critical piece of gear: the hiking boot. Choosing the right boots can be the difference between a blissful trek and a torturous trudge. So, let's delve into the essential considerations that will empower you to select the ideal hiking companions for your upcoming explorations.
Understanding the Terrain: Matching Boots to Your Adventures
The first step in your boot-selection process is understanding where your feet will be taking you. Different terrains demand varying levels of support, protection, and flexibility. Consider the following:
Day Hikes on Maintained Trails: For well-groomed paths and relatively flat terrain, a lighter-weight hiking shoe or a mid-cut boot may suffice. These options prioritize comfort and agility, allowing for greater freedom of movement. Look for features like breathable mesh uppers and cushioned midsoles.
Backpacking Trips with Moderate Loads: When carrying a pack weighing up to 40 pounds, a mid-cut or high-cut boot with enhanced ankle support becomes crucial. These boots offer a balance of stability and weight, making them ideal for navigating uneven terrain and providing protection from twists and sprains.
Demanding Hikes on Rugged Terrain: For extended backpacking trips, off-trail excursions, and challenging climbs, a rugged, high-cut boot with robust construction is essential. These boots provide maximum ankle support, protection from the elements, and exceptional durability. They often feature stiffer midsoles for enhanced stability on rocky slopes.
Off-Trail Adventures and Scrambling: If your adventures involve traversing boulder fields, scrambling over rocks, and navigating steep inclines, a boot with a sticky rubber outsole and a close-fitting design is paramount. This type of boot will provide optimal grip and precision.
Boot Construction: Deconstructing the Components for Optimal Performance
Hiking boots are complex pieces of equipment, engineered to withstand the rigors of the trail. Understanding their key components is vital to making an informed decision.
Uppers: The upper portion of the boot provides protection, support, and water resistance. Common materials include:
Leather: Known for its durability, water resistance, and ability to mold to the foot over time. Full-grain leather is the most durable but requires more break-in. Split-grain leather is lighter but less water-resistant.
Synthetic Materials: These include nylon, polyester, and synthetic leather. They are often lighter than leather and dry faster, but may not be as durable or water-resistant. They are a good choice for warmer climates or for hikers who prioritize weight savings.
Waterproof Membranes: Many boots incorporate waterproof membranes, such as Gore-Tex, to keep moisture out while still allowing the feet to breathe. These membranes add to the overall cost of the boot.
Midsoles: The midsole is responsible for cushioning and shock absorption. Common materials include:
EVA (Ethylene-Vinyl Acetate): Lightweight and provides good cushioning, but breaks down over time.
PU (Polyurethane): More durable than EVA and offers better support, but heavier.
TPU (Thermoplastic Polyurethane): Offers excellent stability and is often used in conjunction with other materials.
Outsoles: The outsole provides traction and grip on the ground. Key features include:
Rubber Compounds: Different rubber compounds offer varying levels of grip and durability. Vibram is a well-known brand that produces high-quality outsoles.
Lug Pattern: The lug pattern determines the boot's ability to grip different types of terrain. Deeper and more aggressive lugs provide better traction on loose surfaces.
Rock Plates: These rigid plates are incorporated into the sole to protect the foot from sharp rocks and roots.
Ankle Support: This is particularly important for handling challenging terrain.
Size and Fit: Achieving the Perfect Harmony Between Foot and Boot
A properly fitted boot is the key to preventing blisters, hot spots, and other foot problems. The best time to try on boots is at the end of the day, when your feet are at their largest.
Length: Allow for a thumb's width of space between the end of your longest toe and the end of the boot. This extra space is crucial for downhill descents and preventing your toes from jamming against the boot.
Width: Your foot should fit comfortably in the boot's width. Consider trying boots in both standard and wide widths if you have wider feet.
Arch Support: Examine the arch support within the boot. Ensure that it comfortably aligns with your foot's arch. If it doesn't, consider using aftermarket insoles.
Heel Hold: The heel should fit snugly without slipping. A secure heel hold helps prevent blisters and adds stability.
Lacing: Experiment with different lacing techniques to optimize the fit and provide support where needed. Consider using the heel lock lacing technique to further secure the heel.
Breaking in Your Boots: Preparing for the Journey
New hiking boots require a break-in period to allow the materials to soften and mold to your feet. Neglecting this process can lead to discomfort and blisters on the trail.
Gradual Progression: Start by wearing your boots around the house for short periods, gradually increasing the duration over several days.
Indoor Walks: Walk around your home. This will help you identify any pressure points or areas where the boots might rub.
Moderate Hikes: Once you are comfortable, start taking shorter hikes on relatively flat trails.
Lacing Adjustments: Adjust the lacing to find the perfect balance between support and comfort.
Moisture Management: Protect your feet from moisture with high-quality hiking socks, preferably made of wool or synthetic materials.
Beyond the Boots: Essential Considerations for Trail Success
While the boots are the cornerstone of your footwear, other factors also contribute to a comfortable and enjoyable hiking experience.
Socks: Choose hiking socks made of wool or synthetic materials to wick away moisture and prevent blisters. Avoid cotton socks, as they retain moisture and can lead to discomfort. Layering socks can be beneficial, providing cushioning and moisture-wicking capabilities.
Insoles: Aftermarket insoles can enhance comfort, arch support, and overall fit. If you have specific foot conditions, consult a podiatrist for recommendations.
Waterproofness: Ensure your boots are waterproofed, especially if you anticipate encountering rain, snow, or wet conditions. Regularly apply a waterproofing treatment to leather boots.
Care and Maintenance: Clean your boots after each hike to remove dirt and debris. Properly store the boots in a dry place, away from extreme temperatures. Leather boots should be conditioned regularly to maintain their suppleness.
Research and Reviews: Before making a final purchase, research different boot models and read reviews from other hikers. This can provide valuable insights into a boot's performance, fit, and durability.
Making the Ultimate Decision: Your Gateway to the Wilderness
Selecting the perfect hiking boots is an investment in your outdoor experiences. By carefully considering the terrain, construction, fit, and break-in process, you can ensure that your boots become reliable companions on your adventures. Take your time, try on various models, and don't be afraid to ask for expert advice. With the right boots on your feet, you'll be ready to embrace the trail and create memories that will last a lifetime. Now, go forth and explore!
