how do i remove a wifi network from my laptop
Title: Forget or Remove a Wireless Network on Windows 10 How-To
Channel: Windows Explained
Forget or Remove a Wireless Network on Windows 10 How-To by Windows Explained
how do i remove a wifi network from my laptop, how do i delete a wifi network from my laptop, how do i forget a wifi network on my laptop, how do i forget a wifi network on my hp laptop, how do you delete a wireless network from your laptop, how to forget a wifi network on my laptop, how to delete a wifi network on windows 10, how to remove wifi network in laptop
Banish That WiFi Network! Erase It From Your Laptop NOW!
The Great WiFi Purge: Liberating Your Laptop from Digital Shackles
Have you ever felt that subtle, almost imperceptible tether? You are unconsciously chained to the digital realm. It is subtle, yet ever-present. I am talking about your laptop's persistent Wi-Fi connection. It is time to break free. This is a call to action. It's time to liberate your digital device. Consider this your official invitation to the Great WiFi Purge!
Why Constant Connectivity is a Double-Edged Sword
Think about it. Your laptop constantly searches for networks. It’s an endless cycle. This pursuit, in itself, is a distraction. Therefore, it chips away at your focus. We must recognize its impact. It affects productivity. Next, consider the security risks. Open networks are like digital trapdoors. Hackers lurk, waiting to pounce. They seek to steal your data. They want your personal information. Consequently, you become vulnerable. Moreover, it fosters a dependence. So, we must liberate ourselves.
Unplugging: Reclaiming Your Concentration
Firstly, deleting your WiFi is a bold move. It's a conscious choice. It shifts your priorities. Secondly, consider the mental benefits. You will experience enhanced focus. You will become less easily distracted. Consequently, your mind will relax. Your creativity will soar. You will think more deeply. This shift is profound. It allows real work to happen. You're no longer at the mercy of notifications. You can define when you connect.
The Art of the Digital Disconnect: A Step-by-Step Guide
Now, let’s get practical. Here's how to start the Purge.
- Locate your WiFi settings: This is the first step. Your operating system varies. However, it is usually in the system tray. It's a small icon. Generally, it shows WiFi status.
- The Erase Function: Right-click the WiFi icon. Or, delve into network settings. Find the menu. Then, seek for your network name. There’s an option. You must "forget" or "remove" it.
- Do this for all networks: Repeat this repeatedly. Eliminate any saved passwords. Remove all connection profiles. Consider it a clean slate.
- Reboot and Reflect: Finally, restart your laptop. Observe the change. Notice the absence. Note the silence. Now, you can choose when to log back on.
Embracing the Benefits of Limited Connection
Suddenly, your laptop is yours again. It’s not endlessly searching. Instead, you control when and where you connect. As a result, you reclaim your time. Digital distractions cease. You gain control over your workflow. You foster a healthier relationship with technology. You may notice new creative sparks. You will see more projects completed. More importantly, you will become more efficient.
Beyond the Purge: Enhancing Your Offline Experience
So, now you are offline. Now, what? Several options are available.
- Embrace the Power of Offline Applications: Many programs work offline. Think of word processors. Consider photo editing software. Leverage these tools. Produce meaningful work without WiFi.
- Batching Your Connections: Decide the best timing for connecting. Schedule times to check emails. Organize online tasks. Limit the time you spend online.
- The Power of Physical Media: Read a physical book. Write in a notebook. Enjoy a walk outside. Disconnect from the digital world.
Troubleshooting: When You Need to Reconnect
Nevertheless, there are times when you must reconnect. Here are some strategies.
- Public WiFi Safety: Be cautious about these networks. Avoid sharing private details. Use a VPN for security.
- Create a Mobile Hotspot: Use your phone as a hotspot. This offers secure connectivity. It will also give you control.
- Prioritize Wired Connections: Use an ethernet cable for the best speeds. Hardwire connections are the most secure.
The Final Verdict: Living a More Focused Existence
Ultimately, deleting your WiFi is a lifestyle shift. It's all about conscious choices. It is about regaining control. It is about enhancing your focus. For instance, I made this change. Consequently, I've seen improvements. Your laptop is a tool. Don’t allow it to control you. Instead, take charge. It starts with that one simple deletion. Take the leap. Experience the change! You will not regret it. So, delete it now.
Unlock Your Laptop's WiFi Hotspot: The Ultimate Windows 7 GuideBanish That WiFi Network! Erase It From Your Laptop NOW!
Hey everyone, ever feel like your laptop's a digital sponge, constantly soaking up WiFi networks it doesn't even need? We've all been there, that phantom connection lurking in the background, whispering sweet nothings about potential bandwidth hogs and security vulnerabilities. Seriously, it's like having a clingy ex-relationship—you just want it GONE! Today, we're going to dive deep into why banishing those unwanted WiFi networks from your laptop is a smart move and, more importantly, how to do it. Trust me, it’s easier than untangling Christmas lights.
1. The Digital Dust Bunnies: Why Unwanted WiFi Networks are a Problem
Think of your laptop like your home. You wouldn’t leave the front door open and invite anyone and everyone to wander in, would you? Well, leaving a bunch of saved WiFi networks on your computer is kind of like leaving the door ajar with a "Welcome, freeloaders!" sign. It's not inherently dangerous, but it introduces potential risks and can definitely slow things down.
- Security Risks: Saved networks, especially those with weak or outdated security protocols, can be exploited by hackers. Think of it like leaving a key under the doormat – eventually, someone might find it.
- Speed Demons: Your laptop constantly searches for and connects to available WiFi networks, which can drain your battery and slow down your overall performance. It’s like your laptop’s trying to juggle a dozen conversations simultaneously!
- Accidental Connections: Ever accidentally connected to a public WiFi network you didn't want to? It happened to me at a coffee shop once, and the connection was so slow, I swear the barista was walking faster than the internet.
- Privacy Intrusion: Some networks might track you, or you run the risk of being on a network that has suspicious activities being run.
2. First Steps: Understanding Your WiFi Landscape
Before we start deleting, let's get a lay of the land. Know where your WiFi networks hang out, know what to look for.
- Windows: Click the WiFi icon in your system tray (usually near the clock). This displays a list of all available networks, and the ones your laptop remembers.
- macOS: Click the WiFi icon in the menu bar (top right). This shows a similar list, and you can also access network settings from there.
3. The Windows Method: Removing the Network from Your Laptop
Okay, Windows users, let’s get rid of those digital squatters. Here’s the simple process:
- Access Settings: Open the Settings app. You can find it by searching for "Settings" in the Start menu.
- Network & Internet: Click on "Network & Internet."
- WiFi : Click on "WiFi"
- Manage Known Networks: This is where the magic happens. Click on "Manage known networks."
- Goodbye, Network!: A list of all your saved networks appears. Click on the network you want to forget, and then hit "Forget." Like closing a door on an unwanted caller!
4. The macOS Approach: Forgetting Networks Like a Pro
Alright, Apple aficionados, the process is just as easy (maybe even slicker!). Here’s how to evict those unwanted WiFi networks:
- Open System Preferences/System Settings: Click on the Apple menu in the top left corner of your screen and select "System Preferences" (or "System Settings" on newer macOS versions).
- Network: Click on "Network."
- WiFi: Ensure WiFi is enabled.
- Advanced: Click the "Advanced" button.
- Network Selection: You’ll see a list of preferred networks. Select the network you wish to delete.
- Remove: Click the "-" (minus) button below the list, right next to the network with which you wish to sever ties.
5. Why Delete Isn't Enough: Security Considerations
Deleting a network from your saved list is like putting a lock on your front door. It's a great first step, but it's not foolproof.
- Public WiFi Caution: Public networks are notoriously insecure. They often log your browsing data, and you may be connected to other nefarious persons. Always avoid sensitive activities (banking, personal information) on public WiFi unless you're using a VPN (Virtual Private Network).
- VPN is your guardian. A VPN encrypts your internet traffic, making it indecipherable.
6. The Importance of Regular Housekeeping: Maintaining a Clean Network List
Think of cleaning up your WiFi networks as a regular chore, like tidying your desk or deleting old emails. It's good practice for staying secure and maintaining a smooth-running laptop.
- Periodic Review: Once a month, take a quick peek at your saved networks.
- Delete the Unnecessary: Get rid of networks you no longer use.
- Update Password: If you change your home network password, refresh the laptop’s information.
- Beware of "Evil Twins": Be cautious of any network that appears similar to a legitimate one (like "Starbucks WiFi" vs. "StarbucksFreeWiFi").
7. Battling that Battery Drain: The Connection Conundrum
Let’s talk about battery life. Is your laptop's battery draining faster than your bank account after a holiday shopping spree? Saved WiFi networks might be part of the problem.
- Continuous Scanning: Your laptop constantly scans for known networks, even when you're not actively using WiFi, wasting precious battery power.
- Disable WiFi when not in use: It might seem obvious, but it is a simple technique that will improve your battery life.
8. Speed Demons: Reclaiming Your Bandwidth
Slow internet speeds can be the digital equivalent of walking through molasses. Unwanted WiFi networks can be a surprisingly significant contributor to this frustrating problem.
- Connection Attempts: Your laptop attempts to connect to saved networks, slowing down your internet connection.
- Prioritize Your Network: If you're in range of multiple networks, your laptop might try to connect to a slower one first. Clearing out the clutter ensures it defaults to your preferred, faster network.
9. The "Forgotten Password" Fiasco: A Preventative Measure
You’ve probably been there: you need to quickly connect to WiFi, and your laptop asks for the password for a network you think you have, but you don't remember the password!
- Password Security: Forgetting a network prevents you from having to remember the password or risk mistyping it.
10. Troubleshooting: When Things Go Wrong with Your WiFi
Sometimes, even after deleting networks, you might encounter WiFi problems. Here are a few quick troubleshooting tips:
- Restart Your Devices: Reboot your laptop and your router.
- Check Your Router: Make sure the router is working correctly (power, internet connection).
- Network Drivers: Ensure your laptop's WiFi drivers are updated.
- Contact Support: If all else fails, reach out to your internet service provider or a tech support professional.
11. The Metaphorical WiFi Cleanse: A Fresh Start
Deleting those unwanted WiFi networks is like a digital detox. It gives your laptop a fresh start, allowing it to focus on what matters: your essential digital needs.
- Simplicity: A streamlined list of connected networks is cleaner and easier to manage.
- Security: Eliminating the noise decreases potential entry points for vulnerabilities.
12. Public WiFi Dos and Don'ts: Playing it Safe
Public WiFi is a double-edged sword. It’s convenient, but it can also be risky.
- Use a VPN: This is your most crucial defense.
- Avoid Sensitive Activities: Banking, shopping, and accessing personal information should be avoided on public networks.
- Check the Network Name: Ensure you’re connecting to a legitimate network.
- Turn Off File Sharing: This will help to protect any existing files on your laptop.
13. Optimizing Your Home Network: Boosting Performance
While deleting unwanted WiFi networks improves your laptop’s performance, you can also optimize your home network for even better results.
- Choose the Right Router: Modern routers offer better speeds and security.
- Router Placement: Position your router in a central location, away from obstructions.
- Update Router Firmware: Keep your router's software up-to-date.
- Consider a Mesh Network: For larger homes, a mesh network can provide better WiFi coverage.
14. The Future of WiFi: Staying Ahead of the Curve
WiFi technology is constantly evolving. Staying up-to-date on the latest trends can help you maximize your digital experience.
- WiFi 6 and Beyond: The latest WiFi standards offer faster speeds, more capacity, and improved security.
- Security Protocols: Keep an eye on the latest security protocols.
- Smart Home Integration: As smart home devices become more prevalent, secure WiFi practices will be more important than ever.
15. The Final Uninstall: Why This Matters in the Long Run
Deleting unwanted WiFi networks is more than just a one-time task. It’s a good digital hygiene habit that offers long-term
HP Laptop WiFi Nightmare: Finally, a Fix That WORKS!How To Delete WIFI Network Profile From Windows 10 PC or Laptop

By Discover You How To Delete WIFI Network Profile From Windows 10 PC or Laptop by Discover You
How To ForgetDelete WIFI Network Profile From Windows 10 Tutorial

By MDTechVideos How To ForgetDelete WIFI Network Profile From Windows 10 Tutorial by MDTechVideos
How to Forget Remove a WiFi Network on Windows 11 or 10 PC

By Tech Tips How to Forget Remove a WiFi Network on Windows 11 or 10 PC by Tech Tips

Title: How to HideRemoveForget Unwanted WiFi Network in Windows 11108
Channel: MJ Tube
How to HideRemoveForget Unwanted WiFi Network in Windows 11108 by MJ Tube
Working With Laptop
Banish That WiFi Network! Erase It From Your Laptop NOW!
The digital frontier, once a realm of endless possibility, can transform into a labyrinth of frustration when an errant Wi-Fi network clings stubbornly to your laptop's memory. This unwanted guest, lingering in your network profiles, can trigger a cascade of problems, from frustrating connection attempts to insidious security risks. We're here to guide you through the process of permanently removing these ghosts of Wi-Fi past, ensuring your laptop operates with peak efficiency and security. Let's dive in and reclaim your digital domain.
Understanding the Perils of Unwanted WiFi Profiles
Before we begin the eradication process, it's crucial to understand why banishing these forgotten networks is so vital. Imagine your laptop, tirelessly searching for familiar Wi-Fi signals every time you boot up. Each failed connection attempt consumes processing power, slowing down your start-up time. This constant searching can also drain your precious battery life, leaving you tethered to a power outlet sooner than anticipated.
Moreover, these inactive profiles can pose significant security vulnerabilities. Older, less secure networks might still be lurking in your laptop's memory, acting as potential entry points for malicious actors. Even seemingly benign networks could be broadcasting outdated security protocols, leaving your data vulnerable to interception. By proactively removing these forgotten networks, we fortify your digital defenses and create a safer browsing experience. Furthermore, stored passwords associated with these networks become useless, rendering a potential attack fruitless.
Method 1: The Windows 10/11 Approach – A Straightforward Solution
For Windows 10 and 11 users, erasing unwanted Wi-Fi networks is a relatively straightforward process. This is the most common operating system, and its users need quick solutions to fix the issues in their laptops. To embark on this digital cleansing, follow these simple steps:
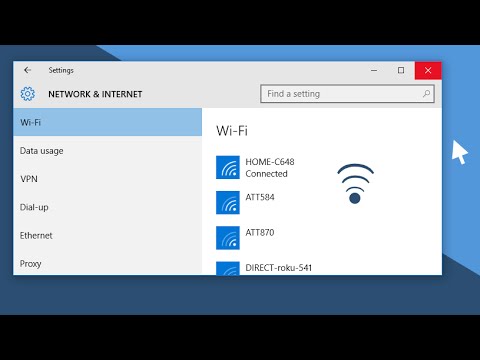
Accessing Network Settings: Begin by right-clicking the network icon, usually displayed in the system tray (the area in the bottom-right corner of your screen). This will often bring up a menu with common networking choices. Alternatively, navigate to the "Settings" app by clicking the Start menu and selecting the gear icon. From there, find and click "Network & Internet."
Managing Wi-Fi Settings: Within the "Network & Internet" settings, choose "Wi-Fi." This section houses all the important information regarding your wireless connections.
Unveiling Known Networks: Scroll down to the "Manage known networks" option. This crucial section displays a list of all the Wi-Fi networks your laptop has previously connected to. This will include public and private networks. Review the available networks here.
The Eradication Process: For each network you wish to banish, click on its entry. Now, click the "Forget" button, a friendly digital prompt, that appears in the network's detailed view. This action will permanently remove the network profile from your laptop's memory. You might be prompted to confirm. The confirmation ensures you don't accidentally delete a network you still use.
Repeat and Refresh: Systematically repeat the "Forget" process for every unwanted network. After completing this step, refresh your Wi-Fi list to ensure the banished networks are truly gone. Your laptop should now start up and connect to the desired networks much faster, without searching for non-existent connections.
Method 2: The Command Prompt Purge – For the More Advanced User
For users who prefer a more technical approach or desire a quicker method for removing multiple networks, the command prompt provides a powerful alternative. This method, although slightly more complex, is equally effective.
Launching the Command Prompt: Type "cmd" into the Windows search bar, located next to the Start button. Right-click on "Command Prompt" and select "Run as administrator." This ensures you have the necessary privileges to modify network settings. The interface is a text-based environment.
The
netsh wlan show profilesCommand: Once the command prompt window is open, type the following command and press Enter:netsh wlan show profiles. This command lists all the Wi-Fi profiles stored on your laptop, akin to the "Manage known networks" section in the Settings app.Identifying the Intruders: Carefully review the output of the
netsh wlan show profilescommand. You'll see a list of network names (SSIDs). These are the network names that your laptop remembers, including the unwanted and forgotten ones.The Eradication Command: For each network you wish to eliminate, use the following command, replacing
"NetworkName"with the exact name of the Wi-Fi network:netsh wlan delete profile name="NetworkName". For instance, to remove a network named "CoffeeShopWiFi," the command would benetsh wlan delete profile name="CoffeeShopWiFi".Confirmation and Verification: After executing the deletion command, the command prompt will usually confirm the successful removal. To double-check, re-run the
netsh wlan show profilescommand to verify the profile has been removed.Managing Multiple Networks: This method excels when removing multiple networks quickly. Just repeat step 4 for each network you wish to remove.
Method 3: Mac OS X – The Apple Ecosystem Solution
Apple's Mac OS X offers a user-friendly approach for removing Wi-Fi networks, ensuring a seamless and secure computing experience.
Accessing Network Preferences: Click the Apple logo in the top-left corner of your screen and select "System Preferences." This brings up the main settings panel.
Navigating to Network Settings: Within System Preferences, click on "Network." This opens the network configuration panel.
Advanced Wi-Fi Management: Select "Wi-Fi" from the left-hand panel if it's not already selected. Then, click the "Advanced…" button located near the bottom-right. This will open up your advanced Wi-Fi settings.
Deleting Forgotten Networks: Within the "Preferred Networks" list, you'll see a list of all the networks your Mac has previously connected to. Select the network you want to remove and click the "-" (minus sign) button below the list. This action will remove the network from your Mac's memory.
Confirm and Apply: Repeat the process for all unwanted networks. After removing the networks, click the "OK" button to close the Advanced settings. Finally, click "Apply" to save the changes within the main Network settings panel, ensuring the modifications are applied to your system.
Troubleshooting Common Issues
Even with these straightforward methods, occasionally, you might encounter minor hiccups. Fear not, as we're equipped to guide you through the most common troubleshooting scenarios.
- Network Still Appears: If the network stubbornly persists even after being "forgotten," try restarting your laptop. The reboot often clears any lingering cache or temporary files that might be preventing the network from being permanently removed.
- Permission Errors: If you encounter permission errors when using the command prompt, ensure you've launched it as an administrator. Right-clicking the Command Prompt icon and selecting "Run as administrator" is crucial for gaining the necessary privileges.
- Incompatible Drivers: Outdated or corrupted network drivers can sometimes interfere with the network deletion process. Consider updating your wireless adapter drivers through Device Manager in Windows or by checking for software updates in System Preferences on a Mac.
- Stubborn Networks: In rare cases, particularly with enterprise or public networks, the network profile might have been installed with administrator rights or pushed through a group policy. Consult your IT administrator if necessary to fully erase these profiles.
- The network list is empty: Some issues on your laptop may prevent the network list from appearing. Make sure that your Wi-Fi is turned on and that the Wi-Fi adapter is not disabled. If the network list is still empty, you may need to restart your laptop.
Beyond the Basics: Refining Your Network Hygiene
Once you've successfully banished those unwanted Wi-Fi networks, there are several additional steps we can take to further refine your digital network hygiene. These recommendations contribute to a more secure and efficient laptop experience.
- Regularly Review Your Network List: Make it a habit to periodically review your stored Wi-Fi profiles. Clean up any outdated or irrelevant entries to maintain optimal performance and security.
- Password Security: Never reuse passwords across different networks. Use strong, unique passwords for all your Wi-Fi networks to protect your data. Consider using a password manager.
- Network Encryption Protocols: Ensure your home network uses the latest WPA3 or WPA2 encryption protocols. These are more secure than older protocols, like WEP, and help protect your data from eavesdropping.
- Avoid Public Wi-Fi Risks: Public Wi-Fi networks are often unsecured and can expose your unencrypted data. Consider using a Virtual Private Network (VPN) when connecting to public Wi-Fi to encrypt your internet traffic and protect your privacy.
- Firewall Activation: Ensure your laptop’s firewall is enabled. The firewall acts as a digital barrier, blocking unauthorized access to your computer, especially when connected to public networks.
Conclusion: Taking Control of Your Wireless World
By following the methods outlined in this guide, you can permanently remove unwanted Wi-Fi networks from your laptop, reclaim valuable resources, and enhance your digital security. Regularly cleaning up old network profiles will lead to faster boot times, improved battery life, and a safer browsing experience. Remember, a clean and well-maintained network environment
