how to make wifi hotspot in laptop windows 7

Title: How to Create a WiFi Hotspot with Windows 7
Channel: 1stepatatime
How to Create a WiFi Hotspot with Windows 7 by 1stepatatime
how to make laptop as wifi hotspot windows 7
Unlock Your Laptop's Hidden Hotspot: Windows 7 WiFi Secret Revealed!
Unveiling the Wireless Oracle: Transform Your Windows 7 Laptop into a WiFi Hub
Have you ever needed to share your internet connection, but found yourself tethered by cords? Perhaps you have a Wi-Fi dead zone at home. Worry no more! Your Windows 7 laptop has a secret. It's a hidden ability to become a wireless hotspot. This feature opens doors to seamless connectivity. Let's explore how to unlock this potential.
The Enchanting Realm of Virtual WiFi
First, understand the setup. Think of your laptop as a magical portal. It's capable of broadcasting its internet signal. This magic is powered by the "Hosted Network" feature. It's a powerful tool, truly. This is integrated within Windows 7. It enables you to share your connection with other devices. Your smartphone, tablet, or even another laptop can be guests.
Preparing the Spell: Checking Your Hardware
Before casting your spell, check your hardware. Does your wireless network adapter support hosted networks? Thankfully, most modern laptops do. To verify, open the command prompt. You can find it by searching in the Start menu. Type netsh wlan show drivers. Press Enter. Look for the "Hosted network supported" line. It should state "Yes". This is great news, indeed. If it says no, you'll unfortunately be unable to proceed. Perhaps a new network adapter might be in order.
Brewing the Potion: Configuring the Hotspot
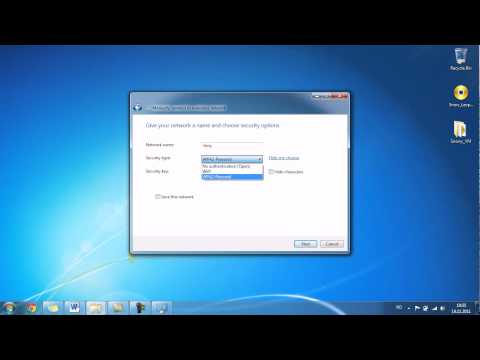
Next, let's configure your hotspot. We'll do this using the command prompt. First, type netsh wlan set hostednetwork mode=allow ssid="YourHotspotName" key="YourPassword". Replace "YourHotspotName" with the name of your hotspot. Select a unique and easy-to-remember name. Also, replace "YourPassword" with a strong password of your choice. Then, hit Enter. This command establishes the basic blueprint for your hotspot.
Activating the Gateway: Starting the Hosted Network
Now, we need to activate the network. Execute the following command: netsh wlan start hostednetwork. This starts the Wi-Fi hotspot. If everything goes as planned, you'll get a confirmation message. Your hotspot should now be active and ready to accept connections.
Connecting the Dots: Sharing Your Internet Connection
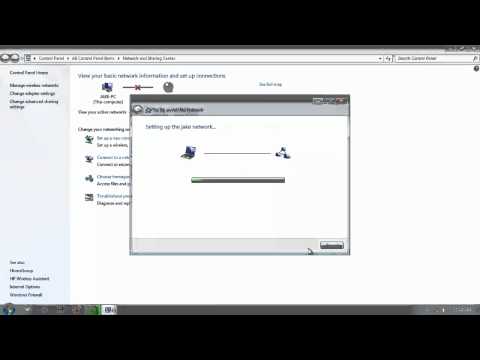
However, we're not quite finished, yet. Your hotspot is active. But, your devices can't yet access the internet. They need to connect to your existing internet connection. Therefore, navigate to the Network and Sharing Center. You can access it via the Control Panel. Click "Change adapter settings." Locate your active internet connection (e.g., Ethernet or Wi-Fi). Right-click on it. Choose "Properties."
The Final Touch: Enabling Connection Sharing
Afterward, select the "Sharing" tab. Check the box that says "Allow other network users to connect through this computer's internet connection." Then, select your hosted network adapter from the dropdown menu. This ensures your hotspot can access the internet. Finally, click "OK."
Fine-Tuning the Magic: Troubleshooting and Optimization
Sometimes, a little fine-tuning is necessary. If devices can't connect, review your password. Ensure that it's correct. Check your firewall settings. They may be blocking the connection. You can also try restarting your laptop. If the connection is slow, consider adjusting the channel on your router. This can reduce interference. Moreover, ensure your laptop is within a reasonable distance of the other devices.
Embracing the Wireless Freedom: Unleashing Connectivity
Your laptop now acts as a wireless router. You've successfully created a hotspot. Share it with friends, family, or guests. Stream videos, browse the web, or play online games. Do all this without needing a physical connection. It's a liberating experience, no question.
Maintaining the Charm: Tips for Ongoing Use
Keep your hotspot secure by using a strong password. Regularly update your Windows 7 system. This will patch security vulnerabilities. Remember that using a hotspot consumes battery power. Monitor your battery life. Consider plugging in your laptop while the hotspot is active. This will ensure continuous internet access.
The Grand Finale: Enjoy the Benefits
In summary, with a few simple steps, you’ve unlocked a powerful feature. Your laptop is now a capable wireless hotspot. Embrace the freedom of seamless connectivity. It's perfect for sharing your internet. It's also valuable in areas with limited Wi-Fi coverage. So, go forth and share the wireless magic! Your laptops's hidden capabilities are now revealed. You've transformed your device into a powerful tool.
Steal Your Phone's WiFi Password & Beam It to Your Laptop! (EASY!)Unlock Your Laptop's Hidden Hotspot: Windows 7 WiFi Secret Revealed!
Hey there, fellow tech enthusiasts! Ever found yourself in a situation where you desperately needed the internet, but a trusty WiFi signal was nowhere to be found? Maybe you're stuck in a hotel room with a frustratingly slow wired connection, or perhaps you're trying to share your internet with a friend who's out of luck. Well, guess what? Your Windows 7 laptop might just hold the key to a secret hotspot that can save the day! We’re talking about turning your trusty laptop into a WiFi router, all thanks to a hidden feature most people don't even know exists. Think of it as your own personal WiFi superhero, ready to swoop in and save the internet day!
1. The Forgotten Powerhouse: Your Windows 7 Laptop
Let's be honest, Windows 7 might seem a little… vintage, right? But don’t underestimate this operating system! It's like that reliable old car that still gets you where you need to go. And just like that car, your Windows 7 laptop has some hidden horsepower we often overlook. It's packed with features, and one of the most useful, albeit often overlooked, is the ability to create a virtual WiFi hotspot.
2. Why You Might Need a Laptop Hotspot
Why bother with a hotspot in the first place? Well, the reasons are as diverse as the internet itself. Here are a few scenarios where your laptop's hidden power can really shine:
- Sharing Internet in a Pinch: Got a friend with no internet? Share yours!
- Connecting Devices Without WiFi Cards: Think older devices without built-in WiFi.
- Bypassing Slow Wired Connections: That hotel internet dragging you down? Turn your laptop into a WiFi router and potentially get a faster connection.
- Extending Your WiFi Range: A laptop can act as a WiFi repeater, extending your coverage. A bit like building a bridge across a digital river of connectivity!
3. Unveiling the Secret: The Hosted Network
The magic behind creating your laptop hotspot lies within a feature called the "Hosted Network." This allows your laptop to act as a virtual WiFi router, broadcasting a wireless signal that other devices can connect to. It’s like a secret agent within your laptop, ready to deploy a WiFi signal whenever you need it.
4. Prepping Your Laptop: What You Need to Know Before You Start
Before we dive into the how-to, there are a few things we need to check. First, ensure your laptop has a wireless network adapter. Almost all modern laptops do, but it's worth a quick check. Second, make sure your WiFi driver is up-to-date. Outdated drivers can cause all sorts of headaches. It's like trying to drive a car with a flat tire - you won't get very far! Finally, and this is critical, you need a working internet connection on your laptop itself – either through Ethernet, another WiFi network, or even a mobile broadband connection.
5. The Command Prompt: Your Secret Weapon
Now for the fun part! We're going to use the Command Prompt, that slightly intimidating, but incredibly powerful, black box that lives within Windows. Don't worry; it's not as scary as it looks. Think of it as the control panel for your laptop’s hidden superpowers.
6. Step-by-Step Guide: Enabling the Hosted Network
Here’s the step-by-step process to unleash your laptop's hidden power:
Open Command Prompt as Administrator: Click the Windows Start button, type "cmd", right-click "Command Prompt" and select "Run as administrator." This is essential; you need administrative privileges for this to work.
Enable the Hosted Network: In the Command Prompt window, type the following command and press Enter:
netsh wlan set hostednetwork mode=allow ssid="YourNetworkName" key="YourPassword"- Replace
YourNetworkNamewith the name you want your hotspot to have (e.g., "MyLaptopWiFi"). - Replace
YourPasswordwith a secure password you’ll use to protect your network. Make it strong!
- Replace
Start the Hosted Network: Type the following command and press Enter:
netsh wlan start hostednetworkShare Your Internet Connection: Go to the Network and Sharing Center (you can search for it in the Start menu). Click "Change adapter settings". Right-click on your active internet connection (the one your laptop is currently using to connect to the internet) and select "Properties." Go to the "Sharing" tab. Tick the box that says "Allow other network users to connect through this computer's Internet connection." Under "Home networking connection," select "Microsoft Hosted Network Virtual Adapter." Click "OK."
7. Troubleshooting Common Hiccups: When Things Go Wrong
Sometimes, things don't go as planned. Don't worry; it happens! Here are a few common problems and how to fix them:
- "The Hosted Network Couldn't Be Started": Make sure your wireless adapter is enabled and that you have an internet connection. Try restarting your laptop. Double-check your spelling in the commands.
- Devices Can't Connect: Ensure you've entered the correct password on your connecting device. Try restarting your connecting device as well.
- Slow Internet Speed: This is often due to the limitations of your existing internet connection. The laptop is acting as a middleman, so the speeds will be limited to those of your primary connection.
8. Security First: Protecting Your Virtual Hotspot
Just like any WiFi network, your laptop hotspot needs to be protected. A strong password is crucial. Avoid using easily guessable passwords like your birthdate or the name of your pet. Think of it like locking your front door – you wouldn't use a lock that's easily picked!
9. Optimizing Your Hotspot for Performance
To get the best performance from your hotspot, consider these tips:
- Choose a Strong WiFi Channel: Your laptop will usually choose a channel automatically, but you can sometimes improve performance by manually selecting a less crowded one.
- Limit Connected Devices: The more devices connected, the slower the speeds will be. If you're sharing with multiple users, be prepared for a potential slowdown.
- Position Your Laptop Strategically: Place your laptop in a central location with minimal obstacles (walls, furniture) to maximize the signal range. Imagine it as the sun in a solar system!
10. The Limitations: What You Need to Know
While your laptop hotspot is incredibly useful, it's not a perfect solution. Consider these limitations:
- Battery Life: Creating a hotspot will drain your laptop's battery faster. Be sure to plug in your laptop if you plan to use it for an extended period.
- Signal Range: The range of your hotspot is limited by your laptop’s wireless adapter. Don’t expect it to reach across vast distances.
- Security Considerations: Always use a strong password to protect your network and be mindful of the data you transmit over the connection.
11. Going Beyond the Basics: Advanced Customization
For those brave enough, you can tweak some more advanced settings, such as specifying a different security protocol (though WPA2 is generally recommended). You can also monitor connected devices and their data usage.
12. Shutting Down the Hotspot: A Clean Exit
When you're done using your hotspot, it's important to turn it off to conserve battery and ensure security. In the Command Prompt (as administrator), type: netsh wlan stop hostednetwork. You can also disable the sharing of your internet connection in the Network and Sharing Center.
13. Hotspot Alternatives: Considering the Options
While your laptop hotspot is fantastic, there are other options, sometimes more suitable, depending on your needs. Dedicated mobile hotspots (MiFi devices) often provide longer battery life and better range. If you need a permanent solution at home, a dedicated WiFi router is always the best bet.
14. The Future of WiFi: Where We're Headed
WiFi technology is constantly evolving. From WiFi 6 to WiFi 7, we're seeing faster speeds, greater range, and improved efficiency. The future holds exciting possibilities for wireless connectivity, and your laptop hotspot might even play a role in bridging the gap until those technologies become more widespread.
15. Windows 10 and Beyond: What About Newer Operating Systems?
While this guide focuses on Windows 7, the concept of creating a hotspot is still relevant in newer versions of Windows. While the specific steps might vary slightly, the underlying principles remain the same.
Closing Thoughts
So there you have it! Your Windows 7 laptop, now armed with the secret of the hidden hotspot, is ready to serve as your personal WiFi savior. We hope this guide has empowered you to unlock this useful feature and make your digital life a little easier. Give it a try, experiment, and who knows, you might just become the hero of your next internet emergency! Remember, technology is all about exploring and having fun, so don’t be afraid to play around with it and discover all of its hidden capabilities. Now go forth and conquer the world of WiFi!
Frequently Asked Questions (FAQs)
1. Can I use my laptop hotspot with any internet connection?
Yes, as long as your laptop has a working internet connection (Ethernet, WiFi, or
Is Your WiFi Dropping? This ONE Weird Trick Fixes It!how to create a wifi hotspot on windows 7 Professional
By iTon how to create a wifi hotspot on windows 7 Professional by iTon
Create a laptop WiFi hotspot in under 30 seconds Windows 7
By jacobspeeds Create a laptop WiFi hotspot in under 30 seconds Windows 7 by jacobspeeds
Cara Mengaktifkan Hotspot Wifi Laptop Windows 7

By LAPTOP TUTORIAL Cara Mengaktifkan Hotspot Wifi Laptop Windows 7 by LAPTOP TUTORIAL

Title: HOW TO CREATE A HOTSPOT IN WINDOWS 7 create hotspots with cmd
Channel: Joko Gledeq
HOW TO CREATE A HOTSPOT IN WINDOWS 7 create hotspots with cmd by Joko Gledeq
Laptop Wifi Hotspot
Unlock Your Laptop's Hidden Hotspot: Windows 7 WiFi Secret Revealed!
Introduction: Bridging the Connectivity Gap with Your Windows 7 Laptop
In an era defined by ubiquitous connectivity, the ability to share an internet connection seamlessly is no longer a luxury, but a necessity. Whether you're traveling without access to Wi-Fi, in a location with limited internet access, or simply seeking to extend your home network's reach, transforming your Windows 7 laptop into a Wi-Fi hotspot can be a game-changer. This guide will illuminate the path, providing you with a comprehensive, step-by-step approach to unlock this often-overlooked functionality. Prepare to transform your laptop into a wireless gateway, enabling you to share your internet connection with multiple devices effortlessly.
Understanding the Foundation: Required Hardware and Software
Before we delve into the configuration, it's crucial to ensure your laptop is adequately equipped. Primarily, you'll need a working internet connection, either through an Ethernet cable or a built-in or external Wi-Fi adapter. The Wi-Fi adapter, essential for creating the hotspot, should be capable of functioning in access point mode. Most modern laptops come standard with Wi-Fi adapters that meet this requirement. Ensure your Windows 7 installation is up-to-date by checking for the latest service packs and updates through Windows Update; this guarantees compatibility and patches any potential security vulnerabilities. Also, be aware that the method described does not require any third-party software; we will utilize the native capabilities of the Windows 7 operating system.
Step-by-Step Configuration: Creating the Virtual Hosted Network
The cornerstone of this process lies in leveraging the Windows 7 command-line interface – a powerful tool for configuring network settings. We will utilize the netsh command, an integral part of Windows for managing network interfaces.
Open the Command Prompt as Administrator: Access this essential tool by typing "cmd" in the Windows search bar, then right-click the "Command Prompt" result and select "Run as administrator." This grants the necessary permissions to modify network settings.
Activating the Virtual Hosted Network: In the Command Prompt window, enter the following command and press Enter:
netsh wlan set hostednetwork mode=allow ssid="YourHotspotName" key="YourPassword"netsh wlan set hostednetwork: This initiates the configuration of the virtual hosted network.mode=allow: This enables the hosted network.ssid="YourHotspotName": Replace"YourHotspotName"with the desired name for your Wi-Fi hotspot (e.g., "MyLaptopHotspot"). Choose a name that is easy to remember but also unique.key="YourPassword": Replace"YourPassword"with a strong password for your Wi-Fi hotspot. This is crucial to secure your network from unauthorized access. Use a combination of uppercase and lowercase letters, numbers, and symbols.
Starting the Hosted Network: Once the hosted network is configured, you need to start it. Execute the following command in the Command Prompt and press Enter:
netsh wlan start hostednetworkAfter this, your virtual Wi-Fi hotspot is now activated, but your internet connection still needs to be shared.
Bridging the Connection: Sharing Your Internet for Wireless Access
With the Wi-Fi hotspot activated, the final step is to share your existing internet connection with the devices that will connect to your new hotspot. This step is crucial, so make sure to perform it correctly.
Accessing Network Connections: Open the Network and Sharing Center. You can typically find this by clicking the network icon in your system tray (bottom-right corner of your screen) and then selecting "Open Network and Sharing Center."
Modifying Adapter Settings: Within the Network and Sharing Center, click "Change adapter settings" on the left-hand side. This will display a list of your network adapters.
Sharing the Internet Connection: Locate the adapter that is currently providing your internet connection (e.g., your Ethernet connection or your primary Wi-Fi adapter). Right-click on the adapter and select "Properties."
Enabling Internet Connection Sharing (ICS): In the properties window, navigate to the "Sharing" tab. Check the box that says "Allow other network users to connect through this computer's Internet connection."
Selecting the Hosted Network: In the "Home networking connection" dropdown menu, select the virtual Wi-Fi adapter that was automatically created when you configured the hosted network. This will likely be called "Microsoft Virtual WiFi Miniport Adapter" or something similar. If you do not see this option, restart your computer.
Confirming and Applying Settings: Click "OK" to save these settings. If prompted with a warning about setting up a private IP address, select "OK" to continue.
Troubleshooting Common Issues and Solutions
Even with careful adherence to the steps, you might encounter challenges. Here's how to resolve some typical issues:
- "The hosted network couldn't be started." Ensure your Wi-Fi adapter driver is up-to-date. Try restarting your computer. If the problem persists, double-check the command used to set up the hosted network for any typos.
- Unable to Connect to the Hotspot: Verify you entered the password correctly. Check that your Wi-Fi adapter is enabled and not disabled in the Network Connections settings. Ensure that the hotspot is running by typing
netsh wlan show hostednetworkin the command prompt; this will display the current status. - Slow Internet Speed: The speed is dependent on the primary connection (Ethernet or Wi-Fi) to which the laptop is connected. The range of your wireless connection is also important. The laptop's Wi-Fi card, and the connecting devices' Wi-Fi capabilities, play a part in the speed.
- "There is no internet access." Ensure that the "Allow other network users to connect through this computer's Internet connection" setting is enabled on the adapter that is receiving the internet. Double-check that you have selected the correct virtual adapter in the "Home networking connection" dropdown menu. Test if your laptop has internet access.
Enhancing Security: Fortifying Your Wireless Hotspot
While we have set up a password, we can take further steps to bolster the security of your hotspot:
- Use a Strong Password: This is your first line of defense. Avoid easily guessable passwords such as birthdays or names. A combination of numbers, symbols, and lowercase and uppercase letters is best.
- Change the Password Regularly: Make it a habit to change your hotspot password periodically, protecting against the possibility of compromise.
- Enable WPA2-PSK Encryption: Verify that your Wi-Fi adapter is using WPA2-PSK encryption, the most secure standard available. This is generally configured by default during the setup.
- Monitor Connected Devices: Regularly check which devices are connected to your hotspot. The command
netsh wlan show hostednetworklists connected devices. If you see any unauthorized devices, immediately change your password.
Maximizing Performance: Optimizing Your Wireless Hotspot
Several factors can impact your hotspot's performance. Implement these tactics for a better experience:
- Position Your Laptop Strategically: Place your laptop in a central location to maximize wireless coverage. Reduce the distance between your laptop and the devices that will connect.
- Minimize Interference: Avoid placing your laptop near other electronic devices that could interfere with the Wi-Fi signal, such as microwave ovens, cordless phones, and Bluetooth devices.
- Limit Connected Devices: The more devices connected to your hotspot, the slower the internet speed will be. Determine how many devices are connected.
- Update Your Drivers: Keep your Wi-Fi adapter drivers current for optimal performance and stability. Check the manufacturer's website or use Windows Update for the latest drivers.
- Consider Upgrading Your Hardware: If you consistently experience slow speeds, consider upgrading your Wi-Fi adapter to a newer model that supports the latest Wi-Fi standards (802.11ac or later) for increased speed and range.
Conclusion: Embracing Wireless Freedom
By following these detailed instructions, you can transform your Windows 7 laptop into a versatile Wi-Fi hotspot. You will now have the power to share your internet connection with multiple devices, opening opportunities for enhanced productivity, entertainment, and connectivity, wherever you go. The ability to create a Wi-Fi hotspot expands beyond just sharing a connection; it offers a solution to different connectivity challenges and fosters greater flexibility in today's digitally driven world. Embrace this function and experience the freedom of seamless wireless connectivity. Remember to maintain security and optimize your setup for a reliable and enjoyable experience.
