asus laptop gets secured wifi connection but no internet

Title: How to Fix Wifi Connected But No Internet Secured in Windows 1110
Channel: Tech Mash
How to Fix Wifi Connected But No Internet Secured in Windows 1110 by Tech Mash
Asus Laptop WiFi Connected, But NO INTERNET?! (Solved!)
Asus Laptop WiFi Woes: You're Connected, But the Internet's MIA? Let's Fix That!
Ever stared at that Wi-Fi icon on your Asus laptop, smugly showing full bars, only to be met with the dreaded "no internet" message? Frustrating, right? It's like your laptop is throwing a digital taunt. Well, breathe easy, friend! We all stumble upon this problem sometimes. This guide is designed to help you navigate this common tech hiccup. We'll troubleshoot those frustrating connectivity issues. Let's dive into the solutions. The aim is to get you back online in a flash.
The Mystery of the Connected, Yet Disconnected:
First things first: let's understand what's happening. Your Asus laptop thinks it's connected. It believes it has a good signal. However, it can't seem to access the vast digital world. This is a really common problem. It's like having a perfectly paved road that leads nowhere. Don't panic. The fix is usually simpler than you think. So many things can cause this problem.
Step 1: Restart, Reboot, and Regenerate Connectivity!
Okay, the classic, but often effective, first step: the restart. But, we really need to do it right. First, give your Asus laptop a full restart. Shut it down completely and then power it back up. After that, power cycle your modem. Then do the same for your router. Wait a few minutes, then turn the router and modem back on. It's surprisingly effective. This step clears temporary glitches. It also helps refresh your network connection. It essentially gives everything a fresh start.
Step 2: Driver Dilemmas: A Software Showdown:
Drivers are the unsung heroes of your computer. They are the software that makes your hardware work. Sometimes, these drivers get outdated or corrupted. So, they fall short of their calling. It is the first place to look when things go wrong. Here's how to update your network drivers.
- Navigate to Device Manager: You must access this. Search for "Device Manager" in the Windows search bar. Then, open it.
- Find Your Network Adapters: Expand the "Network adapters" section. You should see your Wi-Fi adapter listed here. Look for something like "Wireless Network Adapter."
- Update the Driver: Right-click on that adapter. Select "Update driver." Then, follow the prompts. Windows will search for the latest drivers. If it does, it will automatically install them.
- Restart Again: After updating, restart your laptop again. Hopefully, that solves the issue!
Step 3: The IP Address Inquisition: Static vs. Dynamic:
Your laptop needs an IP address to join the internet. An IP address is your unique identifier. This is how data knows where to go. If your laptop has a static IP address, it may be conflicting with your local network. Therefore, it's important to consider this possibility. Here is how to check and, if necessary, switch to a dynamic IP address:
- Open Network Settings: Right-click on the Wi-Fi icon in your system tray. Then click on "Open Network & Internet settings."
- Check Adapter Properties: Click on "Change adapter options." Right-click on your Wi-Fi adapter. Then select "Properties."
- Inspect the TCP/IP Settings: Look for "Internet Protocol Version 4 (TCP/IPv4)." Double-click it.
- Ensure "Obtain an IP address automatically" is selected. Also, check "Obtain DNS server address automatically."
- Apply the Changes: Click "OK" on all windows and restart your laptop. See if your internet works.
Step 4: The Router's Rhapsody: Checking the Gatekeeper:
Your router acts as the gateway to the internet. Therefore, sometimes the problem isn't your laptop, but the router. It's also important to consider that possibility. Consider these troubleshooting tips:
- Is your modem connected to the internet? Check the lights on the modem. They should be showing activity.
- Test other devices: Do other devices (phones, tablets, etc.) connect to the Wi-Fi? If they can't, the problem is likely with your router or internet service.
- Restart your router: Unplug it for about 30 seconds. Then plug it back in.
Step 5: Firewall Fiascos: The Security Blanket Gone Rogue:
Sometimes your firewall can be a little too zealous in protecting your laptop. Therefore, it can inadvertently block internet access. Here's how to check:
- Open Windows Defender Firewall: Search for "Windows Defender Firewall" in the search bar.
- Check Firewall Settings: Click on "Allow an app or feature through Windows Defender Firewall."
- Verify Allowed Apps: Make sure your web browser and any other internet-dependent apps are allowed access.
Step 6: DNS Drama: The Domain Name System Dilemma:
The DNS translates website names into IP addresses. It's like a phonebook for the internet. If your DNS settings are incorrect, you won't be able to browse. Therefore, it is worth checking these settings:
- Go to Network Adapter Properties (Step 3).
- Double-click "Internet Protocol Version 4 (TCP/IPv4)"
- Under "Use the following DNS server addresses:", try setting Google's DNS: Preferred DNS server: 8.8.8.8, Alternate DNS server: 8.8.4.4.
- Apply and restart.
Conclusion: Back Online and Ready to Roll!
So, there you have it! Hopefully, one of these solutions fixed your Asus laptop's Wi-Fi woes. Moreover, remember to systematically go through each step. Don't be afraid to ask for help. If all else fails, contact your internet service provider. You should be back online, browsing, streaming, and connecting in no time. Keep exploring, and happy surfing!
Laptop WiFi Dead? 😱 Fix This NOW!Asus Laptop WiFi Connected, But NO INTERNET?! (Solved!)
Ah, the dreaded WiFi conundrum! We've all been there, staring at our Asus laptop, feeling the sweet, smug satisfaction of seeing those WiFi bars glow brightly, indicating a solid connection. But then… nothing. No internet. It’s the digital equivalent of having a fully loaded car and realizing you've forgotten the keys. Frustrating, to say the least. Fear not, fellow tech travelers! We're going to dissect this common frustration and equip you with the tools to conquer it. Let's dive in and get your Asus laptop back online!
1. The WiFi Conspiracy: Understanding the Problem
Before we start throwing virtual wrenches around, let's understand what's happening. Your Asus laptop is connecting to your WiFi network. Think of it like this: you've driven your car onto a bridge (the WiFi network). The bridge seems perfectly intact. But there's no road on the other side! You're connected, but you can't go anywhere. The issue lies somewhere between your laptop and the vast digital highway we call the internet.
2. Is It Really Your Asus Laptop? A Preliminary Check
Before you blame your beloved Asus, double-check a few things. Sometimes, the culprit isn't your machine.
- Other Devices: Are other devices in your home – your phone, tablet, another laptop – experiencing the same "no internet" problem while connected to the same WiFi network? If so, the issue likely resides with your router or internet service provider (ISP), not your Asus.
- The Router: Have you tried resetting your router? It might seem like a cliché, but a simple restart can often resolve a multitude of sins. Unplug it for 30 seconds, plug it back in, and wait for it to fully boot up.
- The ISP: Sometimes, your ISP is experiencing an outage. Check their website or social media for service alerts. They usually post updates.
If all other devices work fine, then we can confidently say the problem likely lies with your Asus laptop.
3. The Obvious Suspect: The Airplane Mode Conspiracy
This one's embarrassing, but it happens! Make sure Airplane Mode isn't enabled on your Asus. A quick glance at the notification center (usually accessed via the Taskbar) will reveal an airplane icon if it's on. Click it to disable. It's a bit like accidentally activating the car's “parking only” setting—easily done, easily fixed.
4. The Driver Dilemma: Updating Your WiFi Adapter
Your WiFi adapter, the little piece of hardware that lets your laptop connect to the internet, needs the right software (drivers) to function. Outdated or corrupted drivers can cause all sorts of connection issues.
- Update Your Drivers:
- Press the Windows key + X and select "Device Manager."
- Expand "Network adapters."
- Right-click on your WiFi adapter (it will likely be named something like "Intel Wireless-AC 9260" or similar) and select "Update driver."
- Choose "Search automatically for drivers." Windows will try to find and install the latest version.
- If that doesn't work, you can try manually downloading the latest driver from the Asus website, entering your laptop model, and finding the correct driver for your WiFi adapter.
5. Firewall Frenzy: Is Your Firewall Blocking You?
Your Windows Firewall (or any third-party firewall software) acts like a security guard, protecting your computer from unwanted access. However, it can sometimes be too protective and block your internet access by mistake.
- Check Your Firewall Settings:
- Type "Firewall" in the Windows search bar and open "Windows Defender Firewall." (Note: the name may vary if you use other security software).
- Click on "Allow an app or feature through Windows Defender Firewall."
- Scroll through the list and make sure the relevant apps (like your web browser) are allowed to communicate through the firewall for both "Private" and "Public" networks. You can also try temporarily disabling your firewall to see if that resolves the issue (but remember to re-enable it later for security).
6. IP Address Insanity: Troubleshooting Network Configuration
Your computer needs an IP address to communicate with the internet. Sometimes, this address can get messed up.
- Release and Renew Your IP Address:
- Type "cmd" in the Windows search bar and open "Command Prompt."
- Type
ipconfig /releaseand press Enter. This releases your current IP address. - Type
ipconfig /renewand press Enter. This requests a new IP address. - Type
ipconfig /flushdnsand press Enter. This clears the DNS cache. - Restart your laptop.
7. The DNS Detective: Investigating Domain Name System Issues
The Domain Name System (DNS) translates website names (like google.com) into IP addresses that your computer understands. Sometimes, your DNS settings can be the problem.
- Change Your DNS Servers: You can try using a public DNS server like Google's (8.8.8.8 and 8.8.4.4) or Cloudflare's (1.1.1.1 and 1.0.0.1) instead of your ISP's.
- Go to "Control Panel" > "Network and Internet" > "Network and Sharing Center."
- Click on "Change adapter settings."
- Right-click on your WiFi adapter and select "Properties."
- Select "Internet Protocol Version 4 (TCP/IPv4)" and click "Properties."
- Select "Use the following DNS server addresses" and enter the Google or Cloudflare DNS server addresses.
- Click "OK" and restart your laptop.
8. Wireless Network Troubleshooter: Windows' Built-in Rescuer
Windows has a built-in troubleshooter designed to diagnose and fix network connection problems. It's like having a tech support guru built right into your operating system!
- Run the Network Troubleshooter:
- Right-click on the WiFi icon in the system tray (bottom right corner of your screen).
- Select "Troubleshoot problems."
- Follow the on-screen instructions.
9. The Router's Role: Re-examining Your Router's Settings
Your router is the gatekeeper of your internet connection. Sometimes, its settings can be the root of the issue.
- Check Your Router's Configuration:
- Access your router's settings by typing its IP address (usually 192.168.1.1 or 192.168.0.1) into your web browser. You'll be prompted for a username and password (usually found on a sticker on your router).
- Look for settings related to DHCP (Dynamic Host Configuration Protocol). Make sure DHCP is enabled. This allows your router to automatically assign IP addresses to your devices.
- Make sure Wireless is Enabled
- If you've recently changed the password for your WiFi, make sure your Asus is connected with the new password.
10. The WiFi Password Problem: Forgetting the Code
It may seem obvious, but typos happen! Are you absolutely sure you entered your WiFi password correctly? Double-check, triple-check. It's a surprisingly frequent cause of internet grief.
11. Resetting Network Settings: A Nuclear Option
If all else fails, you can try resetting your network settings to their defaults. This is like hitting the "reset" button on your brain – it can clear out a lot of lingering issues.
- Go to Settings > Network & Internet > Network Reset (Windows 10) or Settings > Network & internet > Advanced network settings > Network Reset (Windows 11).
- Click on "Reset now."
- Your computer will restart and apply all the settings to default.
12. Hardware Harmony: The Physical Connection
While less common, sometimes the WiFi adapter itself might be faulty.
- Check the Hardware:
- If you're comfortable with it, you can open your laptop (after turning it off and unplugging it from the power) and check to see if the WiFi adapter is firmly seated in its slot. However, this can void your warranty! Consult a professional if you are unsure.
13. Consider an External WiFi Adapter
If all else fails, and you're still determined to connect, a USB WiFi adapter might be a solution. These small dongles plug into your laptop's USB port and provide an alternative way to connect to WiFi.
14. Back to Basics: Reboot Everything Again (Just in Case!)
Yes, we've already mentioned restarting, but sometimes, a series of reboots (router, laptop) can magically resolve the issue. It's like a digital exorcism. Try it!
15. When to Seek Professional Help
If you've tried everything, and you're still staring at that frustrating "no internet" message, it's time to consult the experts. Contact Asus support or a
Download HCL ME Laptop WiFi Drivers NOW! (Fix Your Internet!)Fix Wi-Fi Error no internet secured windows 10 no internet secured windows 11 wifi

By Teconz Fix Wi-Fi Error no internet secured windows 10 no internet secured windows 11 wifi by Teconz
How to Fix No internet, secured in Windows 11

By NETVN82 How to Fix No internet, secured in Windows 11 by NETVN82
How to Fix No Internet, Secured in Windows 11 2024 Quick FIX
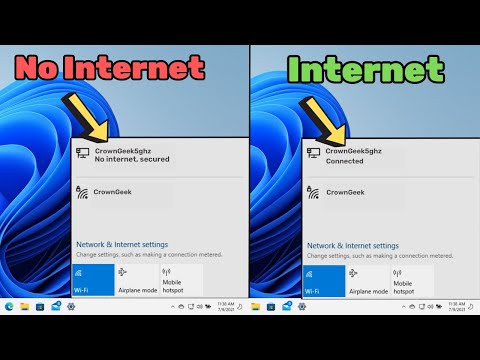
By Crown GEEK How to Fix No Internet, Secured in Windows 11 2024 Quick FIX by Crown GEEK

Title: How To Fix WiFi Connected But No Internet Access On Windows 10 - 5 Ways
Channel: Sandeep Singh
How To Fix WiFi Connected But No Internet Access On Windows 10 - 5 Ways by Sandeep Singh
Wifi On Laptop Phone
Asus Laptop WiFi Connected, But NO INTERNET?! (Solved!)
Navigating the digital landscape is an essential part of modern life. Staying connected is no longer a luxury; it's a necessity. So, when your Asus laptop displays a familiar WiFi connection, but the internet refuses to cooperate, a wave of frustration is understandable. Before you resign yourself to a day of digital isolation, take heart. This comprehensive guide equips you with proven solutions to swiftly diagnose and rectify the "WiFi Connected, But No Internet" dilemma plaguing your Asus laptop. We’ll explore the potential culprits and provide you with the practical steps needed to regain your online access, often without requiring advanced technical expertise.
Understanding the Connection: Decoding the Symptoms
Before jumping into solutions, let's clarify what this frustrating situation entails. Your Asus laptop’s WiFi icon proudly shows it's connected to your wireless network. It might even display strong signal strength. However, when you attempt to browse the web, check your email, or use any other internet-dependent application, you're met with a "no internet connection" error message, a perpetually spinning loading icon, or a complete failure to load any content. This signifies that your laptop is successfully communicating with your router, but a critical link in the chain—the connection to the wider internet—is broken. This breakdown can stem from various sources, and pinpointing the root cause is the key to a swift resolution. The following sections will guide you through troubleshooting, starting with the most common causes and progressing to more advanced solutions.
1. The Router's Role: Checking for Internet Outages
The cornerstone of your internet access is your router. Before troubleshooting your Asus laptop, confirm that the problem isn’t outside of your laptop’s control. The simplest check: try accessing the internet on other devices connected to the same WiFi network. Does your smartphone, tablet, or another computer experience the same issue? If so, the problem most likely lies with your internet service provider (ISP) or your router itself.
- ISP Outage: Sometimes, the issue isn’t on your end. Your ISP might be experiencing a temporary outage. You can verify this through websites that monitor ISP status or by contacting your provider directly.
- Router Reboot: A simple reboot often works wonders. Unplug your router and modem from the power outlet, wait thirty seconds, and plug them back in. Allow the devices to power on and re-establish their connection (this can take a few minutes). Then, check your Asus laptop’s internet connection.
- Router Web Interface: Access your router's settings (usually by typing its IP address into your browser, found in your router's documentation). Check for any error messages or connection issues. Some routers offer diagnostic tools to help identify problems.
If other devices connect successfully, the problem is likely isolated to your Asus laptop. Proceed to the following steps.
2. Network Adapter Fundamentals: The Driver Dilemma
Your Asus laptop’s network adapter is the hardware component responsible for the WiFi connection. Outdated, corrupted, or improperly configured drivers can easily create a “no internet” scenario. This is one of the most common, and thankfully, often easily fixable, culprits.
- Driver Update: The first line of defense is updating your network adapter driver.
- Device Manager: Open Device Manager (search for it in the Windows search bar). Expand the "Network adapters" section. Locate your WiFi adapter (it's usually labeled with names like "Intel Wireless-AC…", "Realtek…). Right-click on it and select "Update driver." Choose "Search automatically for drivers." Windows will search for and install the latest drivers if available.
- Manufacturer's Website: If Windows can’t find updated drivers, visit the Asus support website and enter your laptop’s model number. Download the latest drivers for your WiFi adapter from the support page. Once downloaded, run the installer.
- Driver Rollback: Recently updated drivers can sometimes introduce compatibility issues. If the problem started after a driver update, try rolling back to a previous version. In Device Manager, right-click the WiFi adapter, select "Properties," go to the "Driver" tab, and click "Roll Back Driver" if the option is available.
- Driver Reinstall: In extreme cases, a complete reinstall might be needed. Uninstall the driver from Device Manager, then restart your laptop. Windows will often automatically reinstall a basic driver. If not, reinstall the driver from the Asus support website afterwards.
3. IP Address Configuration: Static vs. Dynamic
Your Asus laptop needs an IP (Internet Protocol) address to communicate with other devices on the network and the internet. There are two primary ways IP addresses are assigned: dynamically (automatically) by your router, or statically (manually) by you. Incorrect IP address settings can disrupt internet access.
- Obtain IP Address Automatically (Recommended): Typically, your router is configured to assign IP addresses automatically using DHCP (Dynamic Host Configuration Protocol). Ensure that your laptop is also set to obtain an IP address automatically.
- Network and Sharing Center: Open "Network and Sharing Center" (search for it in the Windows search bar and click "Change adapter settings"). Right-click on your WiFi adapter and select "Properties."
- TCP/IP v4 Properties: Select "Internet Protocol Version 4 (TCP/IPv4)" and click "Properties."
- Automatic Settings: Ensure that both "Obtain an IP address automatically" and "Obtain DNS server address automatically" are selected. Click "OK" and restart your laptop.
- Check Default Gateway: Verify your default gateway. The default gateway is the IP address of your router. If your laptop isn’t getting this information, it won’t be able to reach the internet. If you’ve used a static IP, this is the most common cause.
- Command Prompt: Open Command Prompt (search for it in the Windows search bar). Type
ipconfigand press Enter. Look for "Default Gateway." Ensure that this address is the same as your router’s IP address. If it is not, recheck your IP configuration.
- Command Prompt: Open Command Prompt (search for it in the Windows search bar). Type
4. DNS Server Dilemmas: Resolving Domain Names
DNS (Domain Name System) servers translate human-readable website addresses (like www.google.com) into machine-readable IP addresses. When your DNS servers are misconfigured or unresponsive, your laptop can't translate website names, even if it has an internet connection.
- Automatic DNS: The easiest solution is to set your laptop to obtain DNS server addresses automatically from your router. The steps are the same as the "Obtain IP Address Automatically" instructions above. Make sure that both settings are set to "obtain automatically."
- Google Public DNS: If the automatic method doesn't work, try using Google's public DNS servers, which are generally reliable.
- Network and Sharing Center: Follow the same steps in section 3 to go to "Internet Protocol Version 4 (TCP/IPv4) Properties."
- Manual DNS Settings: Select "Use the following DNS server addresses." Enter the following addresses:
- Preferred DNS server:
8.8.8.8 - Alternate DNS server:
8.8.4.4
- Preferred DNS server:
- Click "OK" and restart your laptop.
- Flush DNS Cache: Sometimes, cached DNS information can become corrupted. Flushing the DNS cache can resolve this.
- Command Prompt: Open Command Prompt (search for it in the Windows search bar) as an administrator.
- Flush the Cache: Type
ipconfig /flushdnsand press Enter. You should see a confirmation message. Restart your laptop.
5. Firewall Interference: Whitelisting Exceptions
Your Windows Firewall (or third-party firewall software) protects your computer from network threats. However, it can sometimes block internet access for specific applications or, in rare cases, for all internet traffic.
- Check Firewall Settings:
- Windows Firewall: Search for “Windows Defender Firewall with Advanced Security” and open it.
- Allow an App Through Firewall: Click on “Allow an app or feature through Windows Firewall.” Check whether the desired application (e.g., your web browser) is allowed both for "Private" and "Public" networks. If not, click "Change settings," then "Allow another app…" and browse to the application’s executable file.
- Reset Firewall (Caution): As a last resort, you can reset the Windows Firewall to its default settings. (This will reset any customizations you’ve made.) To do this, in the Windows Defender Firewall with Advanced Security go to "Restore Defaults" (on the right-hand side).
- Third-Party Firewall: If you use third-party firewall software, access its settings and ensure that your web browser and other essential applications are allowed to access the internet. Check the software’s documentation for specific instructions.
6. Security Software Intervention: Antivirus Conflict
Antivirus and other security software can sometimes interfere with your internet connection.
- Temporarily Disable Security Software (Caution): As a troubleshooting step, temporarily disable your antivirus or security software. If this restores internet access, the software is likely the culprit. Please be extremely careful when you do this. Do not browse risky websites.
- Check Settings: Investigate your security software settings to see if it's blocking your internet connection. Look for settings related to web filtering, internet protection, or firewall.
- Whitelist Applications: Add your
