how to make windows 7 laptop a wifi hotspot

Title: How to Create a WiFi Hotspot with Windows 7
Channel: 1stepatatime
How to Create a WiFi Hotspot with Windows 7 by 1stepatatime
how to turn your windows 7 laptop into a wifi hotspot
Transform Your Windows 7 Laptop into a WiFi Hotspot: The SHOCKINGLY Easy Trick!
Unleash the WiFi Wizard Within: Turning Your Windows 7 Laptop into a Hotspot
Ever find yourself in a connectivity conundrum? You're staring at your Windows 7 laptop, wishing you could share that precious internet connection. Maybe you’re stuck in a hotel room or a remote location. The good news is, it's easier than you think. Absolutely! No need to feel stranded in the digital desert. Prepare to be amazed. We're about to unlock a surprisingly simple trick. This will transform your laptop into a personal WiFi hotspot.
The Hidden Power of Windows 7: Your Secret Weapon
Forget complicated setups or expensive hardware. Windows 7 has a built-in feature. You might not even realize it's there. Believe it or not, this hidden gem allows you to share your internet connection. It's perfect for sharing with your other devices. Think of your phone, tablet, or even another laptop. They can all tap into your newly created WiFi network. So, grab your trusty laptop. Let’s embark on this digital adventure.
Step-by-Step Guide: Your Journey to WiFi Freedom
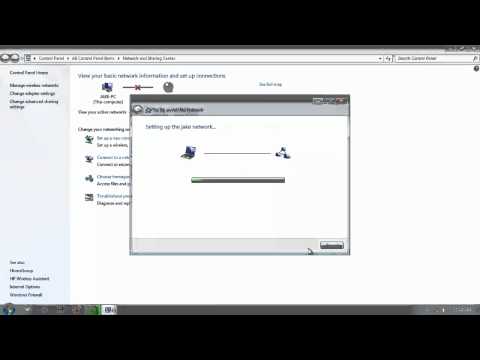
First, locate your Network and Sharing Center. It can be found in your Control Panel. Simply click on it. Look for the option "Set up a new connection or network." Click on this. Next, select "Set up a wireless ad hoc network." (Note: While "ad hoc" is technically the term, it now functions more like a regular hotspot).
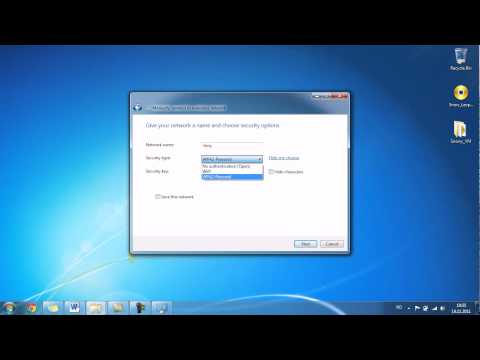
Click "Next." Give your new network a name. Choose a security type such as WPA2-Personal. This is usually the most secure option. Then, create a strong password. Never use something simple like your birthday. Ensure the password is complex. Consider using a combination of letters, numbers, and symbols.
After setting up the network, click "Next." You will then see your network is ready. Close that window. Now, you’re close to success.
Bridging the Gap: Sharing Your Internet Connection
Here's another critical step. You still need to share your internet connection. In the Network and Sharing Center, click "Change adapter settings." You'll see a list of network connections. Identify the one that's currently connected to the internet. This is typically your Ethernet or WiFi adapter.
Now, right-click on this connection. Select "Properties." Click on the "Sharing" tab. Check the box that says, "Allow other network users to connect through this computer's Internet connection." From there, choose your newly created ad-hoc network from the dropdown menu. Click "OK."
Consequently, your laptop is now actively sharing its internet connection. It's beaming WiFi! Remember to make sure the "Network Discovery" is turned On."
Troubleshooting Tales: Conquering Connectivity Challenges
Encountering a few hiccups? Don't worry. Troubleshooting is part of the game. Sometimes, the sharing feature doesn't activate immediately. Try restarting your laptop. Ensure your firewall isn't blocking the connection. Disable your firewall temporarily to test. See if that resolves the issue.
Double-check your password. You might have accidentally typed it incorrectly. Ensure that other devices have WiFi enabled. Finally, make sure your laptop's WiFi adapter is turned on. Often, it is a simple press of a button.
Beyond Basic: Optimizing Your Personal Hotspot
You can customize your hotspot for better performance. Consider changing the channel your hotspot uses. You can do this within the settings of your WiFi adapter. Choosing a less crowded channel can improve speed. Consider the environment. The more devices, the slower the speed tends to be.
Periodically change your password for security. This is a good practice for any wireless network. Keep your laptop plugged in while using it as a hotspot. Conserving battery life is advantageous. Also, limit the number of connected devices. This helps maintain a good speed.
The WiFi Revelation: Embracing the Freedom
There you have it! You've successfully transformed your Windows 7 laptop into a WiFi hotspot. Now you can share your internet connection with ease. You're no longer tethered to a single device. You’ve mastered a powerful, yet simple, feature.
Therefore, you can enjoy the freedom of wireless connectivity, wherever you go. Isn’t that amazing? Enjoy your newfound WiFi freedom. Prepare to become the envy of anyone struggling with connectivity. Go forth, and share your internet wealth with the world (or, at least, your devices).
Laptop WiFi GONE? KB3150513 is the CULPRIT! (FIX INSIDE)Transform Your Windows 7 Laptop into a WiFi Hotspot: The SHOCKINGLY Easy Trick!
Hey everyone, ever been stranded with a laptop and a desperate need for internet? Picture this: you're in a remote cabin, the Wi-Fi is as dead as a doornail (or, let's be honest, your phone’s data allowance is crying for mercy), and you need to connect. Maybe you need to work, stream a movie, or just check the latest cat video (no judgment here!). Fear not, because we’re about to unveil a ridiculously simple trick that’ll turn your trusty old Windows 7 laptop into a personal Wi-Fi hotspot. It's so easy, you'll feel like you've unlocked a secret cheat code!
The Problem: A Universe of Connectivity, Out of Reach
Let's be real. We live in a hyper-connected world. The ability to access the internet is, in many ways, as essential as air. But what happens when that access is cut off? It's like being adrift on a digital sea without a compass. We’ve all been there, staring longingly at that blank screen, feeling the digital world slip through our fingers. The need for a Wi-Fi hotspot can strike anywhere, anytime – from a hotel room with a dodgy connection to a student dorm desperately calling for a shared internet connection – the struggle is universal!
The Solution: The Magic of HostedNetwork
Fortunately, Windows 7 has a hidden gem: the HostedNetwork feature. Think of it as a secret compartment in your laptop, ready to deploy your Wi-Fi signal to other devices. This isn't some complicated piece of software that requires an advanced degree in computer science. Nope! This is something you can set up in minutes, even if you're as tech-savvy as… well, me (I'm more of a "figure it out as I go" kind of person!).
Step 1: Unveiling the Hidden Treasure: Checking Compatibility
Before we get started, we need to make sure your laptop is up to the task. Not every Wi-Fi adapter supports HostedNetwork. So, let’s check. It’s like checking if your car has the right engine for a specific fuel type.
- Hit the Windows key and R key simultaneously. This opens the “Run” dialog box.
- Type
cmdand press Enter. This launches the command prompt (the window with the black background, don't be intimidated!). - Type
netsh wlan show driversand press Enter. This command reveals all the information about your wireless adapter. - Look for the line that says "Hosted network supported: Yes". If you see "Yes," great! You're good to go. If it says "No," unfortunately, this trick won’t work for you. But hey, there are always other options, like USB Wi-Fi adapters – we might explore those in a future post.
Step 2: The Command Prompt Dance: Activating HostedNetwork
Now for the fun part! This is similar to setting up a secret handshake. Let's get your hotspot going, step by step.
- Again, open the Command Prompt (Windows key + R, type
cmd, Enter). - Type this command and press Enter:
netsh wlan set hostednetwork mode=allow ssid="YourHotspotName" key="YourPassword"- Replace
"YourHotspotName"with the name you want your hotspot to have (e.g., "MyLaptopHotspot," "AwesomeWifi"). - Replace
"YourPassword"with a strong password (at least eight characters) – think of it as the lock on your digital castle!
- Replace
- Type this command and press Enter:
netsh wlan start hostednetworkNow you’re activating your hotspot.
Step 3: Sharing the Internet: The Final Piece of the Puzzle
Your hotspot is now “on,” but it’s not sharing the internet yet! This is like having a car but not knowing how to start the engine.
- Open the Network and Sharing Center: you can find this by clicking the network icon (the little computer screen) in the system tray (lower right-hand corner of your screen) and selecting "Open Network and Sharing Center."
- Click "Change adapter settings." This opens the window where you can see all your network connections.
- Find your active internet connection (the one that's connected to the internet). This might be labeled "Wi-Fi" or "Ethernet," depending on how you're connected. Right-click on it and select "Properties."
- Click the "Sharing" tab.
- Check the box that says "Allow other network users to connect through this computer's Internet connection."
- From the "Home networking connection" dropdown menu, select your HostedNetwork. This will usually be named after the SSID you created earlier.
- Click "OK."
And boom! You've successfully shared your internet connection. Your other devices should now be able to find and connect to your new Wi-Fi hotspot using the name and password you created.
Step 4: Troubleshooting: When Things Don't Go Smoothly
Hey, even the best-laid plans sometimes go awry. If your devices aren't connecting, don’t panic. Troubleshooting is like detective work; you just need to follow the clues!
- Check the password: Did you type it correctly? Double-check the case (uppercase and lowercase matter!)
- Restart the HostedNetwork: Try typing
netsh wlan stop hostednetworkin the Command Prompt, thennetsh wlan start hostednetworkagain. - Check your internet connection: Make sure your laptop itself is connected to the internet.
- Update your driver: Outdated drivers can cause problems. You can usually update them through the Device Manager (search for “Device Manager” in the Start Menu).
- Firewall issues: Your firewall might be blocking the connection. Make sure your firewall allows sharing of the internet connection.
Step 5: Managing Your Hotspot: Turning It Off and On
You don’t want your hotspot running 24/7, eating up your data and battery life. Here's how to control it.
- To stop your hotspot: Open Command Prompt and type
netsh wlan stop hostednetworkand press Enter. - To start it again: Open Command Prompt and type
netsh wlan start hostednetworkand press Enter.
The Benefits: Freedom to Connect, Anywhere
This trick is a game-changer. Imagine the possibilities:
- Connect Multiple Devices: Share your internet with your phone, tablet, and other laptops.
- Avoid Data Overages: If you're on a limited data plan, this is your savior. Use your laptop's internet connection to save on your phone's data.
- Work Remotely with Ease: Turn any space into your office.
- The Ultimate Freedom: Access the internet wherever you go, as long as your laptop can connect.
Beyond the Basics: Advanced Options
Let's explore a few advanced tricks for the more adventurous!
- Change the Channel: You can use the
netsh wlan set hostednetwork channel=Xcommand (replaceXwith a channel number between 1 and 11 - try switching if your Wi-Fi is slow). - Persistent Hotspot: To make your hotspot start automatically when your laptop starts, add the command
netsh wlan start hostednetworkto your startup programs.
Security: Protecting Your Digital Fortress
Don't be a sitting duck! Always use a strong password and consider the following:
- Encryption: Ensure your Wi-Fi is using WPA2 or WPA3 encryption for maximum security.
- Monitor Connected Devices: You can see which devices are connected to your hotspot through the Network and Sharing Center.
Battery Life Considerations
Running a hotspot can be a drain on your laptop’s battery. Here's how to manage it:
- Use a Power Adapter: Plug in your laptop whenever possible.
- Limit Usage: Only run the hotspot when you need it.
- Optimize Power Settings: Adjust your power plan to optimize battery life.
Fine-Tuning Your Network Settings
Sometimes, you might want a little more control over your network settings.
- IP Address: Your laptop automatically assigns IP addresses to connected devices. You can tinker with these, but it's generally not necessary for basic hotspot usage.
- Network Name (SSID): You've already set this, but if you want to change it, you can use the same
netsh wlan set hostednetworkcommand.
The Future of Connectivity
As technology evolves, so does the way we connect. What does the future hold?
- Faster Speeds: Expect even faster Wi-Fi standards like Wi-Fi 6 and Wi-Fi 7.
- Improved Security: Further advancements in encryption and network security.
- Seamless Connectivity: More devices that seamlessly connect to your hotspot.
Final Thoughts: Unlock Your Digital Freedom!
So there you have it! Turning your Windows 7 laptop into a Wi-Fi hotspot is a breeze, even for the less tech-inclined among us. It’s like
**WiFi Nightmare? Fix Your Windows 10 Laptop NOW!**Create a laptop WiFi hotspot in under 30 seconds Windows 7
By jacobspeeds Create a laptop WiFi hotspot in under 30 seconds Windows 7 by jacobspeeds
Turn Your Windows 7 Laptop into a WiFi Hotspot 2
By AvoidErrors Turn Your Windows 7 Laptop into a WiFi Hotspot 2 by AvoidErrors
how to create a wifi hotspot on windows 7 Professional
By iTon how to create a wifi hotspot on windows 7 Professional by iTon

Title: Cara Mengaktifkan Hotspot Wifi Laptop Windows 7
Channel: LAPTOP TUTORIAL
Cara Mengaktifkan Hotspot Wifi Laptop Windows 7 by LAPTOP TUTORIAL
Wifi Not Found
Transform Your Windows 7 Laptop into a WiFi Hotspot: The Surprisingly Simple Method!
Are you tethered to a lagging public WiFi connection or burdened by exorbitant mobile data charges? Do you yearn for the freedom to connect your devices without the frustrating limitations of a single-device link? We've got fantastic news: your Windows 7 laptop holds the key to unlocking a personal WiFi hotspot, transforming your portable powerhouse into a wireless hub capable of sharing its internet connection with multiple devices. Forget complicated configurations and technical jargon. This guide will walk you through the streamlined process, revealing the surprisingly easy trick to create your own WiFi hotspot in minutes.
The Magic of Virtual WiFi: Understanding the Underlying Technology
Before we delve into the step-by-step instructions, let's briefly demystify the technology propelling this feat. Windows 7, through its "Hosted Network" feature, allows your laptop's wireless adapter to simultaneously function in two distinct roles: as a client, receiving an internet signal (e.g., from a wired Ethernet connection or a pre-existing WiFi network), and as an access point, broadcasting that signal as a WiFi hotspot. This is achieved through the ingenious concept of a virtual WiFi adapter. This adapter, managed by the operating system, creates a secondary wireless interface, allowing your laptop to share its connection without requiring additional hardware. The beauty of this method lies in its software-based nature, making it accessible to virtually anyone with a Windows 7 laptop and a working internet connection.
Step 1: Accessing the Command Prompt with Administrative Privileges
The heart of the process lies in the Windows Command Prompt. To initiate the Hosted Network, you'll need to access it with the necessary administrative permissions.
- Click the 'Start' button.
- In the search bar, type "cmd".
- Right-click on "cmd.exe" in the search results.
- Select "Run as administrator." This crucial step ensures you have the authority to modify network settings.
Step 2: Unleashing the Hosted Network: The Command Line Commands
Within the elevated Command Prompt window, we will execute a series of commands to configure the Hosted Network. These commands are the building blocks of our WiFi hotspot.
Enabling the Hosted Network: First, we enable the Hosted Network using the command:
netsh wlan set hostednetwork mode=allow ssid="YourWiFiName" key="YourPassword"netsh wlan: This initiates the Windows Wireless LAN service configuration utility.set hostednetwork: This tells the utility to configure the Hosted Network parameters.mode=allow: This enables the Hosted Network.ssid="YourWiFiName": Replace"YourWiFiName"with your desired network name (e.g., "MyLaptopHotspot"). Choose a name that is easily recognizable.key="YourPassword": Replace"YourPassword"with a strong, secure password (at least 8 characters) for your WiFi network. This is crucial for protecting your network from unauthorized access.
Starting the Hosted Network: Next, we start the Hosted Network using the command:
netsh wlan start hostednetworknetsh wlan start hostednetwork: This command activates the previously configured Hosted Network, making it ready for use.
Step 3: Sharing Your Internet Connection: Bridging the Gap
Now that the Hosted Network is enabled and started, the final step involves sharing your existing internet connection with the newly created hotspot. This is where we connect the dots.
Open "Network and Sharing Center." You can access this by right-clicking the network icon in your system tray (located in the bottom-right corner of your screen) and selecting "Open Network and Sharing Center."
Click on "Change adapter settings" in the left pane. This will display a list of your network connections.
Identify the network adapter that provides your internet connection (e.g., your Ethernet connection or your pre-existing WiFi connection). Note that to work with one shared wireless port as an access point, the existing wireless connection must be active for this to work.
Right-click on your internet connection adapter and select "Properties."
Go to the "Sharing" tab.
Check the box that says "Allow other network users to connect through this computer's Internet connection."
In the "Home networking connection" dropdown menu, select "Microsoft Hosted Network Virtual Adapter." This is the virtual adapter created by the Hosted Network.
Click "OK" to confirm the changes.
Step 4: Connecting Your Devices: The WiFi Revelation
With the Hosted Network configured and your internet connection shared, the moment of truth has arrived. It's time to connect your devices – smartphones, tablets, other laptops – to your newly created WiFi hotspot.
On your device, navigate to the WiFi settings.
Search for available WiFi networks. You should see the network name ("YourWiFiName") you specified earlier.
Select your network.
Enter the password ("YourPassword") when prompted.
Your device should now connect to your laptop's WiFi hotspot, granting it access to the internet.
Troubleshooting Common Issues: Navigating the Twists and Turns
While this process is remarkably straightforward, occasional hiccups can occur. Let's address a few common troubleshooting scenarios:
- "The hosted network couldn't be started": This usually indicates a problem with your wireless adapter’s drivers or an issue with its capabilities. Ensure your drivers are up to date. You might also need to reboot your laptop after running the
set hostednetworkcommand. Furthermore, verify that your wireless adapter supports hosted networks. The commandnetsh wlan show driverscan verify support. Look for "Hosted network supported: Yes." - "Unable to share the internet connection": Double-check that you correctly selected the "Microsoft Hosted Network Virtual Adapter" in the "Sharing" tab of your internet connection's properties. Rebooting your computer can resolve this in addition to confirming your sharing settings. An unchecked box is the most common mistake.
- Slow internet speeds: The speed of your hotspot is directly proportional to the speed of your laptop's internet connection. The limitations can also be the number of devices connected to the hotspot. Consider optimizing your actual internet connection.
Advanced Considerations: Fine-tuning Your Hotspot
For those seeking greater control, consider the following advanced tweaks:
- Changing the Network Name (SSID) and Password: You can modify your network name and password at any time by re-running the
netsh wlan set hostednetwork mode=allow ssid="YourNewWiFiName" key="YourNewPassword"command and restarting your hosted network (usingnetsh wlan stop hostednetworkand thennetsh wlan start hostednetwork). Ensure you update your devices accordingly. - Monitoring Connected Devices: Windows 7 doesn't provide a built-in interface to monitor connected devices. However, you can utilize third-party software or, depending on your router's capabilities (if you're using a pre-existing WiFi connection to feed your hotspot), access its management interface to track connected devices and bandwidth usage.
- Security Best Practices: Always use a strong, unique password for your WiFi hotspot. Consider using WPA2-PSK encryption (which is usually the default) as a minimum security standard. Regularly update your laptop's operating system and security software to protect against vulnerabilities.
Beyond the Basics: Expanding Your Horizons
The ability to create a WiFi hotspot is just the tip of the iceberg. This skill can be leveraged in various scenarios.
- Travel Companion: When traveling, your laptop can act as a WiFi hub, allowing multiple devices to connect to a single hotel or public WiFi connection, saving you money (or time) by connecting less often.
- Emergency Connectivity: In situations where your primary internet connection fails, your laptop, tethered to your mobile phone's data plan, can provide a temporary WiFi lifeline for other devices.
- Guest Access: Effortlessly grant guest access to your internet connection without sharing your primary WiFi login details. You simply configure the hotspot with a guest-friendly network name and password.
Conclusion: Embrace the Wireless Freedom
By mastering this surprisingly easy trick, you've equipped yourself with a powerful tool for managing your internet connectivity. Converting your Windows 7 laptop into a WiFi hotspot is no longer a daunting technical endeavor. With these steps, you can unlock a world of wireless convenience, staying connected wherever life takes you. So, ditch the dependence on public networks and expensive mobile data plans, and embrace the freedom of your own personal WiFi hotspot. The surprising ease of this feature empowers you to take control of your wireless future.
