how to use laptop as wifi router in windows 7
Title: Tutorial - How to make your laptop as a wireless router.. Windows 7 and Vista
Channel: q8ieng
Tutorial - How to make your laptop as a wireless router.. Windows 7 and Vista by q8ieng
how to make laptop as wifi hotspot windows 7, can i use my laptop as a wifi router, how to use laptop as wifi router
Windows 7 Wifi Hotspot Trick: Free Internet Sharing!
Unlocking the Digital Oasis: Sharing Your Windows 7 Internet Magic
Alright, tech enthusiasts! Ever found yourself in a digital desert? You know the situation: multiple devices, limited Wi-Fi, and a desperate longing for connectivity. Well, hold onto your hats, because this is where Windows 7 steps onto the stage. We're about to unveil a nifty trick that transforms your laptop into a personal Wi-Fi hotspot. This opens the door to sharing your internet connection with multiple devices. It's a simple process that can be a real lifesaver.
The Secret Ingredient: Hosted Network Technology
The magic behind this feat lies in something called Hosted Network technology. This feature, built directly into Windows 7, allows you to share your internet connection. Primarily, it uses your laptop's built-in Wi-Fi adapter. This ingenious function basically turns your computer into a virtual router. Thus, other devices can connect to your Wi-Fi signal. It's like creating a mini-network, all focused on sharing the internet.
Prepping Your Arsenal: Hardware and Software Requirements
Before we begin, you'll need a few things. First, you'll need a Windows 7 laptop. Next, ensure your laptop has a functional Wi-Fi adapter. This is pretty standard on most laptops, but it's always good to check. Finally, you need an active internet connection. This can be from an Ethernet cable or another Wi-Fi network. Once you are all set up, you can begin.
Setting the Stage: Enabling the Hosted Network
Let's get this show on the road! First, open the command prompt. Search for "cmd" in the start menu and click on it. Now, type the following command into the command prompt: netsh wlan set hostednetwork mode=allow ssid="YourHotspotName" key="YourPasswordHere". Replace "YourHotspotName" with the name you want for your Wi-Fi network. Then, choose a secure password for "YourPasswordHere". Ensure the password is strong. Finally, press enter. This initializes the hosted network.
Fine-Tuning the Connection: Sharing Your Internet
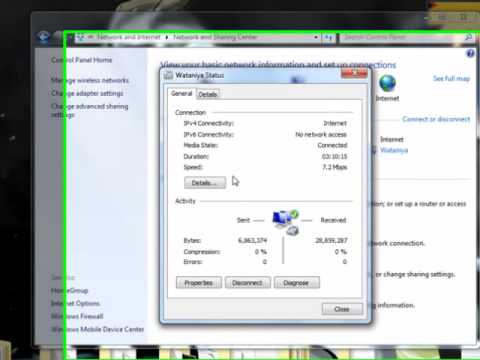
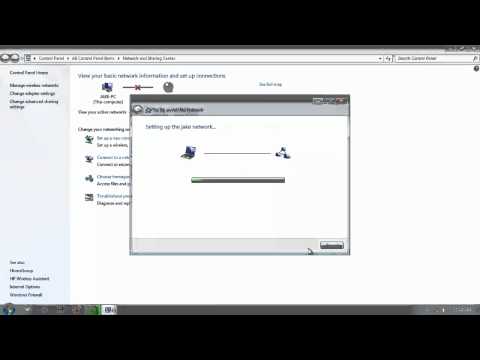
You've created the hotspot, but we are not completely done yet. Now, you need to share your internet connection. Open the "Network and Sharing Center". You can find this in the Control Panel. Then, click on "Change adapter settings". Locate your active internet connection. This might be labeled "Ethernet" or "Wi-Fi". Right-click on it and select "Properties." Navigate to the "Sharing" tab. Now, check the box that says "Allow other network users to connect through this computer's internet connection". Select "Microsoft Hosted Network Virtual Adapter" from the dropdown. Finally, click "OK".
Igniting the Spark: Starting the Hotspot
You've set everything up. Now, it's time to activate the hotspot. Return to the command prompt. This time, type the command: netsh wlan start hostednetwork. Hit enter. This officially starts your Wi-Fi hotspot. At this point, other devices should be able to see your hotspot. Check your phone, your tablet, or any other Wi-Fi enabled device.
Troubleshooting Triumphs: Solving Common Issues
Sometimes, things don't go as planned. Let's address a few common hiccups. If you do not see your hotspot, double-check that the hosted network is enabled. Make sure the Wi-Fi adapter is also enabled. Furthermore, ensure your internet connection is active. If you face connection problems, verify the password you entered is correct. Also, restart your computer. This can often resolve minor glitches. You could also try disabling and re-enabling the Wi-Fi adapter. So, be patient.
Elevating Connectivity: Beyond the Basics
This trick is not just about sharing internet; it's about possibilities. Therefore, you can create a reliable Wi-Fi network anywhere. This is especially useful while traveling. It's also handy when you need to connect multiple devices. Imagine streaming movies on your tablet while your other device uses the internet. The possibilities are plentiful.
Extinguishing the Flame: Stopping the Hotspot
When you're done sharing, you'll want to turn off the hotspot. Therefore, simply go back to the command prompt. There, you can enter the command: netsh wlan stop hostednetwork. This will turn off the hotspot. You can also disable the sharing option in the network settings.
Final Thoughts: Embracing Digital Freedom
There you have it! You've now mastered the Windows 7 Wi-Fi hotspot trick. As a result, you can share your internet connection with ease. It's a powerful tool for anyone who needs to stay connected. Moreover, this is a simple, yet useful functionality. So, go forth, and share the digital wealth! Now, enjoy your freedom and your new shared internet!
iPhone to Laptop WiFi: The Secret Trick Nobody's Telling You!Windows 7 Wifi Hotspot Trick: Free Internet Sharing!
Hey there, fellow tech enthusiasts! Ever found yourself in a Wi-Fi desert, desperately craving a connection? Maybe you're stuck in a hotel with exorbitant internet charges, or perhaps you're trying to share your precious mobile data with a friend. Well, buckle up, because we're diving headfirst into a super cool trick: turning your trusty Windows 7 machine into a Wi-Fi hotspot! Forget those complicated software solutions; we're keeping it simple, effective, and totally free. This isn't just about how to do it; it's about understanding the "why" and appreciating the sheer convenience of internet sharing. Think of it like this: you have a lifeline, and you're about to share it with the world (or at least, those around you!).
Unleashing Your Inner Hotspot Guru: Why Windows 7 Still Matters
Before we get our hands dirty, let's address the elephant in the room: Yes, Windows 7 is an older operating system. But hey, it's still kicking for a lot of us, and honestly, it's perfectly capable of this neat trick. We're not here to bash the latest and greatest; we're here to leverage what we've got! Plus, the simplicity of the Windows 7 approach is a breath of fresh air compared to some of the more complex methods out there. Think of it as a classic car: it might not have all the bells and whistles, but it's reliable and gets the job done.
The Big Question: Is It Really Free Internet Sharing?
Absolutely! We're not advocating for anything illegal here. This method uses the built-in capabilities of Windows 7; you're essentially using your existing internet connection and sharing it wirelessly. If you have a data plan on your phone (or a wired internet connection to your PC), you can use your PC’s wireless adapter to create a Wi-Fi hotspot! It’s like turning your computer into a wireless router, but without the added cost.
Cracking the Code: The Simple Setup Steps
Alright, enough chit-chat, let's get to the nitty-gritty. Here's how to create your very own Wi-Fi hotspot using Windows 7. Don’t worry; it’s easier than baking a cake (and much less messy!).
Step 1: Open the Command Prompt (As Administrator): This is our control center. Search for "cmd" in your Start Menu, then right-click on "Command Prompt" and select "Run as administrator." Think of it as entering the secret lair where the magic happens.
Step 2: The Magic Command: Type the following command and hit Enter:
netsh wlan set hostednetwork mode=allow ssid=YourHotspotName key=YourPassword- Replace
YourHotspotNamewith the name you want to give your hotspot (e.g., "MyAwesomeWiFi"). Think of this as your hotspot's identity! - Replace
YourPasswordwith a password (at least 8 characters) to secure your network. You don’t want unwanted guests, right? - Example:
netsh wlan set hostednetwork mode=allow ssid=FriendsWiFi key=BestPasswordEver
- Replace
Step 3: Start the Hotspot: Type this command and hit Enter:
netsh wlan start hostednetwork- This is the moment of truth! It’s like flipping the switch and watching your hotspot come to life.
Step 4: Share Your Internet Connection:
- Go to "Network and Sharing Center" (you can find this in your Control Panel).
- Click on "Change adapter settings."
- Right-click on the internet connection you're using (usually "Ethernet" if you're connected with a cable, or your Wi-Fi adapter if you’re connecting via Wi-Fi).
- Select "Properties."
- Go to the "Sharing" tab.
- Check the box that says "Allow other network users to connect through this computer's internet connection."
- In the "Home networking connection" dropdown menu, select your new Wi-Fi hotspot connection (it will likely be named something like "Microsoft Hosted Network Virtual Adapter").
- Click "OK."
And… that’s it! You should now see your Wi-Fi hotspot available on other devices.
Troubleshooting Troubles: Making Sure Everything Works Smoothly
Sometimes things don't go according to plan. Don't panic! Here are a few common hiccups and how to solve them:
- Hotspot Doesn't Appear: Double-check the commands, ensuring you typed them correctly (case matters!). Also, make sure your wireless adapter is enabled.
- Can Connect, But No Internet: Make sure the "Sharing" settings are configured correctly (as described above). Also, try restarting your computer. Sometimes a simple reboot is all you need!
- Password Problems: Ensure your password is at least 8 characters long.
Security First: Shielding Your Digital Fortress
While this trick is super useful, security is paramount. Here's how to keep your hotspot safe:
- Strong Password: Use a strong, unique password that’s difficult to guess.
- Monitor Connections: Keep an eye on connected devices. If you see something suspicious, change your password immediately.
- Turn it Off When Not in Use: When you are no longer sharing, close the network. Think of it like closing the door to your house.
Beyond the Basics: Enhancing Your Hotspot Experience
Once you've got the basics down, you can tweak your hotspot for an even better experience.
- Bandwidth Control: While Windows 7 doesn't offer built-in bandwidth limiting, you can use third-party software if you need to manage the speed each device receives.
- Consider Your Range: The range of your hotspot depends on your wireless adapter. Try positioning your PC in a central location for the best coverage.
A Word of Caution: Data Usage and Mobile Plans
Remember to monitor your data usage, especially if you're using a mobile data connection. Streaming videos or downloading large files can quickly eat up your allowance. Keep an eye on your data plan.
The Power of Sharing: Why this Trick Matters
This Wi-Fi hotspot trick isn't just about free internet; it's about empowerment. It's about having the knowledge to solve your own problems and help others. It is about staying connected, which is more important than ever. It is a skill for the modern era.
Summing Up: Your Newfound Internet Freedom
So there you have it! You've learned the Windows 7 Wi-Fi hotspot trick, unlocking a world of free internet sharing. Now go forth and share the Wi-Fi love! Remember to be responsible, prioritize security, and enjoy the convenience. Who knows? Maybe you’ll become the go-to person for tech support amongst your friends and family.
FAQs
1. Does this work with any internet connection? Yes, this method works with any internet connection you have on your Windows 7 PC– wired, wireless, even a mobile broadband connection.
2. Is this legal? Absolutely! As long as you own the internet connection you are sharing, it is perfectly legal.
3. Will this drain my laptop's battery? Yes, creating and sharing a Wi-Fi hotspot uses extra power. Consider plugging your laptop into a power source, especially if you plan to share the connection for extended periods.
4. Can I connect multiple devices? Yes, the number of devices you can connect depends on your wireless adapter and the speed of your internet connection.
5. What if the hotspot stops working? Try restarting your computer. If the issue persists, double-check the commands, the sharing settings, and make sure your wireless adapter is enabled. If you are still stuck, seek help.
- Principal Keywords: Windows 7 Hotspot Free Internet
- SEO Headline: Windows 7 Hotspot: Free Internet Sharing Trick!
- Pathway: Windows 7 Hotspot
- Meta Summary: Learn how to create a free Wi-Fi hotspot on your Windows 7 PC! Share your internet connection and stay connected. Simple steps, no cost!
- Image Alt Text: Hands using a laptop to setup a Wi-Fi hotspot on Windows 7.
Create a laptop WiFi hotspot in under 30 seconds Windows 7
By jacobspeeds Create a laptop WiFi hotspot in under 30 seconds Windows 7 by jacobspeeds
How to Create a WiFi Hotspot with Windows 7

By 1stepatatime How to Create a WiFi Hotspot with Windows 7 by 1stepatatime
How to enable your network connection in Windows 7

By MHELP2U How to enable your network connection in Windows 7 by MHELP2U

Title: How to turn your Windows 7810 Laptop or PC into a WiFi Hotspot UpdatedHD
Channel: iTech
How to turn your Windows 7810 Laptop or PC into a WiFi Hotspot UpdatedHD by iTech
Laptop Wifi Connect
Windows 7 WiFi Hotspot Trick: Free Internet Sharing!
We understand the frustration of being tethered to a single internet connection. Whether it’s a hotel room's limited Wi-Fi, a friend's generosity running low on their data plan, or simply the need to share your own internet access with multiple devices, the desire to create a mobile hotspot from your Windows 7 machine is a common one. And thankfully, it's a straightforward process. In this guide, we will not only walk you through the steps but also provide a deeper dive into the nuances of establishing and optimizing a Windows 7 Wi-Fi hotspot, ensuring a seamless and secure internet sharing experience.
Unlocking the Power of the Windows 7 Hosted Network
The cornerstone of creating a Wi-Fi hotspot on Windows 7 is the "Hosted Network" feature. This often-overlooked capability allows your computer to act as a virtual router, broadcasting its internet connection to other devices. The beauty of this method is its simplicity. With a few clicks and commands, you can transform your laptop into a Wi-Fi access point, sharing your internet connection with phones, tablets, and other laptops. Let's embark on the journey to set this up effectively.
Step-by-Step Guide: Configuring Your Windows 7 Hotspot
The following is a structured guide to creating your Windows 7 hotspot:
Open the Command Prompt with Administrator Privileges: This is crucial. Right-click the "Command Prompt" icon in the Start Menu (or search for it) and select "Run as administrator." This grants the necessary permissions for configuring network settings.
Activate the Hosted Network: At the command prompt, type the following command and press Enter:
netsh wlan set hostednetwork mode=allow ssid="YourHotspotName" key="YourPassword"- Replace
YourHotspotNamewith the desired name for your Wi-Fi network (e.g., "MyMobileHotspot"). Choose a name that reflects your style. - Replace
YourPasswordwith a strong password. This will protect your network from unauthorized access. Use a combination of uppercase and lowercase letters, numbers, and symbols. The password must be at least 8 characters long.
- Replace
Start the Hosted Network: Execute these commands:
netsh wlan start hostednetworkThe command prompt should display a success message.Share Your Internet Connection: This is the final – and most important – step.
- Open the "Network and Sharing Center" (search for it in the Start Menu or access it through the Control Panel).
- Click on "Change adapter settings" on the left side of the window.
- Identify the network adapter that is currently connected to the internet (e.g., Ethernet or Wi-Fi).
- Right-click on that adapter and select "Properties."
- Go to the "Sharing" tab.
- Check the box that says, "Allow other network users to connect through this computer's internet connection."
- In the "Home networking connection" dropdown menu, select the "Microsoft Virtual WiFi Miniport Adapter" (or similar, it may have different characters such as "Wireless Network Connection"). This is the virtual adapter created by the hosted network.
- Click "OK."
Verification: At this point, your hotspot should be active. Scan for Wi-Fi networks on your other devices (phones, tablets, etc.). You should see your "YourHotspotName" network listed. Connect to it using the "YourPassword" you set earlier.
Troubleshooting Common Windows 7 Hotspot Issues
While the process is typically straightforward, several factors may complicate the setup. Here are several common problems and their solutions.
"The hosted network couldn’t be started" Error: This can be due to several causes. Primarily, ensure your wireless network adapter drivers are up-to-date. Open the Device Manager (search in the Start Menu), expand "Network adapters," right-click on your wireless adapter, and select "Update driver." Choose "Search automatically for updated driver software." Secondly, verify that your wireless adapter supports hosted networks. It often requires newer wireless adapters. Finally, check if any third-party network management software is interfering. Disable them temporarily to test.
No Internet Access on Connected Devices: This is a common complaint. Double-check that you have properly shared your primary internet connection (Ethernet or Wi-Fi) with the hosted network adapter following the steps described above. Make sure that your main internet connection is actually working. Ensure the password is case-sensitive and accurately entered on the connecting devices.
Slow Internet Speed: The performance of your hotspot will depend on the speed of your primary internet connection and the number of connected devices. The distance of the connected devices from the hotspot can also affect the speed. Consider upgrading your internet plan if speeds are consistently slow. Closing bandwidth-intensive applications on the host machine to free up resources.
Hotspot Disconnecting Randomly: Several reasons may cause the disconnection. The driver could be outdated. Ensure the drivers of the wireless network adapter are up-to-date as described earlier. The power-saving settings on your wireless adapter. Navigate to Device Manager, expand "Network adapters," right-click your wireless adapter, select "Properties," and go to the "Power Management" tab. Uncheck the box that allows the computer to turn off the device to save power. The hosted network could be stopped. Make sure to enter the
netsh wlan start hostednetworkcommand to start it.
Securing Your Windows 7 Hotspot
Security is paramount when creating any Wi-Fi network. The following steps improve the security of your hosted network:
Strong Password: We've already emphasized this, but it bears repeating. Use a strong, complex password that is difficult to guess. Avoid easily predictable terms like birthdays, pet names, or common words.
WPA2/WPA3 Encryption: Always use WPA2 or WPA3 encryption for your wireless network. They provide robust security.
Disable Network Discovery: In the Network and Sharing Center, change advanced sharing settings. Turn off network discovery. This makes your network less visible to others on the network.
Monitor Connected Devices: Occasionally check which devices are connected to your network. If you see any unfamiliar devices, consider changing your password immediately.
Regular Password Updates: Consider changing your password periodically, particularly if you suspect any security breaches or have shared your password with someone.
Advanced Customization Options
While the basic setup is sufficient, there are ways to adjust your hotspot's behavior:
Changing the SSID: You can change the name of your hotspot more conveniently. This is done by entering:
netsh wlan set hostednetwork ssid="NewHotspotName"and stopping and restarting the network using the commands:netsh wlan stop hostednetworkandnetsh wlan start hostednetwork.Setting the Maximum Number of Connections: Limit the number of devices that can connect to your hotspot. You can use the command:
netsh wlan set hostednetwork maxsize=Xwhere X is the maximum number of devices.Using a Script to Automate Start-Up: Instead of manually running the
netsh wlan start hostednetworkcommand every time, you can create a batch file (.bat) to automate the process. Open Notepad, paste the command (or multiple commands) into the file, save it with a .bat extension (e.g.,start_hotspot.bat), and run as administrator.
Optimizing Performance
The quality of your hosted network depends on your hardware and internet connection. Here are some tips to get the best performance:
Optimize Your Wireless Adapter: Make sure your wireless adapter is positioned for optimal reception. If possible, place your laptop in an elevated position.
Reduce Interference: Keep your laptop away from sources of interference, such as microwave ovens, cordless phones, and other devices that emit radio waves.
Consider a Wired Connection: If possible, connect your laptop to the internet via an Ethernet cable. This will provide a stable internet connection for the hosted network.
Update Your Drivers: Regularly update the drivers for your wireless network adapter. Driver updates often contain performance improvements and bug fixes.
Conclusion: Unleash Your Internet Freedom
Creating a Windows 7 Wi-Fi hotspot is a valuable skill in today's connected world. By following the steps outlined in this guide, you can easily share your internet connection with other devices, whether you are at home, in a hotel, or anywhere else. Remember to prioritize security by using a strong password and taking other protective measures. The ability to create a hotspot empowers you to share the internet and enhances your digital experience.
