laptop not connecting to wifi mac

Title: How To Fix MacBook Not Connecting to Wi-Fi or Wi-Fi Not WorkingSOLVED
Channel: Tricknology
How To Fix MacBook Not Connecting to Wi-Fi or Wi-Fi Not WorkingSOLVED by Tricknology
laptop not connecting to wifi macbook, laptop won't connect to wifi mac, laptop cannot connect to wifi mac, why is my laptop not connecting to wifi macbook, apple mac laptop not connecting to wifi, mac laptop can't connect to wifi, can't connect wifi to macbook
Mac Wi-Fi Nightmare? FIX Your Laptop Connection NOW!
Mac Wi-Fi Woes? Conquer Your Connection Calamity!
Are you battling the dreaded Wi-Fi disconnect on your beloved Mac? Does the spinning beach ball of death taunt you during crucial moments? If so, you're not alone. Many Mac users face frustrating Wi-Fi problems. But fear not! We'll delve into the depths of these connection conundrums and provide you with the tools to reclaim your online freedom. Because let's face it, a slow or unreliable Wi-Fi is an absolute productivity killer.
Is Your Mac's Wi-Fi Truly the Culprit?
Before we begin, it's critical to accurately diagnose the issue. Sometimes, the problem isn't your Mac, but the network itself. First, consider other devices. Are other devices connected to your Wi-Fi experiencing similar troubles? If your iPhone, iPad, or even streaming devices are also suffering, your router or internet service provider might be the issue, unfortunately. Therefore, a quick check of this vital aspect will save you wasted time.
Secondly, a simple restart is frequently effective. Rebooting your router and modem can clear temporary glitches. Consequently, this can often resolve minor connectivity problems. Likewise, restarting your Mac is also worth trying. Moreover, performing a simple restart clears the system cache.
Troubleshooting the Wi-Fi Connection: A Deep Dive
Assuming the problem lies within your Mac, let's explore further. Many variables can impact Wi-Fi performance. One primary suspect is software conflicts. Outdated software can definitely cause issues. Because it's essential to ensure your MacOS is up to date. Go to System Preferences, then Software Update. Then, install any available updates.
Similarly, check your Wi-Fi settings. Navigate to System Preferences and then Network. Select Wi-Fi from the sidebar. Make sure Wi-Fi is turned "on." Also, confirm that you are indeed connected to your desired network. Perhaps you inadvertently disconnected from your Wi-Fi network.
Decoding the Wireless Interference Enigma
Wireless interference can severely degrade your Wi-Fi performance. Many factors can contribute to this. Numerous electronic devices emit radio waves like microwaves, cordless phones, and even Bluetooth devices. These can overlap with your Wi-Fi signal. Hence, try to minimize the number of devices operating in the vicinity of your Mac.
Additionally, consider the physical location of your router and your Mac. Walls and obstacles can impede the signal. Therefore, moving your router to a central location may help. Moreover, ensure your Mac is not blocked by metal objects. Metal degrades the signal.
Conquering Network Configuration Complications
Network settings often go awry. Sometimes, your Mac might have incorrect DNS settings. DNS servers translate website names into IP addresses. Because the default configurations might not always be optimal. To remedy this, consider changing your DNS servers. You can use a public DNS service, such as Google DNS (8.8.8.8 and 8.8.4.4). Because setting those values can improve the speed.
Furthermore, try forgetting and rejoining your Wi-Fi network. In System Preferences, go to Network, then Wi-Fi. Select your network and click "Advanced." Then, click the minus (-) button to remove your network from the preferred networks list. After that, rejoin the network and re-enter the password. Your Mac will then refresh its connection settings.
Advanced Solutions for the Persistent Problem
If the basic troubleshooting hasn't yielded results, it's time to advance. Consider resetting your network settings. This can resolve deep-seated configuration issues. However, be aware that doing this will erase all saved Wi-Fi passwords. In System Preferences, go to Network, and then choose "Assistant." Follow the prompts.
Moreover, you might want to consider using the Wireless Diagnostics tool. Locate this within the Utilities folder. This tool can diagnose various Wi-Fi issues. Because it can show you channel congestion, and even suggest potential solutions. To start the diagnostics, simply open the app and follow the on-screen prompts.
The Final Frontier: Hardware Considerations
In rare instances, the problem may lie with your Mac's Wi-Fi hardware. Although this is less conventional, it's a possibility. If you've tried everything else, contacting Apple support may be necessary. They can assess the device's Wi-Fi card. Or, if you're comfortable, you might consider taking your Mac to an authorized repair shop.
Wrapping up the Wi-Fi Rescue Mission
Dealing with Wi-Fi problems is frustrating. Because a stable connection is essential. However, by following these troubleshooting steps, you can often resolve the issue. Starting with the basics, then moving to more advanced solutions should do the trick. Remember to be patient, as it may take time to pinpoint the root cause. With a little perseverance, you will have your Mac connected to the internet again!
Download HCL ME Laptop WiFi Drivers NOW! (Fix Your Internet!)Mac Wi-Fi Nightmare? FIX Your Laptop Connection NOW!
Let’s face it, we've all been there. You're in a crucial Zoom meeting, about to stream that epic movie, or simply trying to pay your bills, and bam! The spinning wheel of death. The dreaded Wi-Fi symbol with an exclamation point. Your trusty MacBook, normally as reliable as a Swiss watch, has become a digital paperweight, and you’re screaming internally, "Mac Wi-Fi nightmare, why?!"
We understand. We’ve lived this, we’ve felt the frustration, and we've spent countless hours wrestling with our own Mac Wi-Fi woes. But fear not, fellow Apple enthusiasts! We're here to get you back online, faster than you can say "AirDrop." This isn’t just a list of generic fixes; it's a survival guide, a digital lifeline, packed with actionable steps and even a few personal anecdotes to keep things interesting. Let's dive in!
1. The Silent Culprit: Is It Really Your Mac?
Before we start tweaking settings, let’s do a little detective work. Is it actually your MacBook causing the issue? Sometimes, the problem lies elsewhere. Think of your Wi-Fi network like a complex plumbing system. Your Mac is just one faucet.
- Check Other Devices: Grab your phone, tablet, or another computer. Are they experiencing the same Wi-Fi issues? If so, the problem is likely with your router or internet service provider (ISP).
- The Blame Game: Router Reboot: This is the digital equivalent of turning it off and on again. Unplug your router (and if you're lucky, your modem too) for about 30 seconds. Then, plug them back in. Give them a few minutes to power up. This simple step solves about 80% of Wi-Fi problems, we swear!
- ISP Intrusion: If a reboot doesn’t work, contact your ISP. They might be experiencing an outage. Trust us, it happens more than you think.
2. Mac’s Internal Wi-Fi Health Check: Diagnosing from Within
Okay, let's assume the culprit is your Mac. Apple provides some built-in tools to help us diagnose the issue. Think of it as your Mac's personal check-up.
- The Diagnostics Tool: Hold down the "Option" key and click the Wi-Fi icon in the menu bar (top right corner). This reveals a hidden menu. Select “Open Wireless Diagnostics.”
- Running the Test: The Wireless Diagnostics will guide you through a scan of your Wi-Fi environment. It might identify interference, channel congestion, or other potential problems. Follow its recommendations. It’s like having a Wi-Fi doctor right on your computer!
- Logging and Reporting: The diagnostic tool creates logs you can send to Apple Support if the problem persists, providing them with invaluable data.
3. The Forgotten Settings: Checking Your Mac's Preferences
Sometimes, the solution is as simple as a quick peek at your Mac’s Wi-Fi settings.
- System Preferences (or System Settings): Open System Preferences (older macOS versions) or System Settings (newer versions).
- Wi-Fi Tab: Click on the “Wi-Fi” icon. Ensure Wi-Fi is turned on. (Duh, right? But you'd be surprised!)
- Network Order: This is crucial! Click “Advanced” or “Details” (depending on your macOS version) and check the order of your preferred networks. Make sure your home Wi-Fi is at the top of the list. If multiple networks are vying for attention, your Mac might be confused.
- Forget the Network: If all else fails, try “forgetting” the network and rejoining it. This can clear out any corrupted settings. To do this, click the "i" icon next to your network name, and select “Forget This Network.” Then, reconnect to your Wi-Fi, entering your password.
4. Channel Surfing for Wi-Fi Freedom
Your router broadcasts Wi-Fi signals on different channels. Like a crowded highway, some channels are more congested than others. This is where a little channel surfing can work like magic using dedicated apps.
- Channel Congestion Apps: Use apps to scan your Wi-Fi environment and identify the least crowded channel. We recommend using a dedicated application like Wi-Fi Explorer.
- Router Admin Panel: Log in to your router’s admin panel (usually by typing its IP address into your web browser; check your router’s manual for instructions).
- Change the Channel: In the router settings, change the Wi-Fi channel to the one recommended by your scan.
5. The Router's Realm: Modernizing Your Hardware
Older routers can be like old cars: they can get you there, but it might be a bumpy ride. Outdated hardware can bottleneck your Wi-Fi.
- Router Age: How old is your router? If it's more than a few years old, it might be time for an upgrade. Newer routers support the latest Wi-Fi standards (like Wi-Fi 6 or Wi-Fi 6E) for better speeds and coverage.
- Signal Strength: Is your router broadcasting a strong signal? Check its physical placement; ensure it's in a central, unobstructed location.
- Firmware Updates: Keep your router's firmware updated. These updates often include performance improvements and security patches.
6. External Interference: The Wi-Fi Enemy
Think of your Wi-Fi signal as a radio wave being played in a crowded room. Other devices can cause interference.
- Microwave Madness: Microwaves, cordless phones, and other devices operating on the 2.4 GHz frequency can create interference.
- Bluetooth Blues: Bluetooth devices also operate on the 2.4 GHz frequency. Turn off Bluetooth devices you're not using.
- Physical Obstacles: Walls, metal objects, and even water can weaken your Wi-Fi signal. Try moving your router to a more open location.
7. The DNS Dilemma: Deciphering the Digital Address Book
Your Mac uses a DNS server to translate website names (like google.com) into IP addresses (the numerical addresses computers use). Sometimes, the default DNS server can be slow or unreliable.
- Change Your DNS Servers: Open System Preferences/System Settings, go to Wi-Fi, and click "Advanced" or "Details." Then, select the "DNS" tab.
- Popular Alternatives: Consider using a public DNS server like Google Public DNS (8.8.8.8 and 8.8.4.4) or Cloudflare (1.1.1.1 and 1.0.0.1). These are often faster and more reliable than your ISP's default DNS servers.
8. The Power Cycle Power-Up: Restarting Your Hardware
We've mentioned router reboots, but consider the power cycle method which helps a lot.
- The Complete Reboot: Turn off your Mac, your Wi-Fi router & modem, and wait a few minutes. Turn them on in sequence: modem, then router, then your Mac.
9. Software Conflicts: The macOS Conspiracy
Sometimes, the culprit is a rogue piece of software messing with your Wi-Fi.
- Update Everything: Ensure macOS is up-to-date.
- Third-Party Intruder's: Disable or uninstall any new software you've installed recently, especially VPNs or security software, and see if the problem goes away.
10. Resetting the Mac's Network Settings: A Digital Spring Cleaning
This step resets all your network settings to their defaults. Think of it as a complete digital reset.
- Caution: This will erase all your saved Wi-Fi passwords, so make sure you know them beforehand.
- System Preferences Method: Go to System Preferences/System Settings > Network, then right-click (or Control-click) in the list and select "Reset Wi-Fi."
11. Hardware Troubles: External Wi-Fi Adaptors
If all else fails, it might be a hardware issue. For example, your Mac's built-in Wi-Fi card could have issues.
- USB Wi-Fi Adaptor: Try an external USB Wi-Fi adaptor. These are relatively inexpensive and can bypass a faulty internal card.
- Check for Physical Damage: Inspect the internal Wi-Fi card (if you feel comfortable opening up your Mac – and only if you're confident doing so).
12. Location, Location, Location: The Importance of Physical Placement
The physical position of your Mac, and the router, can really influence your Wi-Fi experience.
- Laptop Placement: Make sure your laptop isn't too far from your router. The further away you are, the weaker your signal will be.
- Router Placement: Elevate your router – placing it on a high shelf or table can help avoid obstructions and spread the Wi-Fi signal more efficiently.
13. Battery Anxiety: Power Saving Mode Pitfalls
Your Mac’s power saving settings can, on occasion, compromise Wi-Fi performance.
- Check Power Settings: Make sure power saving settings aren’t too aggressive, especially on battery. Navigate to System Preferences/System Settings > Battery
3 Ways to Fix Wi-Fi Problems on Mac

By Howtober 3 Ways to Fix Wi-Fi Problems on Mac by Howtober
Macbook pro wont connect to wifi and turns wifi on and off over and over.

By yuh yuh Macbook pro wont connect to wifi and turns wifi on and off over and over. by yuh yuh
Wifi Not Connecting Problem in Windows Solve100 Wifi Not Working Problem Fix macniteshwifi

By Mac Nitesh Wifi Not Connecting Problem in Windows Solve100 Wifi Not Working Problem Fix macniteshwifi by Mac Nitesh
Title: Unable To Connect to WiFi On Mac The WiFi Network Could Not Be Join On Mac.
Channel: My iphone support
Unable To Connect to WiFi On Mac The WiFi Network Could Not Be Join On Mac. by My iphone support
Wifi On Laptop Phone
Mac Wi-Fi Nightmare? FIX Your Laptop Connection NOW!
Have you found yourself wrestling with the whims of your Mac’s Wi-Fi, only to be met with a frustratingly weak or unstable connection? Has that little Wi-Fi icon in your menu bar morphed into a symbol of digital dread? Fear not, fellow Mac users. We've all been there. The good news? These Wi-Fi troubles are often surprisingly fixable. Let us delve into the common culprits and equip you with the knowledge to banish these wireless woes, reclaiming the seamless connectivity you deserve.
Diagnosing the Mac Wi-Fi Woes: A Deep Dive
Before plunging into solutions, we must first understand the nature of the beast. Identifying the source of your Wi-Fi problems is the crucial first step. Is the connection intermittent, dropping out at random intervals? Or is it consistently slow, making even simple tasks a chore? Is it just your Mac, or are other devices in your household also suffering the same fate?
- Intermittent Dropouts: This often points to interference, router issues, or a problem with your Mac's Wi-Fi hardware/software.
- Slow Speeds: This could be a consequence of distance from the router, network congestion, an outdated Wi-Fi standard, or ISP limitations.
- Connection Issues on Multiple Devices: This strongly suggests a problem with your router or your Internet Service Provider (ISP).
Testing Your Internet Speed: Establishing a Baseline
Before embarking on troubleshooting, it’s essential to establish a baseline by testing your current internet speed. Several free and reliable speed test websites are available, such as Speedtest by Ookla or Fast.com. Run a test on your Mac, preferably while physically close to your router. Record the results for both download and upload speeds. Compare these figures to the speed advertised by your ISP. Are you receiving the speed you're paying for? If not, contact your ISP; they may be experiencing a service disruption at their end, or you may need to ask them to investigate.
Restarting the Usual Suspects: Your Mac and Your Router
Sometimes, the simplest solutions are the most effective. Let's start with the tried-and-true method, the IT technician's friend: a reboot.
- Restart Your Mac: A simple restart can often clear temporary glitches and refresh the Wi-Fi interface. Click the Apple menu in the top-left corner of your screen, and select "Restart."
- Restart Your Router: Unplug your router and modem (if separate devices) from the power outlet. Wait for a full minute before plugging them back in. Allow them both to fully power up (this can take a few minutes) before attempting to reconnect to the Wi-Fi. This process clears the router’s cache and resolves many common networking hiccups.
Checking for Physical Obstructions and Interference
Wi-Fi signals, while invisible, are susceptible to environmental factors. Physical obstructions can weaken the signal, and competing radio waves from other devices can cause interference.
- Obstructions: Walls, especially those made of concrete or brick, can significantly impede Wi-Fi signals. Keep your Mac and your router as free from obstructions as possible.
- Interference: Other electronic devices, such as microwaves, Bluetooth devices, cordless phones, and even other Wi-Fi routers, can interfere with the signal. Move your router away from these devices, and try changing the Wi-Fi channel on your router (see below).
Troubleshooting The Wi-Fi Connection: A Step-by-Step Guide
If restarting has not solved the problem, we must dig a little deeper. Follow these systematic troubleshooting steps.
- Verify Your Mac's Wi-Fi is Enabled: Ensure that Wi-Fi is switched on. Click the Wi-Fi icon in your menu bar. Make sure it says "Wi-Fi On."
- Check Your Network Selection: Confirm that you are connected to the correct Wi-Fi network. Select your home network from the list of available networks. You will most likely need to enter your Wi-Fi password.
- Forget and Reconnect to The Network: Sometimes, a corrupted network profile can cause connection issues. Forget the network and reconnect. To do this, go to System Settings > Wi-Fi. Click the (i) button next to your network name. Select "Forget This Network." Then, reconnect and re-enter your password.
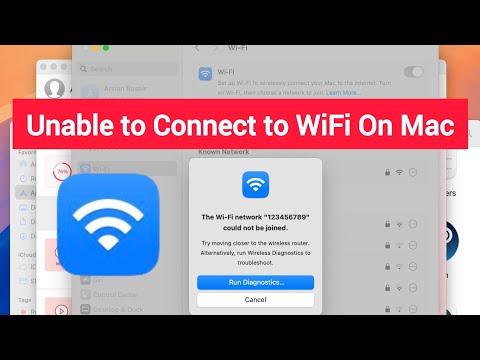
- Run Wireless Diagnostics: Your Mac has built-in diagnostic tools that can help identify potential problems with your Wi-Fi connection. Press and hold the Option key, then click the Wi-Fi icon in the menu bar. Select "Open Wireless Diagnostics." Follow the on-screen instructions. It will perform scans and make recommendations. You can also use this utility to monitor your connection over time.
- Update Your macOS: Ensure your Mac is running the latest version of macOS. Software updates often include bug fixes and improvements to Wi-Fi performance. Go to System Settings > General > Software Update to check for updates.
- Check Your Router Settings: Access your router's settings (usually by typing its IP address into your web browser). Ensure the Wi-Fi channel is set to "Auto" or try selecting a different channel. Some routers use the 2.4 GHz band, while others use the 5 GHz band. If your router offers both, the 5 GHz band is generally faster and less prone to interference, but it has a shorter range. Select the appropriate Wi-Fi standard.
The Wi-Fi Channel Selection: Optimizing Your Connection
Wi-Fi routers broadcast on different "channels." If your router is set to a channel that's congested with other Wi-Fi networks in your area, your connection can suffer. Experimenting with different Wi-Fi channels can often improve performance.
- Access Your Router's Settings: Log in to your router's configuration by typing its IP address (often 192.168.1.1 or 192.168.0.1) into your web browser’s address bar. The router's manual or the sticker on the router will provide the default username and password.
- Find the Wi-Fi Channel Settings: Look for the wireless or Wi-Fi settings section within the router's interface.
- Select A Different Channel: Choose a different channel. Try switching to channels 1, 6, and 11 on the 2.4 GHz band, as these are the least likely to overlap. If your router supports the 5 GHz band, this band offers more channels and is usually less congested. Select "Auto" or try a different channel. Save the settings and restart your router.
- Use a Wi-Fi Analyzer App: For more in-depth analysis, consider using a Wi-Fi analyzer app on another device (like your iPhone or Android). These apps scan your local Wi-Fi environment and recommend the best channel to use.
Addressing Router Firmware and Hardware Issues
Your router's firmware is the software that runs it. Outdated firmware can cause a host of problems, including Wi-Fi connectivity issues. Hardware issues with the router itself, or the antenna, can also be a contributing factor to your Wi-Fi troubles.
- Update Your Router's Firmware: Access your router's settings and look for a firmware update option. Follow the instructions to download and apply the latest firmware.
- Consider Replacing Your Router: If your router is old (more than three to five years), it may be time for an upgrade. Older routers may not support the latest Wi-Fi standards (like 802.11ac or 802.11ax - Wi-Fi 6), resulting in slower speeds and weaker performance. Newer routers offer improved performance, better range, and enhanced security features.
- Check Router Placement: Ensure that your router is not placed in a corner, in a cabinet, or near other electronic devices. Placing the router in an open area, at a central location, and at an elevated position can improve signal distribution.
Exploring Advanced Troubleshooting Techniques - Advanced Troubleshooting
If the above solutions have not resolved the issue, let's explore some more advanced techniques.
- Renew Your DHCP Lease: Dynamic Host Configuration Protocol (DHCP) assigns your Mac an IP address. Sometimes, this address can become problematic. You can renew your IP address lease to try and resolve the issue. Go to System Settings > Wi-Fi. Click the Details… button next to your connected network. Click the "Renew DHCP Lease" button.
- Flush DNS Cache: Your Mac stores a DNS cache, which can sometimes cause problems. Clearing this cache can help resolve connection issues. Open Terminal (found in Applications > Utilities) and type the following command, then press Enter:
sudo dscacheutil -flushcache; sudo killall -HUP mDNSResponder. You may be prompted for your user password. - Create a New Network Location: A corrupted network configuration can hinder your Wi-Fi. Creating a new network location can sidestep this problem. Go to System Settings > Network. Click the "…" button in the Wi-Fi section and choose "Edit Locations." Click the "+" button to add a new location. Name it, and select "Wi-Fi." Connect to your network and test the connection.
- Reset NVRAM/PRAM: NVRAM (non-volatile random-access memory) and PRAM (parameter RAM) store certain system settings, including network settings. Resetting them can sometimes
