download laptop wifi hotspot free

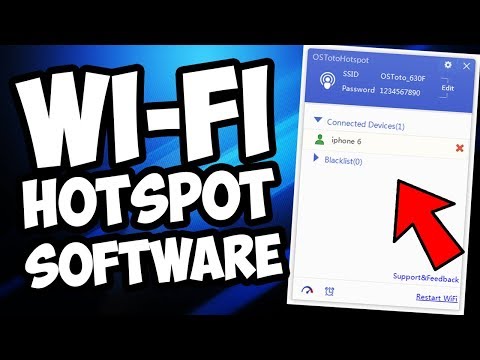
Title: TUTORIAL MENDOWNLOAD DAN INSTAL APLIKASI BAGI JARINGANhotspot MY WIFI ROUTER
Channel: IGO JUNIOR
TUTORIAL MENDOWNLOAD DAN INSTAL APLIKASI BAGI JARINGANhotspot MY WIFI ROUTER by IGO JUNIOR
laptop wifi hotspot free download, can i use my laptop as a wifi hotspot
Download FREE Laptop WiFi Hotspot: Unleash Your Internet Power NOW!
Transform Your Laptop into a WiFi Powerhouse: Get a FREE Hotspot!
Imagine this: you’re stranded without internet. Your phone’s data is dwindling. Moreover, you have urgent emails to send. Suddenly, a solution presents itself. Your laptop could be the answer. Indeed, it can become a personal WiFi hotspot. This article unveils how.
Unlocking the Hidden Potential of Your Laptop
Most modern laptops possess hidden talents. They can broadcast their internet connection. This incredible feature transforms any laptop into a mobile WiFi hotspot. Consequently, you can share your internet. This opens up a world of possibilities. You can connect multiple devices. This includes your phone, tablet, or even another laptop. Accessing the internet becomes seamless. The best part? You can get the software for free. It's easier than you think.
Why a Laptop Hotspot is a Game Changer
Picture yourself in various scenarios. Perhaps you’re traveling. Maybe, the hotel WiFi is unreliable. Your laptop hotspot offers a reliable alternative. Consider a camping trip. You wish to stay connected. Furthermore, family needs online access. A laptop hotspot proves invaluable. The convenience is undeniable. It provides internet connectivity. It does so wherever you go. In addition, it’s a fantastic backup plan. It functions when other internet sources fail.
Step-by-Step Guide to Creating Your Free Hotspot
Setting up your laptop as a hotspot is straightforward. First, check your operating system. Typically, Windows and macOS offer native hotspot capabilities. For Windows, you proceed as follows. Search for “Mobile Hotspot” in the search bar. Click the settings option. Toggle the “Share my Internet connection with other devices” switch to “On.” Choose the internet source. This is the connection your laptop uses. Set up a network name and password. This secures your hotspot.
If you have a Mac, the process is similar. Open “System Preferences.” Then, click on “Internet Sharing.” Select "Share your connection from". Choose your connection type (e.g., Wi-Fi). Then, check the box next to "Wi-Fi" and configure your hotspot’s name and password. Finally, start the sharing process, and you are ready.
Troubleshooting Common Issues
Sometimes, you may experience some hiccups. Don’t worry; these are usually fixable. Check your internet connection first. Ensure your laptop is connected. It is important to do so before attempting to share it. Verify your security settings. Make sure your firewall isn’t blocking the connection. Furthermore, make sure you have the correct network drivers. Sometimes, these need updating. It's best to restart your laptop. Then, attempt to connect again.
Enhance Your Hotspot Experience
You can enhance your hotspot experience. Start by choosing a strong password. This protects your network from unauthorized access. Monitor your data usage. This is key to avoid exceeding your data plan limits. Be mindful of device connections. Too many devices can slow down the connection. Consider your location. Try to find a location with a strong signal.
Alternatives to Native Hotspot Features
While native features are great, you can also explore other options. Some third-party software provides extra features. These may include advanced security options. Some offer bandwidth management tools. Alternatively, consider a dedicated portable router. These are small, purpose-built devices. They are also usually simple to set up.
Maximizing Your Internet Power
Your laptop’s potential extends beyond work. It serves as a gateway to a connected world. It transforms your digital experience. It empowers you to stay connected wherever you go. Furthermore, using a free hotspot increases your connectivity. You become your own internet provider. You can connect with family and friends. You can also conduct urgent business. You will never be caught without internet again.
The Future of Mobile Connectivity
Mobile connectivity continues to evolve. Expect even more seamless experiences. We may see faster speeds and improved security. The convenience of hotspots will continue to grow. They are becoming essential. As technology advances, new possibilities will emerge. Your laptop will remain a vital element in this evolving landscape.
Embrace the Freedom of a Laptop Hotspot
Now, you can download it. You can get the software. It sets you free. You can leverage your laptop’s capabilities. Your laptop becomes a powerful tool. You gain control over your internet access. Your digital life becomes simplified. The laptop hotspot has all the answers. Why wait? Unlock your laptop’s potential today. Get online and enjoy the benefits. Experience the freedom.
Download WiFi Laptop Software: Blazing-Fast Internet, INSTANTLY!Download FREE Laptop WiFi Hotspot: Unleash Your Internet Power NOW!
Hey there, fellow internet adventurers! Ever been stranded without Wi-Fi, feeling like a ship lost at sea? That frustrated feeling, that craving for connection? We’ve all been there. Picture this: you’re on a road trip, your mobile data is dwindling faster than a politician's promises, and that crucial email needs to be sent yesterday. Or maybe you're stuck in a hotel with ridiculously expensive Wi-Fi and a burning desire to stream your favorite show. Well, guess what? We've got a solution.
1. The Wi-Fi Wilderness: Why a Laptop Hotspot is Your Digital Life Raft
Let's be honest, reliable and affordable internet access is practically a human right in the 21st century. It's how we connect, work, learn, and unwind. But what happens when the usual streams dry up? That's where your laptop, transformed into a Wi-Fi hotspot, becomes your digital life raft. Think of it as a personal wireless router, broadcasting your internet connection to your other devices – phone, tablet, even your smart TV! It's like having a mini-internet café right in your pocket.
2. Decoding the Magic: What Exactly IS a Laptop Wi-Fi Hotspot?
So, what is this mystical "hotspot" thing? Simply put, your laptop, equipped with a Wi-Fi adapter, becomes a wireless access point. It takes the internet connection it’s already receiving (via Ethernet cable, mobile data, or even another Wi-Fi network) and shares it with other devices. Think of it as a digital relay race, passing the baton of the internet to your other gadgets. Neat, huh?
3. The Fantastic Freebies: Why FREE is the Best Price Tag
The beauty of a laptop Wi-Fi hotspot? It's often free! Many operating systems, like Windows and macOS, have built-in features that let you set up a hotspot without spending a dime. It’s like getting a superpower without the pesky radioactive spider bite. We're talking access, freedom and convenience, all rolled into one neat package.
4. Windows Warriors: How to Conjure a FREE Hotspot on Your Windows Laptop
For Windows users, the process is remarkably straightforward. It's like following a recipe for a delicious digital cake.
- Step 1: Embrace the Settings: Open your Windows settings (usually by hitting the Windows key and typing "settings").
- Step 2: Network & Internet Adventure: Click on "Network & Internet."
- Step 3: Mobile Hotspot Magic: Select "Mobile hotspot."
- Step 4: The Grand Finale: Toggle the "Share my Internet connection from" switch. Choose your internet source (Wi-Fi or Ethernet). Tweak the network name and password for added security. Then, finally, turn on the "Mobile hotspot" switch! Voilà!
5. Mac Mavericks: Creating a Hotspot Haven on Your MacBook
Mac users, fear not! The process is equally user-friendly, albeit with a slightly different flavour.
- Step 1: Head to System Preferences: Click the Apple icon in the top left corner of your screen, then select "System Preferences".
- Step 2: Sharing is Caring: Click on "Sharing."
- Step 3: Internet Sharing Symphony: Select "Internet Sharing" from the left-hand menu.
- Step 4: Source Selection: In the "Share your connection from" dropdown, choose your internet source (Wi-Fi or Ethernet).
- Step 5: Wireless Wonder: Check the box next to "Wi-Fi." Click "Wi-Fi Options" to configure your network name and password.
- Step 6: Ignition! Check the "Internet Sharing" box to activate your hotspot.
6. Data Dance: Understanding Data Usage & Avoiding Surprises
One crucial detail is data usage. Streaming a movie, video conferencing with your boss, or downloading large files will consume a significant amount of your data. Always be mindful of your data allowance, especially when using mobile data as the internet source. It’s like budgeting your money; you need to know where it’s going to prevent any unexpected overdrafts.
7. Security Shield: Securing Your Hotspot to Ward Off Digital Vandals
Just like you wouldn’t leave your front door unlocked, securing your Wi-Fi hotspot is essential. Use a strong, unique password. Avoid default names for your network. And consider encryption protocols like WPA2 or WPA3 for an added layer of security. It’s all about protecting your digital castle.
8. Speed Check: Optimizing Your Hotspot for Peak Performance
The speed of your hotspot will depend on the speed of your internet connection in the first place. If your connection is slow, everyone using the hotspot will experience a similar lag. But there are ways to optimize speed! Consider moving closer to the source of your internet connection (if using Wi-Fi), closing unnecessary background applications on your laptop, and limiting the number of devices connected to the hotspot.
9. Troubleshooting Titans: Conquer Common Hotspot Headaches
Sometimes, things don't go according to plan. If your hotspot isn't working, don’t panic! Common issues include:
- Incorrect settings: Double-check your network name, password, and internet source.
- Firewall interference: Your firewall might be blocking hotspot connections. Temporarily disable it (but remember to re-enable it later!).
- Driver problems: Make sure your Wi-Fi adapter drivers are up-to-date.
- Network errors: Sometimes, a simple restart of your laptop or connected devices will fix the problem.
10. Battery Buddies: Conserving Power While Hotspot-ing
Running a hotspot drains your laptop’s battery faster than a vampire at a blood bank. To conserve power, consider:
- Plug in your laptop: This is the simplest solution.
- Lower screen brightness: Dimming your screen can significantly extend battery life.
- Close unnecessary applications: Every running program consumes power.
- Use power-saving mode: Most operating systems have power-saving modes that optimize battery performance.
11. Beyond the Basics: Advanced Hotspot Features to Explore
Once you’ve mastered the basics, you can delve into more advanced features. Explore options like:
- Bandwidth limiting: Control how much bandwidth each connected device can use.
- MAC address filtering: Allow or block specific devices from connecting.
- Guest networks: Create a separate network for guests, reducing the risk to your primary network.
12. The Mobile Data Alternative: When Hotspotting Isn't the Best Option
While a laptop hotspot is incredibly useful, it's not always the ideal solution. If you have consistently poor Wi-Fi coverage or use a limited data plan, consider these alternatives:
- Personal Hotspot on your phone: If your phone has a decent data plan, this is often the simplest and most convenient option (but watch your data usage!).
- Public Wi-Fi hotspots: Libraries, coffee shops, and other public spaces offer free Wi-Fi.
- Mobile broadband: If you need reliable internet access on the go, consider a dedicated mobile broadband device or a mobile data plan for your laptop.
13. The Ethical Internet Explorer: Using Your Hotspot Responsibly
Remember, with great power comes great responsibility. When using your hotspot, be mindful of data usage, security, and the acceptable use policies of the network you’re using to share your internet connection. Treat the internet like you would a shared resource.
14. The Cool Tools: Handy Apps and Software for Enhanced Hotspotting
While the built-in functionality of your operating system is a great start, numerous apps and software can enhance your hotspot experience. Explore options like:
- Connectify Hotspot: A popular third-party software for Windows that offers advanced features
- MyPublicWiFi: Another Windows-based option with a user-friendly interface.
- Third-party Wi-Fi management tools: Many offer extended features like bandwidth control and user management.
15. Embrace the Freedom: Unleash Your Digital Potential
In essence, creating a free laptop Wi-Fi hotspot is about empowering yourself. It's about breaking free from the shackles of limited connectivity and embracing the freedom of the internet, wherever you are. From emergency situations to casual streaming, a laptop hotspot is a valuable tool in our increasingly connected world. So, go forth, explore, connect, and remember – the digital world is your oyster!
Closing Segment
So there you have it! We've explored the ins and outs of creating a FREE laptop Wi-Fi hotspot, empowering you to connect, create, and conquer the digital world, wherever your adventures take you. Now go forth, download, and unleash your internet power! Don't forget to share this article with your friends and family, so they too can experience the freedom of a portable Wi-Fi network. Happy hotspotting!
Frequently Asked Questions
1. Is it really free to create a laptop Wi-Fi hotspot?
Yes, in most cases! Both Windows and macOS have built-in features that allow you to create a hotspot using your existing internet connection without paying extra. However, you are still responsible for the cost of your primary internet connection (
Laptop WiFi Dead? Reconnect NOW! (Easy Fix Inside)How to create Wifi Hotspot on PC Free Download

By NerdArtist How to create Wifi Hotspot on PC Free Download by NerdArtist
Laptop sebagai Hotspot WiFi 2025 Panduan Lengkap

By ReviewQuasar Laptop sebagai Hotspot WiFi 2025 Panduan Lengkap by ReviewQuasar
Panduan 2024 tentang 5 perangkat lunak hotspot Wi-Fi terbaik untuk Windows
By Windows Report Panduan 2024 tentang 5 perangkat lunak hotspot Wi-Fi terbaik untuk Windows by Windows Report
Title: Software Hotspot Wifi GRATIS Terbaik Khusus Untuk WINDOWS 10
Channel: kilObit
Software Hotspot Wifi GRATIS Terbaik Khusus Untuk WINDOWS 10 by kilObit
Working With Laptop
Title: The Ultimate Guide to Mastering the Art of Sourdough Baking at Home
We are embarking on a journey, a fragrant adventure into the ancient and rewarding art of sourdough baking. Forget the lackluster supermarket loaves; imagine the crusty, tangy perfection that comes from your very own oven. This guide is your comprehensive companion, transforming you from a novice into a confident sourdough artisan. We’ll explore every facet of this transformative practice, from cultivating your starter to crafting breathtaking loaves that will become the centerpiece of any meal.
Cultivating Your Sourdough Starter: The Foundation of Excellence
The heart and soul of any exceptional sourdough is, without question, the starter. This living culture, a vibrant symphony of wild yeasts and beneficial bacteria, is the key to that signature tang and spectacular rise. We will begin by constructing a strong and vigorous starter.
Our journey begins with equal parts (by weight) of unbleached, all-purpose flour and non-chlorinated water (chlorine can inhibit the growth of beneficial microorganisms). Mix these components in a clean, clear glass jar. A clear jar allows us to visually monitor the starter’s progress. Cover loosely with a cloth or the lid of the jar, allowing for some airflow. Let it rest at a constant temperature, ideally between 70-75°F (21-24°C). This is crucial.
For the first five to seven days, discard half of the starter each day and feed it with equal parts (by weight) of fresh flour and water. This crucial step eliminates excess acidity and prevents the development of undesirable flavors. Initially, we might not see much activity. Don't despair! That's completely normal. Gradually, around day four or five, small bubbles should start forming. This signifies the initial activity of the wild yeast.
As the days progress, the starter will become increasingly active. Watch for bubbles, a slight puffiness, and a subtle increase in volume. The aroma will also start to evolve, transforming from a slightly sour smell to one of fresh bread or even a pleasant, slightly alcoholic scent. This is our indication of progress.
By the end of the first week, the starter should roughly double in size within 4-8 hours after feeding at room temperature. At this point, it is ready for our first bake. Remember to feed regularly (every 12-24 hours) and maintain a consistent temperature. A reliable kitchen scale is essential, guaranteeing consistent results. Consistency is key to a thriving starter.
Understanding the Active Starter: Peak Performance Indicators
The active starter demonstrates its readiness through clearly visible signs. We are searching for a doubling in size, showcasing robust fermentation. The surface will be riddled with bubbles, resembling a honeycomb. Also, the smell will be pleasant. The aroma will be a telltale sign; it will smell noticeably sour, but not excessively so. A slightly sweet note might also be present. Be aware of significant changes. If the starter consistently exhibits a vinegar-like odor or fails to double, there are factors to take into account. Adjust the feeding schedule, use higher-quality flour, and maintain a suitable temperature.
The Art of Feeding and Maintaining Your Starter
The feeding process is pivotal for maintaining a healthy starter. The frequency of feeding depends on the ambient temperature and the activity level of the starter. In warmer environments, the process will be faster; feedings are required more frequently. In cooler environments, the process will be slower, and feedings can be less frequent.
When feeding, always discard a portion of the starter (typically half) before adding fresh flour and water. This is necessary to prevent the accumulation of excessive acidity and maintain a proper balance of microorganisms. The discarded starter can be saved and used for future recipes, such as pancakes or crackers.
For storage, consider keeping the starter in the refrigerator. This slows down fermentation and reduces the frequency of feeding. When stored in the refrigerator, feed the starter once a week. Before baking, remove the starter from the refrigerator and feed it at least once or twice at room temperature to reactivate it.
The ratios of flour, water, and starter used in feeding will vary between recipes. Start with the classic 1:1:1 ratio (starter:flour:water), weighing the ingredients for precision. This creates a consistent baseline for observing the starter's performance.
Choosing Your Flour: The Building Blocks of Flavor and Texture
The type of flour significantly affects the bread's flavor, texture, and nutritional content. Unbleached all-purpose flour is a good starting point. For more complex flavors, substitute some of the all-purpose flour with whole wheat, rye, or spelt. The type of flour will influence the rise, texture, and flavor of the final product. Whole wheat flour contains more bran, which can absorb more water, potentially resulting in a denser loaf. Experiment!
Higher protein flours will generally produce a better rise. This is due to the gluten development. High-quality flour is generally preferred, as the freshness and milling process directly affect the flavor and performance. In certain cases, stone-ground instead of roller-milled flour can add additional depth and complexity.
The Sourdough Baking Process: From Mixing to Baking
The baking process itself is a delicate balance of timing, temperature, and technique. We will break the process into stages: mixing, bulk fermentation (the first rise), shaping, proofing (the second rise), and baking.
The Mixing Phase: Building the Dough
In a large bowl, combine flour, water, and the active starter. Mix until they form a shaggy dough. Cover the bowl and let it rest (autolyse) for 30-60 minutes. This allows the flour to thoroughly hydrate, which is a fundamental process. After autolyse, add salt. Salt is important for flavor and gluten development. Knead the dough briefly until the salt is incorporated.
Bulk Fermentation: Nurturing the Rise
This phase is about allowing the dough to develop flavor and structure. Cover the dough and let it rise at room temperature for several hours, depending on the ambient temperature and the activity of your starter. During bulk fermentation, perform a series of "stretch and folds." Every 30-60 minutes for the first 2 to 3 hours, gently stretch one side of the dough upwards and fold it over itself. Rotate the bowl and repeat the process. This strengthens the gluten structure and distributes the gases produced during fermentation. Be careful not to over-ferment, as this can create a sour flavor and a weak loaf.
Shaping Your Loaf: Crafting the Form
Once the bulk fermentation is complete, gently turn the dough out onto a lightly floured surface. Shape the dough into the desired form (round, oval, etc.). This involves manipulating the dough to create surface tension, which helps the loaf keep its shape during baking. There are several different shaping techniques, such as folding the dough in thirds, or creating a batard or boule.
Proofing: The Final Rise
After shaping, place the loaf in a banneton basket (a proofing basket) lined with flour to prevent sticking. Cover the basket with a cloth or plastic wrap and refrigerate overnight (or for up to 24 hours). Cold proofing slows down fermentation and can develop a complex flavor profile. It also makes the loaf easier to score before baking.
Baking to Perfection: The Transformation
Preheat the oven to a high temperature (typically 450-500°F or 232-260°C) with a Dutch oven or a baking stone inside. A Dutch oven traps steam, crucial for achieving a crispy crust. Carefully place the proofed loaf inside the hot Dutch oven, cover it with the lid, and bake for a certain time (typically 20-25 minutes). Then, remove the lid and continue baking until the crust is deeply golden brown and the internal temperature reaches 200-210°F (93-99°C).
Troubleshooting Common Sourdough Challenges
- Flat Loaf: This could be a sign of an under-proofed loaf, a weak starter, or over-fermentation. Ensure your starter is active, control bulk fermentation time, and proof your loaf adequately.
- Dense Crumb: The dough may not have fermented long enough. Increase the bulk fermentation time, or your bread might be under-proofed.
- Sour Taste: This is a desired characteristic, but excessive sourness can be a problem. Adjust your feeding schedule, reduce the bulk fermentation time, or slightly lower your starter-to-dough ratio.
- Tough Crust: The dough may have been baked at too high a temperature for too long, or may have been over-proofed. Try lowering the oven temperature slightly or reducing the baking time.
- Uneven Crumb: Shaping issues could be the culprit. Focus on developing proper tension during shaping.
Advanced Techniques: Expanding Your Sourdough Repertoire
Once you've mastered the fundamentals, start experimenting. Try adding seeds (sunflower, sesame, etc.), nuts (walnuts, pecans, etc.), or dried fruits (cranberries, raisins, etc.) to your dough. Experiment with different flours. Incorporate different flours, such as rye or whole wheat, into your dough for added depth and complexity. This will yield a different outcome.
The Joy of Sharing
Sourdough is a labor of love, a testament to the interplay of patience, timing, and the natural world. The satisfaction derived from pulling a perfectly baked loaf from the oven, the aroma filling your kitchen, and the first bite that offers a symphony of flavor – these are the rewards of the sourdough journey. Share your creations with others
