can i make my laptop a wifi hotspot windows vista
Title: Turn your windows vista into wifi hotpsot
Channel: Ankit bhatia
Turn your windows vista into wifi hotpsot by Ankit bhatia
Vista Hotspot Hack: Turn Your Laptop Into a WiFi GOD!
Unleash Your Inner WiFi Wizard: Transforming Your Laptop into a Powerful Hotspot
Ever found yourself craving a reliable internet connection, only to be stranded without one? Perhaps you’re in a pinch, desperately needing to share that precious bandwidth. Worry no more! Your laptop holds the key. You can transform it into a WiFi hotspot, becoming a true digital hero. Get ready to become the envy of everyone around you.
The Secret Weapon: Your Laptop's Hidden Powers
Your laptop is a powerhouse of untapped potential. Furthermore, a hidden feature grants access to a WiFi hotspot. This allows you to share your internet connection with countless devices. Think of it as a personal WiFi fortress, readily accessible whenever you need it. Preparing to delve into this fascinating capability is a good start. It seems almost magical; it’s not.
Setting the Stage: Essentials for WiFi Domination
Before you embark on this WiFi adventure, several elements are necessary. First, ensure your laptop has a working internet connection. This can be through an Ethernet cable or your existing WiFi. After that, confirm your laptop’s wireless network adapter is functioning correctly. Consequently, you’ll easily broadcast your connection. Also, make sure you have sufficient power. You wouldn't want your hotspot to abruptly fail while you’re in a vital meeting. Charging up is never a bad idea.
Creating Your WiFi Kingdom: Step-by-Step Guide
Now, let’s get down to business. You can build your own WiFi empire. This transformation is surprisingly straightforward.
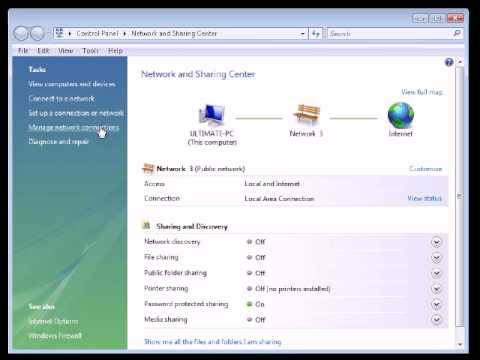
Navigate to Network and Sharing Center: You must find your way to this vital control panel. In Windows, usually, it's accessible through the Control Panel. Moreover, you can search for it in the Start menu.
Set Up a New Connection or Network: Once inside the Network and Sharing Center, locate the option to set up a new connection. Select this option to begin the hotspot creation process.
Choose "Set up a wireless ad hoc (computer-to-computer) network": This may also appear differently depending on your operating system. This option is your gateway to hotspot creation. Select it carefully.
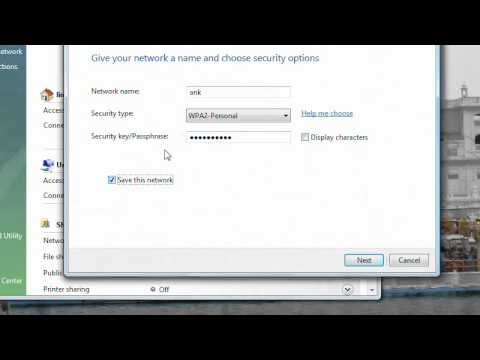
Name Your Network and Set a Password: Then, you must give your network a name. Choose something memorable (or hilarious!). Furthermore, create a strong password to secure your network. This protects your bandwidth from unwanted guests.
Share Your Internet Connection: After setting up your network, you'll need to share your current internet connection. In your network adapter settings, find the "Sharing" tab. You should enable sharing and select your newly created network as the recipient.
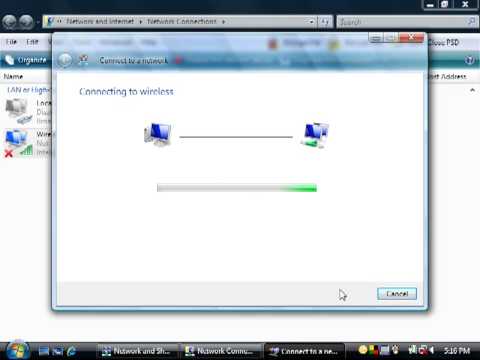
Start Your Hotspot: Now, after completing the setup, start your ad-hoc network. Your laptop is officially a WiFi hotspot.
Troubleshooting: Conquering Common Connectivity Challenges
Even the most seasoned WiFi wizards encounter issues. However, several common problems can arise.
"Unable to Start Hosted Network": This issue can sometimes occur. However, it’s often caused by outdated network drivers. Simply update your drivers to fix it.
Devices Can't Connect: Double-check the password is correct. Also, make sure the devices are within range. Moreover, verify that your internet connection is stable.
Slow Internet Speeds: Bandwidth is a precious resource. Therefore, ensure that other devices aren't excessively consuming your connection. Furthermore, consider upgrading your internet plan if possible.
Expanding Your WiFi Influence: Advanced Techniques
Once comfortable with the basics, explore advanced techniques.
Consider using third-party software: Some programs offer more advanced features. They include greater control over your hotspot settings. Also, they provide enhanced security options.
Optimize Your Network Settings: Experiment with different channel settings. This can improve your network's performance and range.
Reaping the Rewards: The Perks of Being a WiFi Guru
The benefits of creating a WiFi hotspot are numerous. You can share your internet connection with friends and family. It is useful when traveling or in areas with limited WiFi availability. Furthermore, it's a convenient solution for connecting multiple devices to the internet.
Conclusion: Your WiFi Destiny Awaits
In conclusion, transforming your laptop into a WiFi hotspot is easy. It’s an invaluable skill to master. It empowers you to control your access to the internet. So, embrace your inner WiFi wizard. Start sharing your internet connection with the world. The digital realm is your oyster. Now go forth and conquer!
Laptop on 5G WiFi Can't See PC on Ethernet? THIS FIX WORKS!Vista Hotspot Hack: Turn Your Laptop Into a WiFi GOD!
Hey everyone! Remember those times when you were stranded without Wi-Fi, staring forlornly at your phone, praying for a signal? We've all been there. But what if I told you that your trusty old laptop, running good ol' Vista (yes, Vista!), could be your personal WiFi savior? Think of it – turning your laptop into a mobile hotspot, essentially becoming a WiFi GOD, beaming glorious internet connectivity to your phone, tablet, and other devices wherever you go. Sounds awesome, right? Let’s dive in and make it happen!
1. The Untold Story of Vista and its Hotspot Potential
Believe it or not, Vista, often seen as a stepchild in the Windows family, actually had hidden potential when it came to creating a wireless hotspot. While it wasn't as straightforward as later operating systems, with a little tech-savviness, you could absolutely coax Vista into distributing that precious internet signal. This wasn't just a neat trick; it was a lifeline for many, especially before affordable mobile data plans became commonplace. Think of it as a secret super-power, a hidden ability lurking within the shadows of your laptop.
2. Understanding the Basics: What Makes a Hotspot Tick?
Before we get our hands dirty, let's understand the core concepts. A hotspot, in its simplest form, is a device that creates a local wireless network, allowing other devices to connect to the internet through it. Your laptop, acting as the hotspot, essentially shares its internet connection – whether it's from a wired Ethernet connection, a Wi-Fi connection, or even a 3G/4G USB dongle. It's like your laptop becomes a mini-router, broadcasting the internet's waves.
3. Gathering Your Arsenal: What You'll Need
Fortunately, turning your Vista laptop into a WiFi GOD doesn’t require any super-expensive equipment. Here’s what you’ll need:
- A Vista-powered laptop: Obviously!
- An internet connection: This could be a wired Ethernet connection, a Wi-Fi connection (if you're piggybacking off another network, which is generally not a legal practice), or a USB cellular modem.
- A touch of patience: We'll get our hands dirty, perhaps, but it's pretty straightforward.
4. The Manual Method: Your Vista Hotspot Hack
Now, here’s where the magic happens. We're going to use the command prompt to unleash Vista's hidden hotspot capabilities. This is like casting a spell, but instead of waving a magic wand, you'll be typing commands.
Open the Command Prompt: Search for "cmd" in the Start menu and right-click on "Command Prompt," selecting "Run as administrator." This is crucial; otherwise, the commands won't work. You might get the "Access Denied" message, we'll see how to handle this.
The First Spell (Setting up the Virtual Adapter): Type the following command and press Enter. This command creates a virtual Wi-Fi adapter, which is the heart of your hotspot.
netsh wlan set hostednetwork mode=allow ssid=YourHotspotName key=YourPassword- Replace "YourHotspotName" with the name you want for your hotspot network. (Think: "MyAmazingWiFi," "HotspotofAwesome," or whatever sparks joy.)
- Replace "YourPassword" with your desired password (minimum 8 characters). Make it strong!
The Second Spell (Starting the Hosted Network): Type the following command and press Enter:
netsh wlan start hostednetworkThe Third Spell (Sharing Your Internet Connection):
- Go to Network and Sharing Center (search for it in the Start menu, or try from the Control Panel).
- Click “Change adapter settings” on the left.
- Locate the internet connection you're using (e.g., "Ethernet," "Wi-Fi").
- Right-click it and select "Properties."
- Go to the "Sharing" tab.
- Check the box that says "Allow other network users to connect through this computer's internet connection."
- Choose your Virtual network adapter from the dropdown menu (it'll likely be named something like "Local Area Connection* 2")
- Click "OK."
That’s it! You've essentially built your own WiFi fortress.
5. Troubleshooting Common Issues: When the Spell Fails
Sometimes, the incantations don't work the first time. Here are some common hiccups and how to fix them:
- "Access Denied": This usually means you didn't run Command Prompt as an administrator. Go back and try again.
- Hotspot Doesn't Appear: Double-check the spelling of the commands, and ensure the hosted network is running (check
netsh wlan show hostednetwork). - Devices Can't Connect: Make sure you entered the correct password, and that your device isn't too far from the laptop.
- Internet Doesn't Work on Connected Devices: Double-check that you've correctly shared your internet connection in the Network and Sharing Center (the "Sharing" tab, remember?).
6. Security First: Protecting Your WiFi Kingdom
Creating a hotspot that is unsecured is like leaving your front door wide open. Always set a strong password and consider using WPA2 (or the latest security protocol your laptop supports) for encryption to keep your data and your network safe from prying eyes.
7. The GUI Alternative (If You Crave a User-Friendly Interface)
While the command prompt is the heart of this method, a few third-party software solutions can make the process easier. These options are available as free or premium products, but they essentially accomplish the same goal: turning your Vista laptop into a WiFi powerhouse.
8. Understanding the Bandwidth Blues: How Many Devices Can You Handle?
Your laptop's processing power and your internet connection speed are the limiting factors. You can generally support a few devices concurrently, but streaming multiple HD videos at once might bog things down. The more devices connected, the slower the internet speed will be for everyone.
9. The Battery Drain: Preparing For Power Consumption
Running a hotspot drains your laptop's battery faster than usual. Make sure your laptop is plugged into a power source before you begin your transformation.
10. Vista's Legacy: Why This Still Matters
Even though Vista is ancient, its legacy teaches us that useful features can be extracted from older operating systems. This approach demonstrates how to get more from your old hardware.
11. When To Use Your Laptop Hotspot
Think about situations where public WiFi is unreliable or unavailable. When you’re on a road trip with a tablet or when you are in a hotel, and you want to get the most out of your limited data plan.
12. Legal Considerations: Play by the Rules
Be aware that using another person's WiFi without their permission is often illegal, and using your connection for excessive downloads could violate the terms for your internet service. Always respect the law, and remember to check your contract with your ISP.
13. Optimizing Performance: Tips for a Smooth Experience
To get the best performance, ensure your laptop is in a location where it can get a good signal from your internet source. Turn off any unnecessary programs to free up system resources. The closer your devices are to your laptop's WiFi antenna, the better the connection.
14. The Modern Alternatives: Why Your Phone Might Be Easier
While the Vista hotspot hack is cool, remember your phone is likely set up to be a hotspot already. However, this can be a great skill to have.
15. Vista Hotspot Hack: Is It Worth It?
Absolutely! The Vista Hotspot hack still holds value. While it might seem a bit old-school, it shines when you are in a pinch. As a technical exercise, it's a great way to revisit the tech basics.
Closing Thoughts: Be a WiFi GOD!
So, there you have it! With a few simple commands, you can transform your Vista laptop into a WiFi GOD, providing internet connectivity to your devices wherever you go. It demonstrates even the most ancient technology has value! Keep in mind your laptop's battery life and the limitations of your internet connection. Be responsible with your newly found power and enjoy the freedom of always being connected. Go forth and share the internet's bounty!
Frequently Asked Questions (FAQs)
1. Can I use this method on other Windows versions?
While the method generally works on other Windows versions, the commands and steps may vary. Newer systems like Windows 7, 8, and 10 often have built-in hotspot features or dedicated apps that make the process easier.
2. What if I get an "Access Denied" error?
Ensure you are running Command Prompt as an administrator. Right-click on "Command Prompt" in the Start menu and select "Run as administrator."
3. Will this work with any internet connection?
Yes, it should work with a wired Ethernet connection, a Wi-Fi connection, or a USB cellular modem.
4. Is this safe?
Yes, if you use a strong password and keep your network secure. Always be mindful of
Unlock Your Laptop's WiFi: The Secret Phone Trick!vista Laptop As wifi hotspot

By deadlyheart4u vista Laptop As wifi hotspot by deadlyheart4u
How to connect Windows Vista to your wireless network
By NetComm How to connect Windows Vista to your wireless network by NetComm
Make your laptop a HotSpot VISTA

By MarkusHelps Make your laptop a HotSpot VISTA by MarkusHelps
Title: Microsoft Windows Vista Cannot Find Any Additional Wireless Networks - Detailed Tutorial
Channel: Andrews Roy
Microsoft Windows Vista Cannot Find Any Additional Wireless Networks - Detailed Tutorial by Andrews Roy
Wifi On Laptop
Here is the title of the would-be article: The Ultimate Guide to Mastering the Art of French Macarons
The Ultimate Guide to Mastering the Art of French Macarons
For centuries, the delicate dance of egg whites, sugar, and almond flour has been a symphony of simplicity, yielding the ethereal delight known as the French macaron. More than just a confection, the macaron is a testament to precision, patience, and the unwavering pursuit of perfection. This comprehensive guide transcends the superficial, diving deep into the nuances of macaron-making, equipping you with the knowledge and techniques to achieve consistently stunning and delicious results. Prepare to embark on a culinary journey that will transform you from a novice baker into a macaron maestro.
Decoding the Macaron's Magical Ingredients
The macaron's allure lies in its deceptively simple ingredients. Each plays a critical role, contributing to the final texture, flavor, and appearance. Understanding these ingredients is the first step toward mastering the macaron.
Almond Flour (or Almond Meal): This foundational ingredient provides the structure and signature texture of the macaron shell. The quality of the almond flour significantly impacts the final outcome. Opt for finely ground, blanched almond flour, as this results in a smoother, more delicate shell. Sift the almond flour thoroughly to remove any coarse particles, ensuring an even distribution throughout the batter. The ideal flour will possess a fine, powdery consistency.
Powdered Sugar (or Confectioners' Sugar): This delicate sugar contributes sweetness and helps create the smooth surface of the macaron shell. Its fine granules dissolve effortlessly into the egg whites, facilitating the creation of the characteristic meringue. Choose a brand that is very fine.
Granulated Sugar: Used in the Italian meringue method, granulated sugar is cooked with water to a specific temperature, creating the syrupy base for the perfectly stable, glossy meringue.
Egg Whites: The heart of the macaron, egg whites provide structure and volume. Aged egg whites are often recommended, as they contain less moisture and whip up to a more stable meringue. To age egg whites, separate them from the yolks, store them in a clean, airtight container in the refrigerator for 24-48 hours.
Food Coloring: Gel-based food coloring is the preferred choice, offering vibrant hues without altering the consistency of the batter. Powdered food coloring can also be used; however, it should be dissolved first in a small amount of liquid (water or extract) before adding it to the batter. Experiment with different colors to create visually stunning macarons.
The Two Pillars: Meringue Methods
Two primary meringue methods are used in macaron-making: French and Italian. Each method has its own advantages, and the choice often depends on personal preference and experience.
French Meringue: This straightforward method involves whisking egg whites with granulated sugar to stiff peaks, gradually incorporating the dry ingredients. It is a more forgiving technique, suitable for beginners. The main challenge lies in achieving the right consistency of the batter, called macronage.
Italian Meringue: This method creates a more stable meringue by pouring hot sugar syrup into whipped egg whites. The resulting meringue is firmer and less prone to collapsing, producing macarons with a more consistent rise and structure. This method requires precise temperature control, but it often yields more reliable results, especially in humid environments.
Mastering the Macaronage: The Crucial Step
The most critical step in macaron-making is macronage, the process of folding the meringue and dry ingredients together to achieve the perfect batter consistency. The goal is to create a batter that flows smoothly and is neither too thick nor too thin.
Folding Technique: Gently fold the dry ingredients into the meringue using a spatula. Start by folding in a third of the dry ingredients. Fold from the bottom up, incorporating the dry ingredients until just combined. Then, add another third and repeat. Finally, add the last third and begin the process of macronage.
Achieving the Right Consistency: The batter should resemble thick, flowing lava. As you fold, the batter should slowly ribbon down from the spatula, leaving a trail that slowly merges back into the batter after approximately 20-30 seconds. The batter should not be runny or too stiff. The perfect consistency is essential for the macaron's signature "feet" (the ruffled edges) and its smooth surface. Over-mixing results in flat macarons without feet, while under-mixing leads to cracked shells.
Piping and Resting for Macaron Success
Once the batter has reached the perfect consistency, it's time for piping. This is the process of transferring the mixture onto a baking sheet.
Preparing the Baking Sheet: Line baking sheets with parchment paper or silicone mats. Using a template (printed circles are helpful), pipe circles of batter onto the sheet, ensuring they are evenly spaced.
Piping Technique: Hold the piping bag vertically above the center of each circle, applying even pressure to release the batter. Stop squeezing when the circle reaches the desired size. Then gently pull the tip away.
Tapping and Resting: After piping, hold the baking sheet and tap it firmly on the counter several times. This action releases air bubbles and helps the macarons settle. Then, allow the piped macarons to rest at room temperature for 30-60 minutes. This allows the shells to form a skin, which is crucial for developing the feet during baking. The resting time depends on the humidity in your environment. The macarons are ready when the surface is dry to the touch, without any stickiness.
The Art of Baking: Achieving Perfect Feet
Baking macarons is a delicate balance of temperature and time. This step is critical for developing perfectly formed feet.
Oven Temperature: Preheat your oven to the recommended temperature, which can vary depending on your oven. A convection oven is ideal, as it provides even heat distribution. Be sure to use a thermometer to check the actual temperature.
Baking Time: Bake the macarons for the recommended time until the feet have risen and the shells are set. The baking time also depends on the oven temperature and size of the macarons.
Cooling and Removal: After baking, cool the macarons completely on the baking sheet before removing them. If the macarons are sticking to the parchment paper or silicone mat, they are not baked properly.
Creating Delightful Fillings: A World of Flavor
The possibilities for macaron fillings are endless. From classic ganaches and buttercream to fruit curds and custards, the choice of filling is limited only by your imagination.
Buttercream: A versatile choice, buttercream can be flavored in countless ways. Italian meringue buttercream is more stable and less sweet than American buttercream.
Ganache: Made with chocolate and cream, ganache is rich and decadent. Experiment with different types of chocolate, or adding other flavors like coffee, or spices.
Fruit Curds: Lemon, raspberry, and passion fruit curds add a bright, tangy element to the macarons.
Troubleshooting Common Macaron Challenges
Even with careful attention to detail, macaron-making can present challenges. Here's a guide to some common problems and their solutions.
Cracked Shells: Often caused by over-mixing the batter, too much oven heat, or resting the macarons for too long.
Lack of Feet: May be due to under-mixing the batter, insufficient resting time, or an oven temperature that is too low.
Hollow Shells: This is usually caused by too much air in the batter, an oven temperature that is too high, or under-baking.
Flat Macarons: Can be caused by over-mixing the batter, insufficient resting time, or an oven temperature that is too low.
Wrinkled Shells: The result of under-baking, or moisture in the environment.
Flavor Pairings and Creative Variations
Once you have mastered the basic techniques, it's time to explore the world of flavor pairings and creative variations.
Classic Combinations: Chocolate ganache with vanilla shells, raspberry buttercream with almond shells, salted caramel buttercream with coffee-flavored shells.
Adventurous Flavors: Lavender honey, pistachio rose, matcha white chocolate, Earl Grey tea.
Creative Decorations: Dust the shells with edible glitter, cocoa powder, or create patterns with colored cocoa butter. You can also add sprinkles or decorative elements after the filling.
Practice and Patience: The Keys to Success
Mastering the art of French macarons takes time and practice. Don't be discouraged if your first attempts are not perfect. Each batch is an opportunity to learn and refine your technique. Embrace the process, experiment with different flavors and techniques, and most importantly, enjoy the journey. With persistence and a passion for perfection, you will unlock the secrets of the macaron and create these delicate, delightful treats with confidence.
