cara memasang wifi di laptop windows xp

Title: How to Setup Wifi in Windows XP
Channel: Etechlic
How to Setup Wifi in Windows XP by Etechlic
Windows XP WiFi: The SHOCKINGLY Easy Fix (No Tech Skills Needed!)
Windows XP WiFi: Conquering the Wireless Frontier (No Tech Degree Required!)
Once upon a time, connecting to the internet on Windows XP was a battle. It felt like navigating a minefield. But guess what? Taming the WiFi beast isn't nearly as daunting as you think. I'm here to tell you: you can surf the web wirelessly on that vintage machine. And you don't need a degree in rocket science!
The Ghost of WiFi Past: Why XP's Wireless Woes?
Let's be honest. Windows XP is old. Really old. Technology has evolved at warp speed since its heyday. Wireless standards have improved dramatically. Therefore, XP wasn't designed with today's WiFi in mind. Consequently, it faces compatibility challenges. Specifically, driver issues are common. Also, security protocols can be outdated.
Unearthing the Magic: Your WiFi Adapter.
First things first: your WiFi adapter. Do you have one? It may be built-in. Or, it might be an external USB device. It's the crucial link between your PC and the wireless world. Often, this is where the problems begin. Check to see if the adapter is recognized. If not, you'll need to install the correct drivers.
Driver Detective: The Secret Key to Connectivity.
Drivers are the unsung heroes of the tech world. They act as translators. They allow hardware to communicate with your operating system. Finding the right ones can feel like a treasure hunt. Start by identifying your adapter's model number. Then, visit the manufacturer’s website. Download the drivers specifically for Windows XP. Ensure they are the correct version.
Installation Initiation: Guiding Your System.
The driver installation process varies. But, typically, it involves running an executable file. Follow the on-screen prompts. It’s usually pretty straightforward. Rebooting your computer after installation is often essential. Afterward, you’re one step closer to wireless freedom.
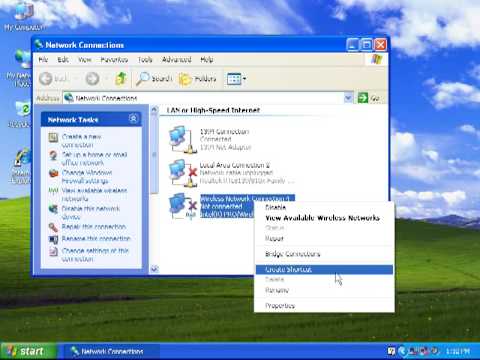
Navigating the Wireless Network Menu.
Once the drivers are installed, it’s time to configure your WiFi settings. Right-click on the network icon. It is usually in the system tray. Choose “View Available Wireless Networks.” A list of potential networks should appear. Select your network. You'll likely be prompted for your security key (password).
Security Savvy: Protecting Your Digital Life.
Security is paramount. Never connect to an unsecured WiFi network. Always use a strong password. Consider using WPA2 or WPA3 encryption. These are significantly more secure. Check your router’s settings for the best security options. Don't take your online safety lightly.
Troubleshooting Tactics: When Things Go Awry.
What if things don’t work perfectly? Don’t panic! Several troubleshooting steps can resolve many issues. First, restart your computer and router. Check your network connection cables. Ensure the network adapter is enabled. Double-check your security key for accuracy.
The Art of the IP Address: Static vs. Dynamic.
In some cases, you might need to configure your IP address. Your router typically assigns these automatically (dynamic IP). Occasionally, a static IP setup is needed. This might be for some older networks. If you’re unsure, stick with the default settings. Consult your router’s manual for more advanced guidance.
Legacy Lives On: Adapting to End-of-Life.
Let's face it. Windows XP is no longer actively supported by Microsoft. This means no new security updates. Consequently, you should proceed with caution. Consider using a firewall and antivirus software. Keep your data backed up. Be mindful of the sites you visit.
Beyond the Basics: Enhancing Your Wireless Experience.
Want to boost your wireless speed? Try moving your computer closer to the router. Minimize obstructions between your PC and router. You can also investigate channel optimization. These simple steps can make a difference.
The Grand Finale: Embracing the Wireless Renaissance.
You’ve conquered the WiFi frontier! You did it, without needing any complicated tech knowledge. You successfully connected your Windows XP machine wirelessly. You are now ready to explore the internet. Enjoy! Remember to be safe and stay informed. Now, get out there and enjoy the wireless world!
Unlock Your Phone's WiFi Freedom: Laptop Hotspot Hack!Windows XP WiFi: The SHOCKINGLY Easy Fix (No Tech Skills Needed!)
Alright, folks, gather 'round! Remember those days? Dial-up screeching in your ears, the internet feeling like a snail's pace on a sugar rush? Well, if you're still rocking that trusty old Windows XP machine, odds are you've encountered a little hurdle: getting Wi-Fi working. And let's be honest, it can feel like trying to teach a cat to knit. But guess what? We're here to tell you it's not only possible, but it's also surprisingly easy, even if you consider yourself more of a "computer whisperer" than a tech guru. Consider this your emergency rescue kit for getting your XP machine online!
1. The WiFi Woes of Windows XP: A Blast From the Past (and a Potential Headache!)
Let's face it, Windows XP is a relic. A glorious, nostalgic relic, but a relic nonetheless. And like all relics, it can be a little…stubborn. The built-in Wi-Fi support, while present, can feel a bit like a rusty bicycle – it can work, but you might need a little grease and a gentle push. That's where we come in, armed with the WD-40 of the digital world: simple solutions. The challenges often stem from a few key areas: outdated drivers, lack of modern security protocols, and sometimes, just a plain old lack of understanding of how XP handles wireless connections. But don't worry, we'll break it down.
2. Before We Begin: What You'll Need (Spoiler Alert: Not Much!)
The beauty of this fix? You don't need to be a coding wizard or a hardware guru to get started. Here's your simple checklist:
- Your Windows XP Computer: Obviously. Make sure it's powered on and ready to go.
- A Wireless Network Adapter: This is the crucial piece. It could be an internal adapter (built into your laptop) or an external one (a USB Wi-Fi adapter). If you're using a desktop, you'll almost certainly need an external adapter.
- Your Wi-Fi Network Name (SSID) and Password: This is the key to the kingdom. Make sure you have this handy. It's usually printed on your router or in your router's settings.
- Patience (and a little caffeine, maybe): We'll guide you, but a little bit of patience always helps. Think of it like baking a cake – even the simplest recipes take a little time.
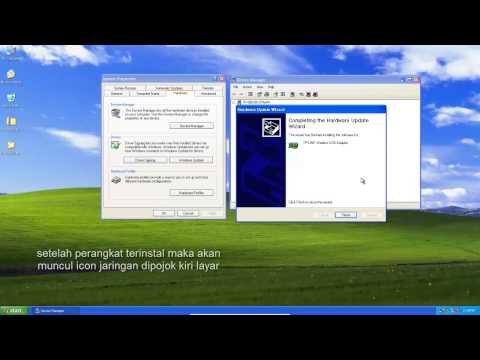
3. Checking Your Wi-Fi Adapter: Is It Even There?
First things first: let's make sure your computer recognizes your Wi-Fi adapter. Think of it like this: are you home alone, or are you hosting a party?
Right-click on "My Computer" (or "Computer" in newer versions) on your desktop, and select "Manage." This opens the "Computer Management" window.
Click on "Device Manager" in the left-hand pane. This is where all your computer's hardware is listed.
Look for "Network Adapters." Click the little arrow to expand this category. Do you see your Wi-Fi adapter listed? If you do, great! It might be something like "Wireless Network Adapter" or a specific brand name (e.g., "Netgear Wireless Adapter").
- If You See It: Proceed to the next step: connecting!
- If You Don't See It: This is the tricky part. You might need to install drivers. We'll discuss this in Section 5. Sometimes, a simple restart can also work wonders, like a magic trick!
- If You see a yellow exclamation mark: This signifies a driver issue.
4. Connecting to Your Wi-Fi Network: The Easy Part!
Assuming your adapter is recognized, connecting to your Wi-Fi is usually pretty straightforward. Think of your network as an open door offering a warm hello.
- Click on the Wi-Fi icon in your system tray (bottom-right corner of your screen). It looks like a series of bars or a small computer screen with radiating lines.
- A list of available Wi-Fi networks should appear. Your network's name (SSID) should be in this list.
- Click on your network.
- Enter your Wi-Fi password (the "Network security key"). Double-check that you've typed it correctly! It's like carefully unlocking the door.
- (Sometimes) You might need to click "Connect" or "OK."
- If all goes well, you should connect to the internet! Look for the Wi-Fi icon in your system tray to show connected.
5. Driver Dilemma: Fixing the Missing Link (If Needed)
If your Wi-Fi adapter isn't showing up in Device Manager, or if there's a yellow exclamation mark beside it, you're likely missing the necessary drivers. Drivers are like the instruction manuals that allow your computer to "speak" to your hardware.
- Identify Your Adapter: You can often find the manufacturer and model name of your wireless adapter in Device Manager (even if it has the issue). The most common way to identify your wi-fi adapter is to visit the manufacturers website.
- Go Online (Using a Different Device): You'll need another computer, tablet, or smartphone to search for and download drivers.
- Search for Drivers: Go to the manufacturer's website (e.g., "Netgear drivers," "TP-Link drivers"). Search with the device name.
- Download the Driver: Locate the driver specifically for your Wi-Fi adapter model and Windows XP.
- Transfer the Driver: Transfer the downloaded file to your XP machine via a USB drive or by emailing it to yourself.
- Install the Driver: Run the downloaded .exe file or instructions from the manufacturer. This will install the correct drivers.
- Restart: A restart is often required to apply the changes.
6. Security Settings: WEP, WPA, WPA2…Oh My!
Windows XP has limitations in terms of the latest security protocols. If your router is set to the newest standard, like WPA3 we'll need to check and probably adjust.
- Check Router Settings: Access your router's settings (usually by typing its IP address, like 192.168.1.1, in a web browser).
- Check the Wireless Security: Look for the security settings (WPA, WPA2, WEP) and compatibility.
- If Possible, Use WPA2: This is generally the most secure option supported by XP. Try to use the Wi-Fi Settings, and check the configuration.
- If WPA2 Isn't Working: You might need to select WPA, but be aware this is less secure.
- WEP (Avoid if possible): This is very outdated and insecure and should only be used as a last resort, if your router and adapter absolutely won't work with anything else.
7. The "IP Configuration" Tango: If All Else Fails
Sometimes, even after connecting, your XP machine might not be able to access the internet. This is where IP configuration comes into play. It's like making sure your computer has the correct address to send and receive information.
- Right-click on your Wi-Fi connection icon in the system tray and select "Status."
- Click on the "Support" tab.
- Click "Details."
- Check the IP Address: If the IP address starts with "169.254…", your computer isn't getting a valid IP address from your router. This indicates a problem.
- Go to "Start" -> "Control Panel" -> "Network Connections."
- Right-click on your wireless network connection and select "Properties."
- In the "Networking" tab, make sure "Internet Protocol (TCP/IP)" is selected. Click on "Properties."
- Select "Obtain an IP address automatically" and "Obtain DNS server address automatically." This is the easiest option: It lets your router handle the address assignment.
- Click "OK" on all windows and restart your computer.
8. Troubleshooting Tips: When Things Go Sideways
Sometimes, even with the best instructions, things can go wrong. Don't panic! Here are a few troubleshooting tips:
- Restart Your Computer and Router: The classic "turn it off and on again" solution. It's amazing how often this works!
- Check Your Router's Internet Connection: Make sure your router is actually connected to the internet (e.g., your modem is working).
- Move Closer to the Router: Wi-Fi signals can fluctuate, so try moving your XP machine closer to your router, like moving next to your friend.
- Disable Firewalls Temporarily: Sometimes, firewalls can block internet access. Disable
Dasar Instalasi wireless adapter - winxp
By TP-Link Indonesia Dasar Instalasi wireless adapter - winxp by TP-Link Indonesia
Bagaimana menghubungkan Windows XP ke jaringan nirkabel Anda
By NetComm Bagaimana menghubungkan Windows XP ke jaringan nirkabel Anda by NetComm
1.3a - Koneksi internet dengan Windows XP

By jackjohn684 1.3a - Koneksi internet dengan Windows XP by jackjohn684

Title: Cara Memperbaiki Wifi Tidak Berfungsi di Windows XP Tutorial
Channel: MDTechVideos
Cara Memperbaiki Wifi Tidak Berfungsi di Windows XP Tutorial by MDTechVideos
Laptop Working
The Undeniable Guide to Mastering the Art of Sourdough Bread Baking
The aroma. The texture. The unparalleled taste. Sourdough bread is more than just a food; it's an experience. From the satisfying crackle of the crust to the tangy, complex flavor of the crumb, a perfectly baked loaf is a testament to patience, skill, and a deep connection to the ancient art of fermentation. This guide provides the knowledge and detailed instructions you need to embark on your sourdough journey, ensuring you consistently produce loaves that will impress even the most discerning palates.
Unveiling the Magic: What Makes Sourdough Unique?
Sourdough's allure stems from its unique leavening process, which relies on a symbiotic relationship between wild yeasts and lactic acid bacteria. This natural fermentation, unlike the rapid rise achieved with commercial yeast, unlocks a symphony of flavors and textures. This extended fermentation period allows for the development of complex flavor profiles, moving far beyond the simplicity of regular bread, along with improved digestibility and a longer shelf life. The sourdough process also has a more positive impact on our gut health by providing us with prebiotics.
Cultivating Life: The Essential Starter
The heart of sourdough is the starter, or levain – a living culture of wild yeasts and bacteria. Developing a robust starter is the cornerstone of successful sourdough baking.
Building Your Starter:
- The First Steps: In a clean glass jar, combine equal parts (by weight) of unbleached all-purpose or bread flour and non-chlorinated water. Mix thoroughly to a smooth consistency.
- The Daily Ritual (Days 1-7): Cover the jar loosely (a lid with a slight gap or cheesecloth secured with a rubber band is ideal). Place the jar in a moderately warm environment (around 70-75°F/21-24°C). Each day, discard about half of the mixture and feed the remaining starter with equal parts flour and water, repeating the thorough mixing process. Look for signs of activity, such as bubbles forming on the surface and within the mixture.
- Observation and Adjustment: The first few days may show only minimal activity. This is normal. As the yeasts and bacteria colonize, you'll start observing a rise and fall in the starter's volume, and the aroma will evolve from a somewhat yeasty smell to something tart and, quite possibly, fruity.
- Maturation (Days 7+): Once your starter consistently doubles in size within 4-8 hours of feeding, it's considered active and ready for baking. This usually occurs around day 7 or later. This is a solid indication that you are ready to bake sourdough bread.
Maintaining Your Starter:
- Storage: Once your starter is active, you can store it in the refrigerator. Refrigeration slows down the fermentation process, allowing you to bake less frequently.
- Feeding Schedule: Even refrigerated, your starter needs regular feeding. A good practice is to feed it once a week. Prior to feeding make sure to take it out of the refrigerator and allow it to warm up to room temperature. Discard half before feeding with equal parts flour and water, or use the discard for other recipes.
- Reviving a Dormant Starter: If you haven't baked in a while, your starter might appear dormant. To revive it, bring it to room temperature, feed it twice a day for a few days until it becomes active again.
Crafting the Dough: Ingredients and Techniques
With a flourishing starter, you can now move on to creating the dough. The following is a guide on the key elements of the baking process.
Essential Ingredients:
- Flour: High-quality bread flour is crucial for structure and a good rise. The protein content should ideally be around 12-14%. You can experiment with different flours, such as whole wheat or rye, but keep the initial ratios to the bread flour as the foundation.
- Water: Non-chlorinated water is essential to avoid inhibiting the yeast. Water temperature will also matter. This should be lukewarm (around 80-90°F/27-32°C) to help activate your starter and the dough.
- Salt: Essential for flavor and controlling fermentation. Use fine sea salt.
- Your Active Starter: The active starter, the leavening agent, is essential for a successful sourdough.
The Method:
- Autolyse (Optional but Recommended): In a bowl, combine the flour and water. Mix until just combined, avoiding any dry flour pockets. Let it rest for 30-60 minutes. This process allows the flour to fully hydrate, improving the gluten development and resulting in a more open crumb.
- Adding the Starter and Salt: Add the active starter and salt to the autolysed dough. Mix thoroughly, ensuring everything is well incorporated. This can be done by hand or with a stand mixer (using the dough hook).
- Bulk Fermentation (The Bulk Rise): Cover the dough and let it rise in a warm place. This is the most critical phase.
- Stretch and Folds: Perform a series of stretch and folds every 30-60 minutes for the first 2-3 hours of bulk fermentation. Gently stretch a portion of the dough upwards and fold it over itself. Rotate the bowl and repeat this process around the entire circumference. This strengthens the gluten and builds structure.
- Observation: Observe the dough. It should increase in volume by about 20-50%, and you should see bubbles forming throughout. The duration depends on the room temperature and the strength of your starter.
- Shaping the Loaf: Once the bulk fermentation is complete, gently turn the dough out onto a lightly floured surface. Shape it into your desired form (round or oblong).
- Proofing (The Second Rise): Place the shaped loaf in a floured banneton basket or a bowl lined with a floured cloth. Cover it and refrigerate it for 12-24 hours. This slow, cold proof enhances flavor development and gives the loaf a better oven spring.
- Baking: Preheat your oven with a Dutch oven inside to 450-500°F/230-260°C for at least 30 minutes.
- Carefully remove the hot Dutch oven. Place the proofed loaf in the Dutch oven (score it with a sharp knife or lame) and cover it.
- Bake covered for 20 minutes.
- Remove the lid and bake for another 20-30 minutes, or until the crust is deeply golden brown and the internal temperature reaches 200-210°F/93-99°C).
- Cooling: Let the baked loaf cool completely on a wire rack before slicing. This is crucial for the bread's internal structure to set properly.
Troubleshooting Common Sourdough Challenges
Even the most experienced bakers encounter challenges. Here's how to navigate some common problems:
- Flat Loaves: This is typically caused by:
- Under-proofed dough: The dough hasn't risen enough.
- Weak starter: Your starter isn't active enough.
- Over-fermentation: The gluten structure has broken down.
- Dense Crumb: This can happen if:
- Under-proofed dough: The structure didn't have time to develop.
- Not enough gluten development: Be sure to do several stretch and folds.
- Sour Taste Too Strong (Or Not Strong Enough):
- Too Sour: The long bulk fermentation or slow proof in the refrigerator can lead to a sourer loaf.
- Not Sour Enough: Short fermentations or the lack of a slow cold proof may provide a less sour flavor.
Elevating Your Sourdough Game: Advanced Techniques
Once comfortable with the basics, experiment with these techniques:
- Pre-ferments: Incorporate pre-ferments like a poolish (a wet pre-ferment) or levain (a preferment made from a portion of the starter) to boost flavor and enhance oven spring.
- Hydration Levels: Experiment with higher hydration doughs (80% or more) for a more open crumb, but be prepared for more challenging handling.
- Inclusions: Add seeds, nuts, olives, or other ingredients to enhance the flavor and texture.
Embracing the Journey of Sourdough
Sourdough baking is a journey, not a destination. Embrace the process, be patient with yourself, and celebrate the unique beauty of each loaf. As you practice, refine your techniques, and discover the nuances of your starter, you'll unlock a rewarding culinary experience. Your kitchen will be filled with the enticing aroma of freshly baked bread, and you'll find genuine satisfaction in the art of sourdough.
